
Welcome, to the Bokor thread! Feel free to discuss anything related to the glorious Bokor class. If you have any questions or would like advice, don’t hesitate to ask!
Note: You may use one of the following skill simulators when requesting build advice:
http://www.tosbase.com/tools/skill-simulator/ (Save Build Name at the bottom of the page and link to URL)
https://tos.neet.tv/skill-planner (Place skill points and link to URL)
##||Introduction||
Bokor, a Vodou Sorcerer, is an offensive class under the Cleric tree made available at Rank 3. Bokors make use of Voodoo magic to curse enemies, assist allies, and summon the undead. Zombies, which are weak at the beginning, can later be supported through the use of Veve’s (Symbols) and used as Mediums to activate other skills, making the Bokor a valuable ally or fearsome adversary.
##||Skills||
Hexing

Description: Curses an enemy to decrease its magic defense and prevent natural HP recovery.
Circle: 1 [Max level: 15]
Type: Debuff
SP Usage: 30 [+5.3 per skill level]
Effect:
- Targets Magic Defense: -(12 + SPR × 0.3) | [Magic Defense: -3 per skill level]
Hexing Duration: 15 seconds | [Duration: +1 seconds per skill level]
Hidden Effects:
- AoE Attack Ratio: +1 per skill level
[details=Click Here for Attributes ✦]Attributes:
Hexing: Dark - Enemies affected by [Hexing] will receive 10% additional damage per attribute level from Dark property attacks.
[Max Level: 3] | [Additional skill cost: SP +10][/details]
Overview:
Hexing is your first-steps skill. Starting off, before you can do anything as a Bokor you have to first use Hexing. It allows you to target an enemy within medium range from your character and cast a Curse onto it. Any enemies nearby the initial cursed target may also be cursed; the amount of affected enemies depends on the level of Hexing and sizes of the enemies (Under normal circumstances).
Leveling priority: Medium (Lvl 5 ~ 10)
Effigy

Description: Damages enemies within range afflicted with a curse. Bonus damage is dealt on the 3rd attack.
Circle: 1 [Max level: 15]
Type: Attack (Magic: Dark)
SP Usage: 17 [+2.7 per skill level]
Cooldown: 0 seconds
Effect:
- Deals (170) damage to all cursed enemies within medium-range. Deals (×1.6 ~ ×2.3) bonus damage on the 3rd Effigy.
[Damage: +32 per skill level] [Bonus damage: +(×0.07 ~ ×0.09) per skill level]
[details=Click Here for Attributes ✦]Attributes:
Effigy: Enhance - Increases the damage dealt on an enemy with [Effigy] by 1% per attribute level.
[Max Level: 100]
Effigy: Blind - Enemies hit by [Effigy] have a 5% chance per attribute level to become afflicted with [Blind] for 5 seconds.
[Max level: 5] | [Additional skill cost: SP +8][/details]
Overview:
This will be your main DPS skill, and depending on your build, may still be your main DPS skill even after completing your Rank 7. All enemies affected by Hexing/Curse within medium range of your character will be hit by Effigy. Since this skill has no cooldown, it will quickly drain your SP when used repeatedly. SP issues aside, the skill is good both early and later on.
Leveling priority: High (Lvl 15)
Tet Mamak La

Description: Throws a skull, which lures Zombies and deals damage to enemies that touch it.
Circle: 1 [Max level: 1]
Type: Summon
SP Usage: 27 [+4.6 per skill level]
Cooldown: 0 seconds
Effect:
- Makes your Zombies change their attention towards the spot the skull was thrown. A Zombie that touches the skull will pick it up.
Tet Mamak La Duration: 20 seconds
Hidden Effects:
- Constantly deals Poison-type, Strike-property damage to enemies that touch it.
Overview:
One of the 2 skills used to control the movement of your Zombies. It makes all Zombies, regardless of their current location on the map, immediately head towards the direction of the thrown skull. It also doubles as a DPS skill, because the skull itself is a summon and will quickly deal damage to whatever is touching it. The level of the skull is equal to the level of your character, and just like other Summons, the skull can die before its duration ends if it receives too much damage. There is no cap to how many skulls you can have summoned, so you can throw out as many as possible. Best used on Boss monsters that are vulnerable to it’s damage properties.
Leveling priority: High (Lvl 1)
Zombify

Description: Create a magic circle on the ground. Enemies killed in the circle will rise as Zombies. The HP and Defense of the Zombie is affected by your SPR and Defense.
Circle: 1 [Max level: 15]
Type: Debuff
SP Usage: 32 [+5 per skill level]
Cooldown: 54 seconds
Effect:
- Zombify circle duration: 10 seconds | [Duration: +5 seconds per skill level]
Maximum Zombie Summons: 4 | [Maximum Zombies: +1 per skill level]
Additional Zombie HP: (SPR × 5) {Thanks @castillnu}
[details=Click Here for Attributes ✦]Attributes:
Zombify: Large Zombie - Increases the chance of creating a large-type zombie when zombifying a large-type monster by 1% per attribute level.
[Max Level: 50] | [Additional skill cooldown: CD +10s] | [Unlocked at Skill Level: 2]
Zombify: Wheelchair Zombie - Increases the chance of creating Wheelchair Zombie when creating a zombie by 1% per attribute level.
[Max Level: 50] | [Additional skill cooldown: CD +5s] | [Unlocked at Skill Level: 3]
Zombify: Creating Zombie (Bokor C2) - Increases the maximum number of zombies from [Zombify] by 1.
[Max Level: 1] | [Additional skill cost: SP +8][/details]
Overview:
The summoning circle used to raise your minions! The enemies must be killed inside of the circle to summon a Zombie, and the level of the Zombie will be the same as the level of the enemy. Anything that can be debuffed by Zombify can be turned into a Zombie-- including other summons and traps. The summoned Zombies will be afflicted with the “Zombie” debuff, constantly decreasing their HP over time.
Leveling priority: Low ~ High (Lvl 3 ~ 11)
Mackangdal

Description: Throw a talisman to nearby allies that temporarily suppresses pain. The ally is immune to damage while the talisman is active, but received all accumulated damage at once when the effect ends.
Circle: 2 [Max level: 10]
Type: Buff
SP Usage: 30 [5.4 per skill level]
Cooldown: 67 seconds
Effect:
- Invincibility Duration: 11 seconds | [Duration: +1 seconds per skill level]
[details=Click Here for Attributes ✦]Attributes:
Mackangdal: Decreased Cumulative Damage - Decreases the accumulated damage from [Mackangdal] by 2 per attribute level.
[Max Level: 100] | [Unlocked at Skill Level: 3][/details]
Overview:
Mackangdal is basically a mobile version of Safety Zone, that stops being ‘safe’ once the duration ends. If the amount of damage you received during its duration is higher than your current HP, then you’ll be instantly killed. The damage can be avoided by stepping into Safety Zone when the duration ends, or used to save a party member whose HP is low by casting it on them and then healing them to full health before it ends.
Leveling priority: Very Low (Lvl 1) (PvP build: Lvl 5 ~ Lvl 10)
Bwa Kayiman

Description: Instruct your summoned zombies to march. All summoned zombies will follow behind you and deal damage to anything they touch.
Circle: 2 [Max level: 10]
Type: Attack (Physical: Strike, Property: Dark)
SP Usage: 31 [+5.5 per skill level]
Cooldown: 10 seconds
Effect:
- Deals (105) damage to enemies on contact.
[Damage: +33 per skill level]
Hidden Effects:
- Knockdown state applied on contacted enemies.
[details=Click Here for Attributes ✦]Attributes:
Bwa Kayiman: Enhance - Increases the damage dealt on an enemy with [Bwa Kayiman] by 1% per attribute level.
[Max Level: 100]
Bwa Kayiman: Zombie Defense - Increases the zombie’s physical defense by 8 per attribute level when using [Bwa Kayiman].
[Max Level: 5] | [Additional skill cost: SP +10][/details]
Overview:
Your second skill used to control the movement of your Zombies. All of your Zombies will organize themselves into a line, and march behind you for the skill duration. This is a ‘channeling’ skill, so it will be interrupted if you are dealt damage. Since this skill deals Physical damage, it can only reach its max potential in a Physical DPS Cleric build. However, it still has its uses in a Magic build, as it allows your Zombies to keep up with you and can be used to CC all enemies it touches into a knockdown state.
Leveling priority: Very low (Lvl 1)
Samediveve

Description: Place a glyph on the ground symbolizing Baron Samedi, the Loa of death. Temporarily increases the maximum HP and movement speed of you and your zombies. Only half of the effect applies to you.
Circle: 2 [Max level: 10]
Type: Buff
SP Usage: 33 [+5.6]
Cooldown: 51 seconds
Effect:
- Zombie HP: +298.6 | [HP: +74.6 per skill level]
Movement Speed: 4 | [Movement Speed: +1 per skill level]
Samediveve Duration: 70 seconds | [Duration: +10 seconds per skill level]
[details=Click Here for Attributes ✦]Attributes:
Samediveve: Increased Range - Increases the range of [Samediveve] to 110.
[Max Level: 1] | [Additional skill cooldown: CD +5s][/details]
Overview:
One of the 2 skills used to improve your Zombies. This gives them the movement speed they needed at C1, and also gives you half of the effect in the process. The skill level should always be an odd number, since you only get half of the effect. Well… that’s it. Movement Speed. Yay.
Leveling priority: Very low ~ High (Lvl 5 ~ 9, or Lvl 0)
Ogouveve

Description: Place a glyph on the ground symbolizing Ogoun Feray, the Loa of power. Increases the STR and AoE Attack Ratio of your zombies.
Circle: 3 [Max level: 5]
Type: Buff
SP Usage: 33 [+5.6 per skill level]
Cooldown: 51 seconds
Effect:
- Zombie STR: +(INT × 0.5 + 2) | [Zombie STR: +1.2 per skill level]
Zombie AoE Attack Ratio: +1.5 | [AoE Attack Ratio: +0.5 per skill level]
Ogouveve Duration: 70 seconds | [Duration: +10 seconds per skill level]
[details=Click Here for Attributes ✦]Attributes:
Ogouveve: Decreased Strength - Decreases an enemy’s STR within the range of [Ogouveve] by 2 per attribute level.
[Max Level: 5] | [Additional skill cooldown: +5s]
Ogouveve: Increased Range - Increases the range of [Ogouveve] to 110.
[Max Level: 1] | [Additional skill cooldown: CD +5s][/details]
Overview:
The second Glyph skill, used to increase the damage of your Zombies. The STR increase from this is only half of your INT though, so it’s not too good, or too bad. Unfortunately, the INT formula doesn’t increase per skill level, so this skill isn’t worth investing in past Lvl 1.
Leveling priority: Very low (Lvl 1)
Damballa

Description: Detonates Zombies near the targeted area and deals damage to nearby enemies, knocking them back. The affected Zombies will be destroyed if the damage dealt is higher than their remaining HP.
Circle: 3 [Max level: 5]
Type: Attack (Magic: Dark)
SP Usage: 35 [+5.8 per skill level]
Cooldown: 10 seconds
Effect:
- Deals (2.0 × 505) damage on detonated Zombies and Enemies up to (3) times.
[Damage: +130 per skill level] [Detonated Zombies: +3 per skill level] - Damaged enemies will be knocked back.
Hidden Effects:
- Destroyed Zombies have a moderate chance of spawning a new Zombie.
[details=Click Here for Attributes ✦]Attributes:
Damballa: Enhance - Increases the damage dealt on an enemy with [Damballa] by 1% per attribute level.
[Max Level: 100]
Damballa: Chance of Zombification - Increases the chance of a new zombie emerging from [Damballa] by 2% per attribute level.
[Max Level: 5] | [Additional skill cooldown: CD +7s]
Damballa: Remove Knockdown - [Damballa] no longer knocks enemies down. (Only applies if this attribute is set to ON).
[Max Level: 1][/details]
Overview:
- The final skill for the Bokor, and also one of the strongest burst skills in the entire Cleric tree. However, the skill is situational. For normal monsters, it requires you to position all of your available Zombies within close-range of the Damballa cast to achieve the maximum damage, since the Damballa Orb has a duration of 5 seconds. The level of this skill (Maximum targets) should be close to the maximum number of Zombies you can summon with Zombify.
Leveling priority: Very low ~ High (Lvl 0 ~ 5)
##||Zombies||
Zombies are your summoned minions that follow and assist you in battle. They’re not the brightest, but they’ll always serve a purpose throughout your journey.
General Info
- All Zombies are Dark element with Leather armor.
- Zombies can be Healed, and in certain cases, buffed.
- A monster under Hexing that dies by a Zombie, will become a Zombie.
- Zombies can also be created from traps.
- A Zombie will live for roughly 3 minutes without receiving damage or heals.
- Summoned Zombies will change maps with you and be available after logging off/on. All Zombies will regain max HP this way.
- Zombie damage does not scale well into end-game. After reaching the Rank 7 stage, their damage will have fallen off considerably on most monsters. They will however, still be useful as aggro targets.
Zombie Capsule

The Zombie Capsule is an item that allows you to instantly summon a (Normal) Zombie with the same level as your current level. You can only summon as many Zombies as your current level of Zombify allows. You can buy the Capsules from the Bokor Masters.
Cost: 300 Silver
Cooldown: 27 seconds
Zombie (Normal)

Movement Speed: Slow
Special traits:
- Loves Tree Root Crystals
Wheelchair Zombie

Movement Speed: Normal
Special traits:
- Will not pick up Tet Mamak La skulls
- Strike-property damage
Scale Zombie

Movement Speed: Very Slow
Special traits:
- AoE Attacks
- Higher sustain
Compatible Buffs
- Aspersion [Priest]
- Revive [Priest]
- Does not prevent death from Zombify HP decrease
- Stone Skin [Priest]
- Currently does not allow Zombies to block
- Aukuras [Krivis]
- Daino [Krivis]
- Zalciai [Krivis]
- Statue of Goddess Ausrine [Dievdirby]
- Requires Zombies to properly circle around the statue
- Mackangdal [Bokor]
- Increase Magic Defense [Pardoner]
- Prophecy [Oracle]
- Revenged Sevenfold [Kabbalist]
- Buffs a maximum of 5 targets (including yourself)
- Sometimes reflects ‘1’ damage in PvE
- Ein Sof [Kabbalist]
- Quicken [Chronomancer]
- Haste [Chronomancer]
##||Character Management||
“A Zombie is only as good as the one who raised it.” - George Washington
Character Stats
It takes more than just skill placement to ensure your Bokor is efficient!
The typical stat placement is a ratio of 1:3:1 for CON, INT, and SPR respectively. This means that for every 5 stat points you gain, 1 will go towards CON, 3 will go towards INT, and 1 will go towards SPR. INT will always be invested into, but CON and SPR have breakpoints. You may adjust the ratio and breakpoints as you see fit, but the INT stat should always be the highest-invested. All future points after CON/SPR is broken off will be placed into the INT stat.
Points in CON will be cut off once you are comfortable with your rate of survival in battle. If you feel you die too easily after cutting off this stat, feel free to re-invest points back into it until your survival rate is stable again.
Points in SPR will be cut off between 50 - 100. SPR is used to make your leveling experience easier, and certain skills in your Cleric build may benefit from this.
NOTE: For characters running a Phys Cleric/Bokor build, your stat spread is likely to not include INT or SPR. The STR:DEX ratio may vary, but the advice for CON will still apply.
[Bokor] Equipment
Your equipment may vary depending on your personal likes (and budget), but a mix of Plate and Cloth armor is recommended. The one thing you will need sooner or later however, is the Bokor’s Holy Grail; the Krausas Mace.
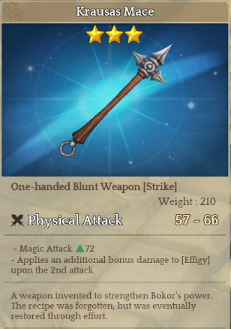
The Krausas Mace is a Lvl 40 weapon dropped from the monster “Spoiled Coliflower Archer”, in the map “Guard’s Graveyard”. It allows you to activate Effigy’s bonus damage on the 2nd attack instead of the 3rd. The drop rate for this item is very low, so be prepared to hang around there for awhile.
Monster Gems
Next up are the Monster Gems. Monster Gems are items that can be slotted into your gear at the cost of -1 Potential. They increase the level of an unlocked skill by 1 level, and can allow a skill to be leveled past it’s Circle (Example: Lvl 16 Effigy). Monster Gems of the same name will not stack. These are the Monster Gems available for Bokor:
Hexing (Red Luxodon Gem) [Hand/Foot]
Location: Vieta Gorge | Monster: Red Luxodon
Effigy (Operor Gem) [Weapon/Hand]
Location: Gate Route | Monster: Operor
Zombify (Pawnd Gem) [Weapon/Foot]
Location: Tenet Church 1F | Monster: Pawnd
Mackangdal (White Geppetto Gem) ( ͡° ͜ʖ ͡°) Nope.
Location: Tenants’ Farm | Monster: White Geppetto
Bwa Kayiman (Orange Hamming Gem) ( ͡° ͜ʖ ͡°) Nope.
Location: Baron Allerno | Monster: Orange Hamming
Samediveve (Tombsinker Gem) [Sub-weapon/Foot]
Location: Royal Mausoleum 2F | Monster: Tombsinker
Ogouveve (Hohen Mage Gem) ( ͡° ͜ʖ ͡°) Nope.
Location: Demon Prison District 5 | Monster: Hohen Mage
Damballa (Siaulamb Shaman Gem) [Weapon/Hand]
Location: Uskis Arable Land | Monster: Siaulamb Shaman

 +
+ 

