A guide to dungeons and 100+ content
Version: 2017, 3 June
I use this in the guide, if you see the arrow, you may click:
Click for text <<Click here
Please feel free to ask questions or comment.
Post 1 (this post) : Dungeons
Dungeon location - required dungeon levels
Dungeon bosses - Some suggested dungeon routes, and videos, and bosses
Dungeon mobs
Dungeon drops (boss may drop card when killed + may drop card from cube)
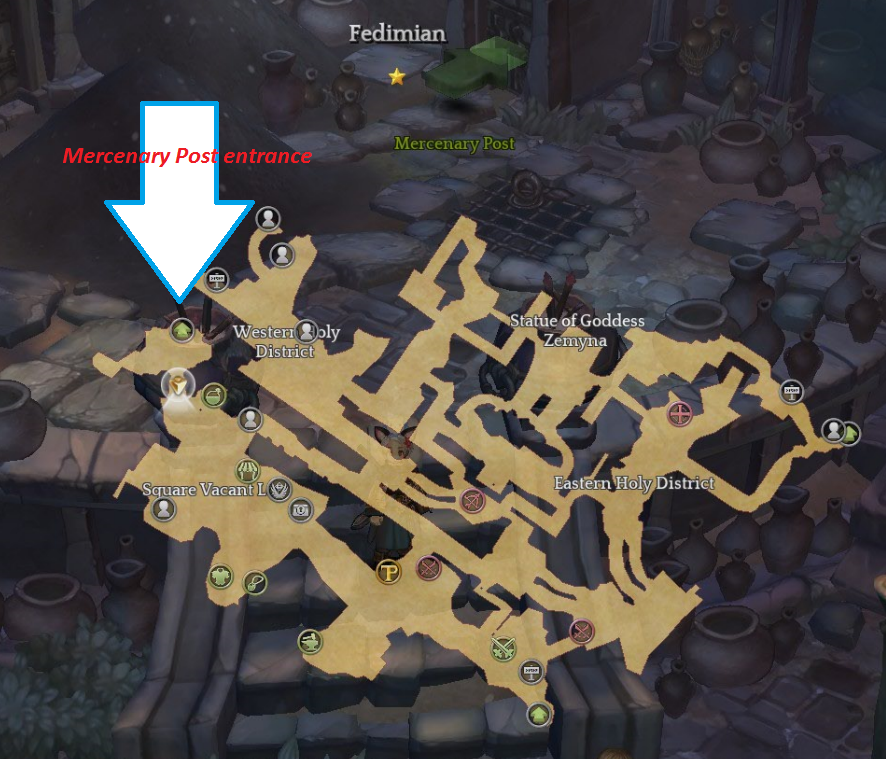
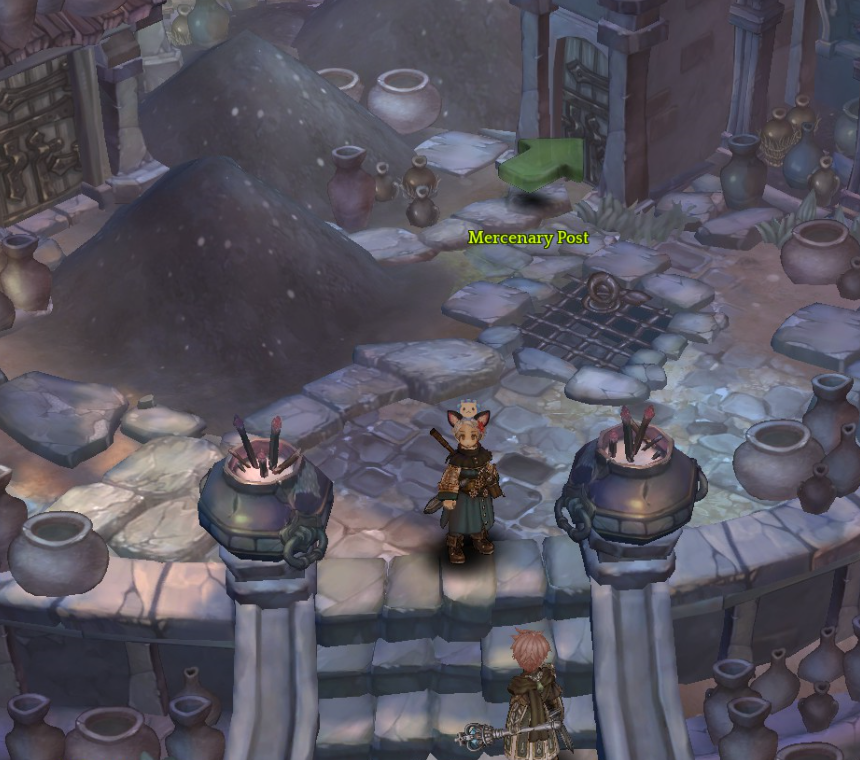
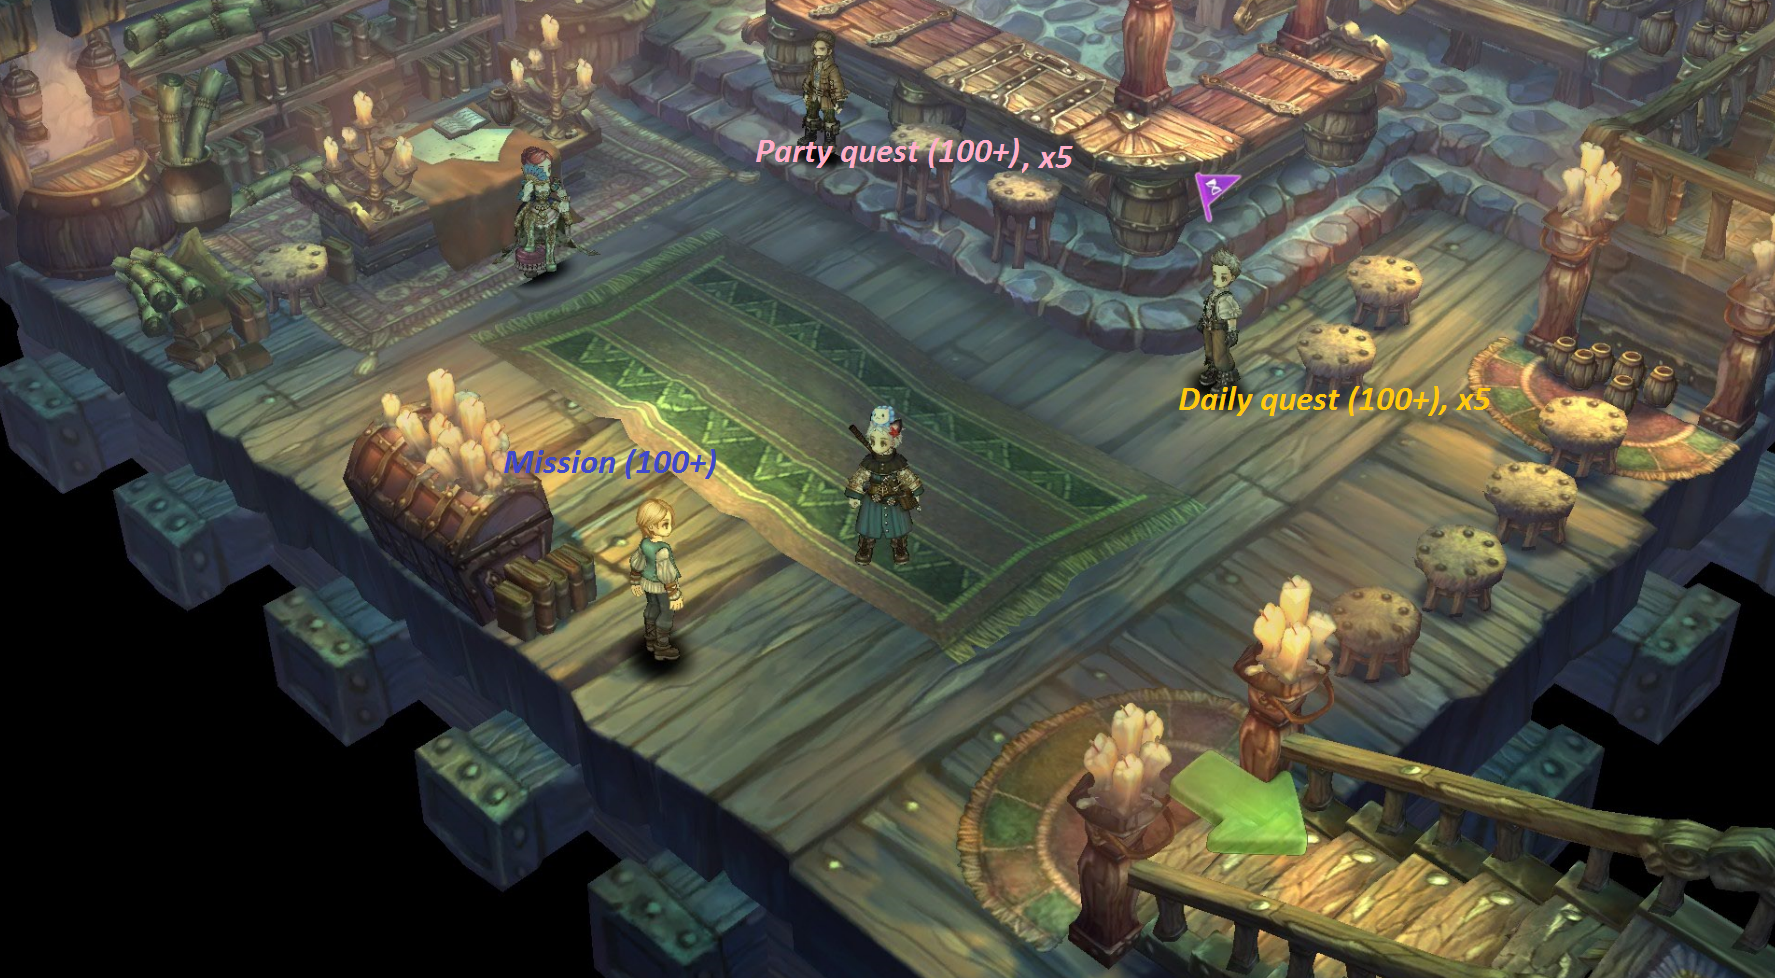
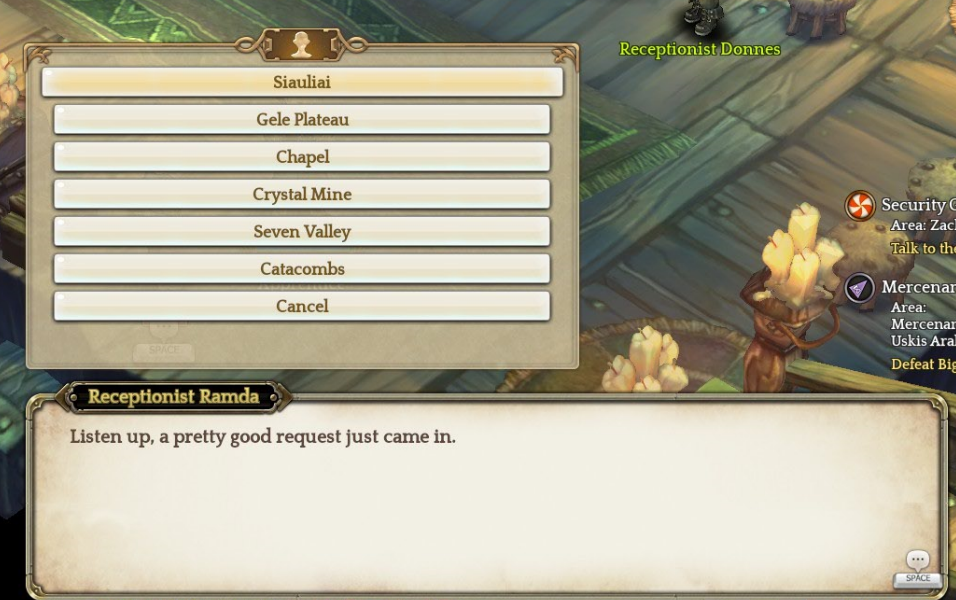
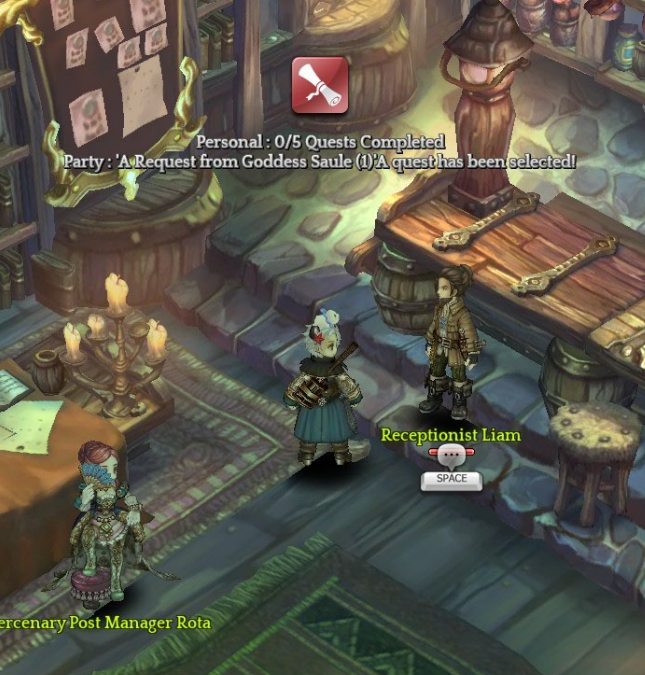
Post 2: Mercenary Post
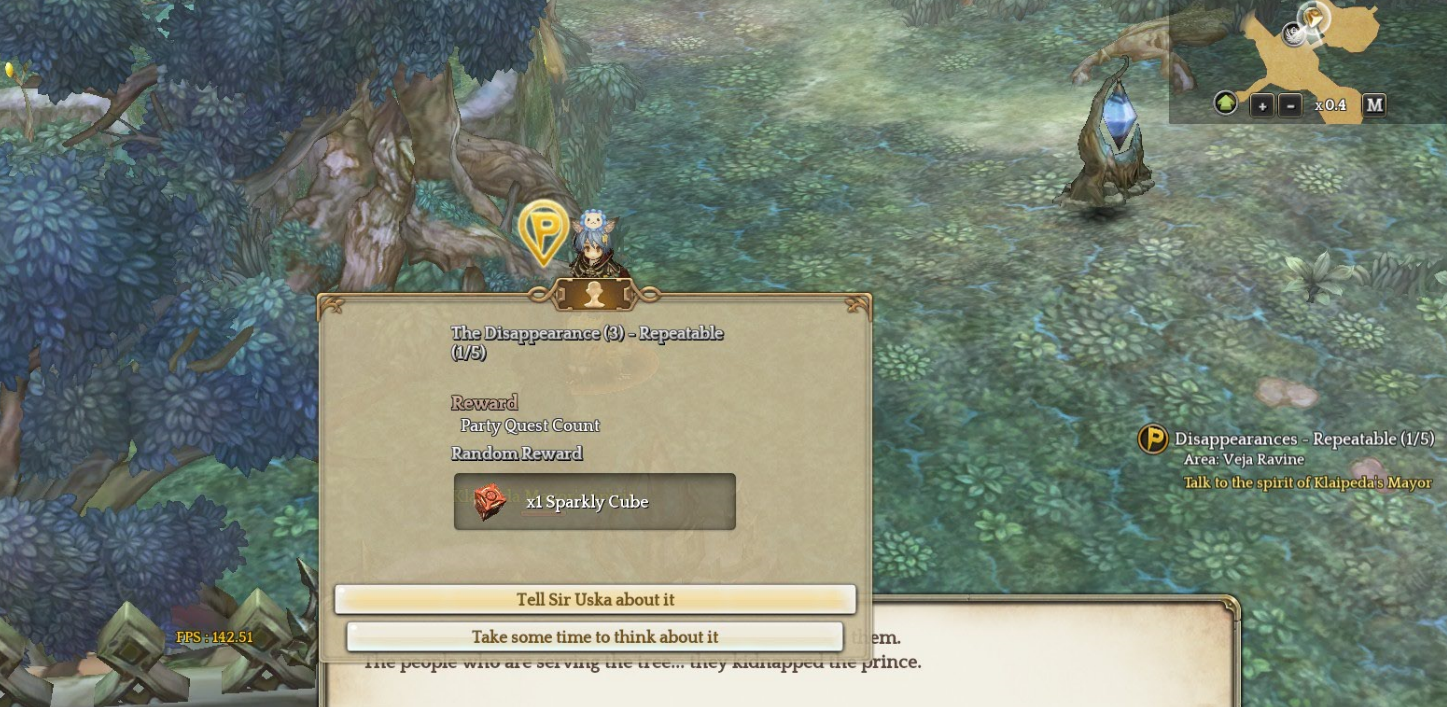
Mission location - missions, dailies, party quests
Mission bosses (yes, they drop cards)
Mission mobs
Mission drops (boss may drop card when killed - card is not from cube)
Click here to jump to post #2: [Guide] Dungeon guide (type /indun in game) -Version 2017 May 3-
Post 3: Saalus Convent & Uphill Defence
Saalus Convent & Uphill Defence location - mission objectives
Saalus Convent bosses (yes, you may get a card from cube!)
Saalus Convent & Uphill Defence mobs
Saalus Convent & Uphill Defence drops
Click here to jump to post #3: [Guide] Dungeon guide (type /indun in game) -Version 2017 May 3-
Compact Boss Card List
Card Effect Google doc by TK_Magnus& community https://docs.google.com/document/d/15PnKTitv6pzcEbC2v7UPnZXrcIM8KBvtwHtuCN8CIaE/edit#
Boss guide by Pole_Doge: (click>>>) [Guide] Big Bossing: Vol. 2 (8/4/2017)
Earth Tower:
New! Video guide by Sung1: [Guide] Earth Tower (ET) video guides - Journey to the Top
Old Earthtower text doc:
Link: Earth Tower Handbook v1.10 (No longer updated.)
Link: https://docs.google.com/document/d/1HWygKXsVXtJPNTKAvwD6_dvuAXPScAcycwD80jF-ycA/edit
Fantasy Library:
Nicola her guide:
Link: [Guide] 315 Dungeon - Fantasy Library
Card effects
Card Effect Google doc by TK_Magnus& community https://docs.google.com/document/d/15PnKTitv6pzcEbC2v7UPnZXrcIM8KBvtwHtuCN8CIaE/edit#
Old! Outdated! card list by Hillgarm.
Link (outdated!): [List] Boss Cards and Effects [Discontinued]
Hunting grounds
Drop list by TK magnus: [UPDATE] Hunting Grounds Drop List (Outdated)
Videos (location/entrance): https://www.youtube.com/watch?v=XPvGtrcB53g&list=PLW-t9DMNqeb2UG_Av_ueQCPLW1HobGXKG
Boss & Worldbosses :
New! Boss guide by Pole_Doge: (click>>>) [Guide] Big Bossing: Vol. 2 (8/4/2017)
(outdated!!!)Detailed forum guide by Poledoge (three-four parts): [Guide] Big Bossing: Part 1 World Bosses (outdated as of 8/1/2017)
(outdated!!!)Part 2: [Guide] Big Bossing: Part 2 Event/Gimmick Bosses (7/11/2017)
(outdated!!!)Part 3: [Guide] Big Bossing: Part 3 Field bosses (7/11/2017)
Other
(outdated!!!)Click to jump to post: [Guide] Dungeon guide (type /indun in game) -Version 2017 May 3-
(outdated!!!) Worldboss locations: http://tosmod.com/world-boss-dropslocations-by-bananaweed
(outdated!!!)Worldboss guide by Veritas: World Bosses, and what you should know approaching them (Updated 9/20 - Fade myth reproven)
Dungeon info & how to enter
Click for text <<Click here
(2x per day, 3x for token users)You may check your remaining dungeon runs, required dungeon
levels, and other info when you
type /indung in game chat and press enter
(it must be NORMAL chat). Several dungeons have 2 maps with entrances. Once you enter a dungeon, you will be transported to the special dungeon map. You may explore this map 100%.
All mobs inside are aggressive (they will attack you automatically), and some dungeons have unclear paths. Dungeons provide decent exp for you.
Note this image is outdated, the levels of the dungeons are incorrect. The interface is still similar.
[image of /indung]
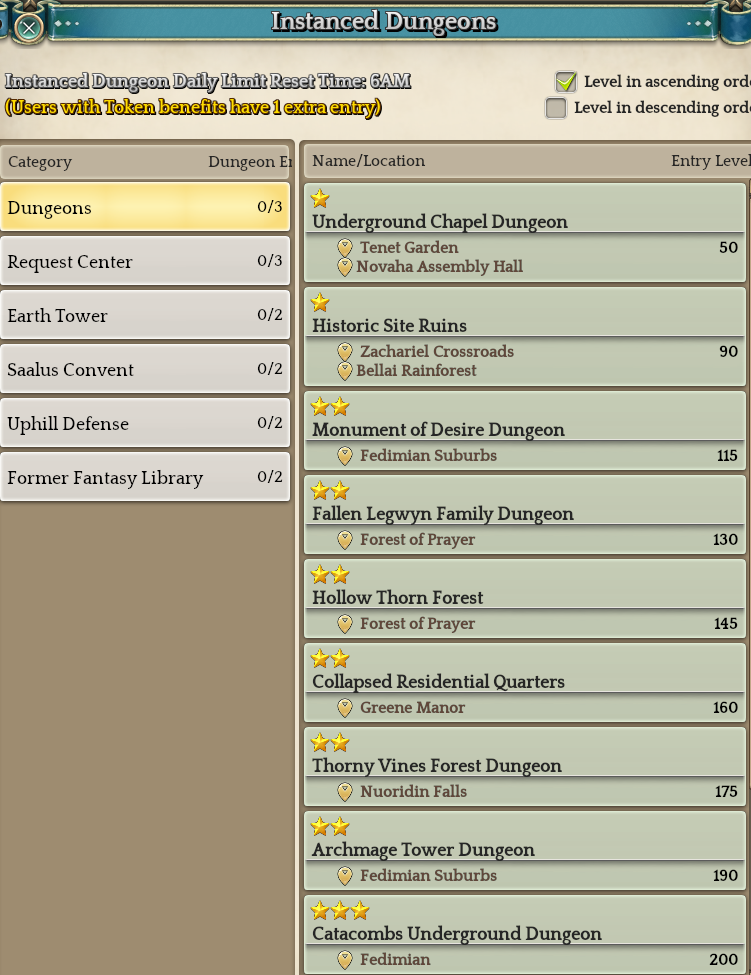
Once you defeat the dungeon boss (some dungeons have multiple bosses!) a cube will be dropped. You should get this cube and open it to receive a reward. Once the final boss has died, all members will be kicked within 1 minute. Tip: if you wish to leave sooner, teleport out or press ESC -> character select.
Tip: the boss may drop a card when killed - the card is not from the cube! Make sure to look carefully - don’t forget to pick up your card.
Often, people may shout for ‘dungeon rush’. This means
ignoring all mobs, running towards the boss, and killing it (for the drop).
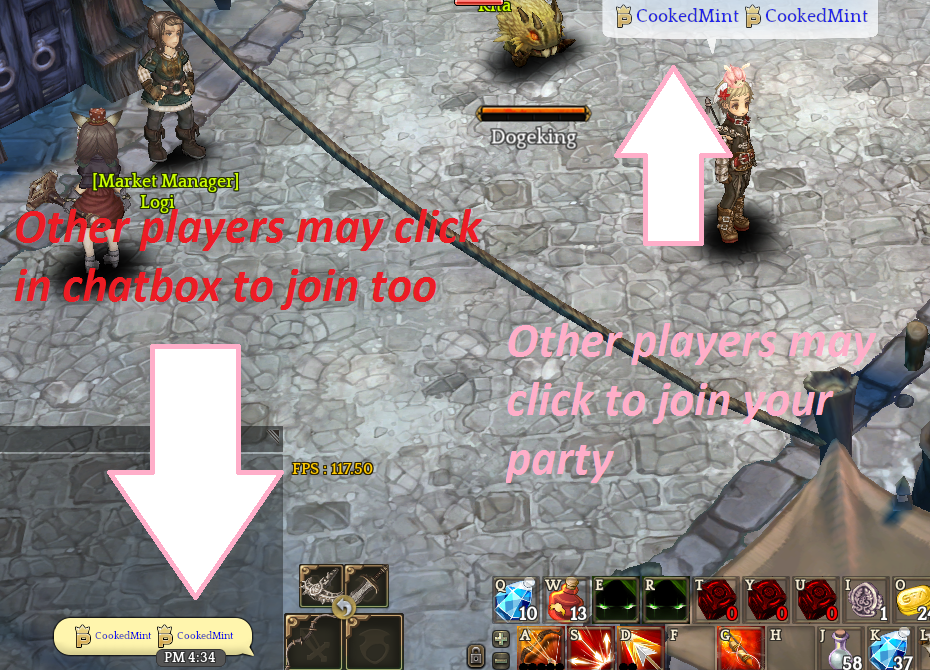
How to shout (party advertising)
Note you need a megaphone (you may buy 5 megaphone each several hours with your ‘free TP’ (you receive free TP per 4 hours, a megaphone at TP shop is 1 TP). Your free TP cannot exceed 5 TP. Please use at least 1 free TP to start generating new free TP again. Open inventory to view your free TP.
Open party info window by pressing f6 (default setting). Please do not forget to use the ‘settings’ tab inside f6 window too. Please disable ‘share quest’ option to reduce lag when a member joins the party.
Image:
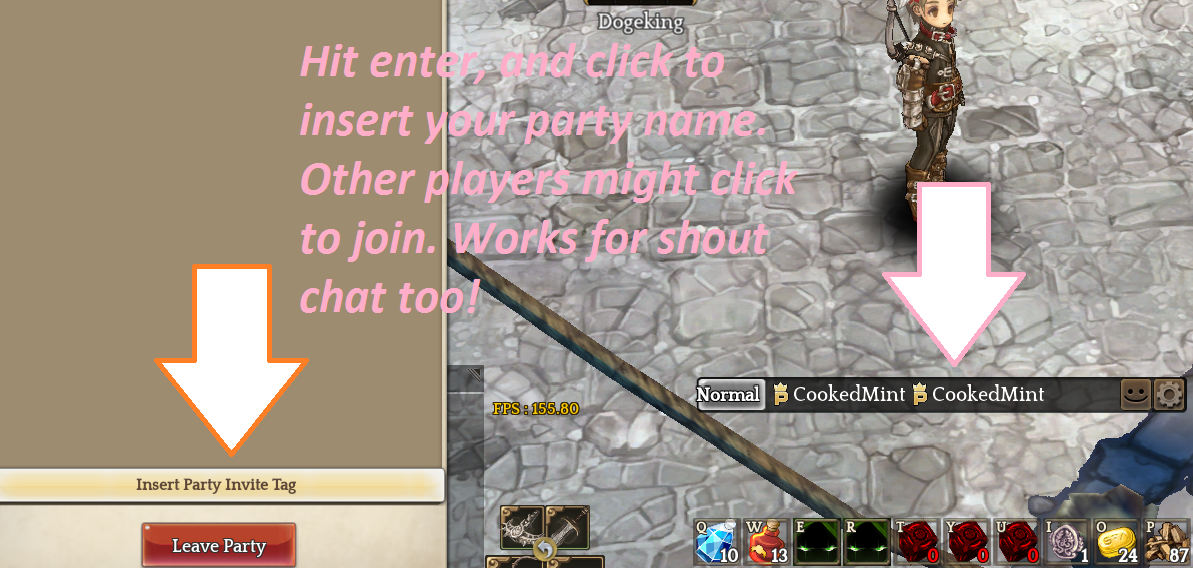
.
Some dungeons require you to kill mobs before a door opens (lvl 110 dungeon requires you to clear all mobs to get to boss #2, lvl 200 dungeon requires you to kill 2 specific mobs, etc.) - rushing these dungeons is a lot more difficult. Dungeon rushes are with pre-made parties, and each member has to select ‘enter’ to meet inside the dungeon map.
People dungeon rush once they want a dungeon drop (or silver), and are too high lvl to benefit from the exp.
Be prepared before you enter, buy antidotes to dispell poison at the item merchant if you enter a dungeon (with poison mobs), buy potions, and bonfires. If you can afford it, buy dispeller scrolls (from market - named: dispeller) to become immune to lvl 1 CC (sleep, freeze, etc.). Some dungeon mobs have annoying crowd control skills.
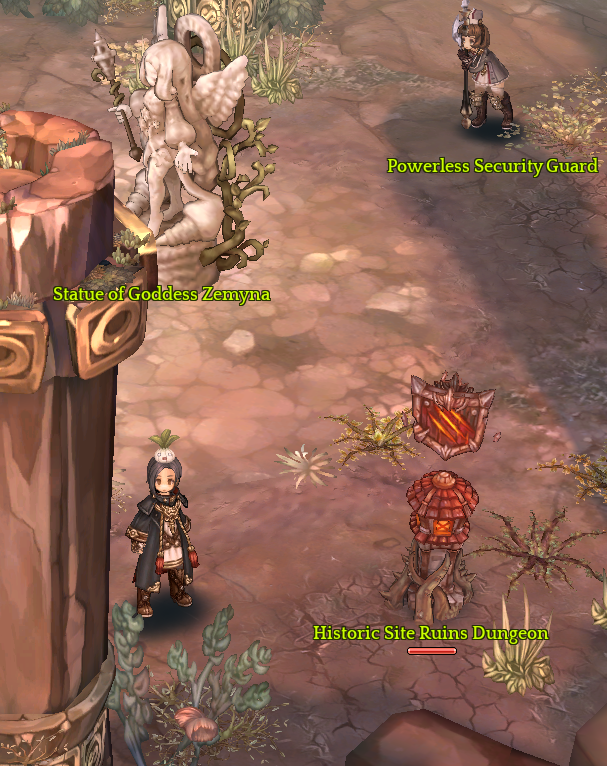
Example of a dungeon entrance: dungeon entrance (is a tower) of the lvl 80 dungeon at zachariel crossroads
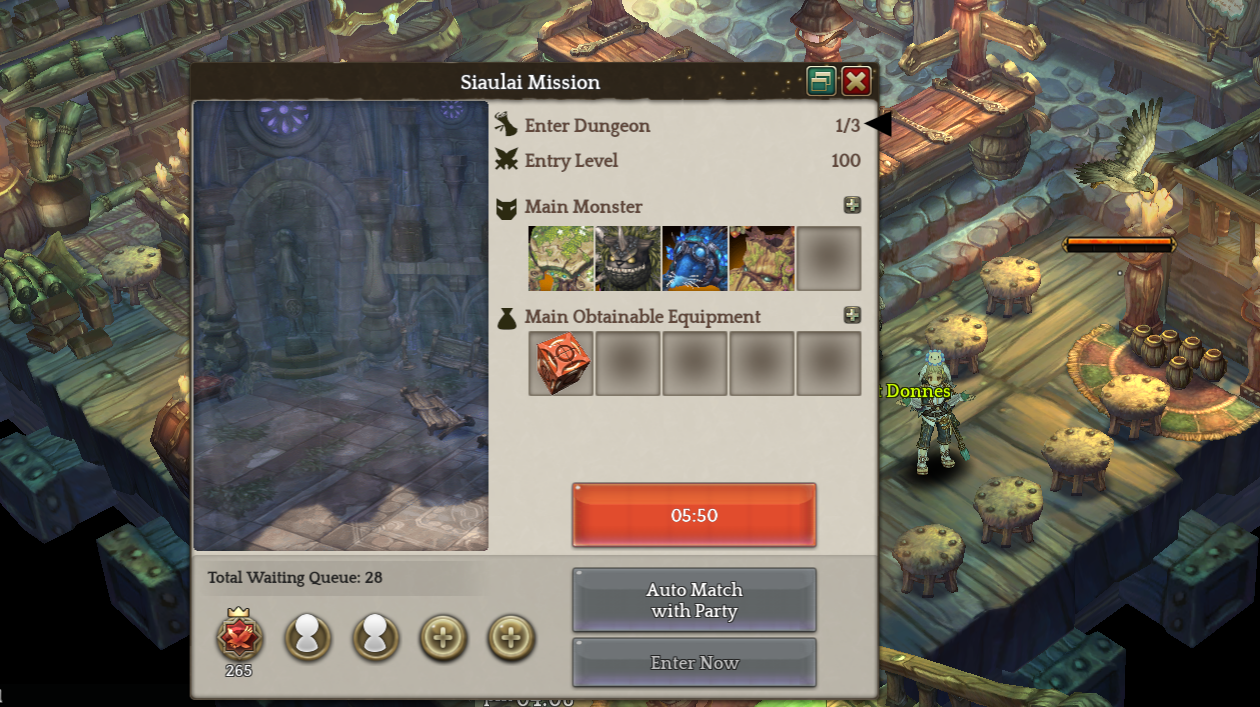
How to enter a dungeon - Party Search function & Pre-made
Text <<Click here
Once you interact with the tower, you may select 'search for party'. The game will put you in queue. The red box will show you your time in queue, and it will show you the amount of players currently in queue.During matchmaking you will automatically enter the dungeon if there are 4 other players (total of 5 members). Tip: if you use this ‘search for party’ function, you and your matchmaking party will receive 600% Bonus exp from the dungeon! This means each player gets +120% bonus exp!
If you wish to enter with less players, you may select the ‘match 2 to 4 player’ option (button). Tip: using this option does NOT give you lower exp
If you have a premade (or wish to solo), you have to make a party - you may be the sole member - and select ‘enter’.
Image of dialog box you get before entering the dungeon (red box = time in queue).
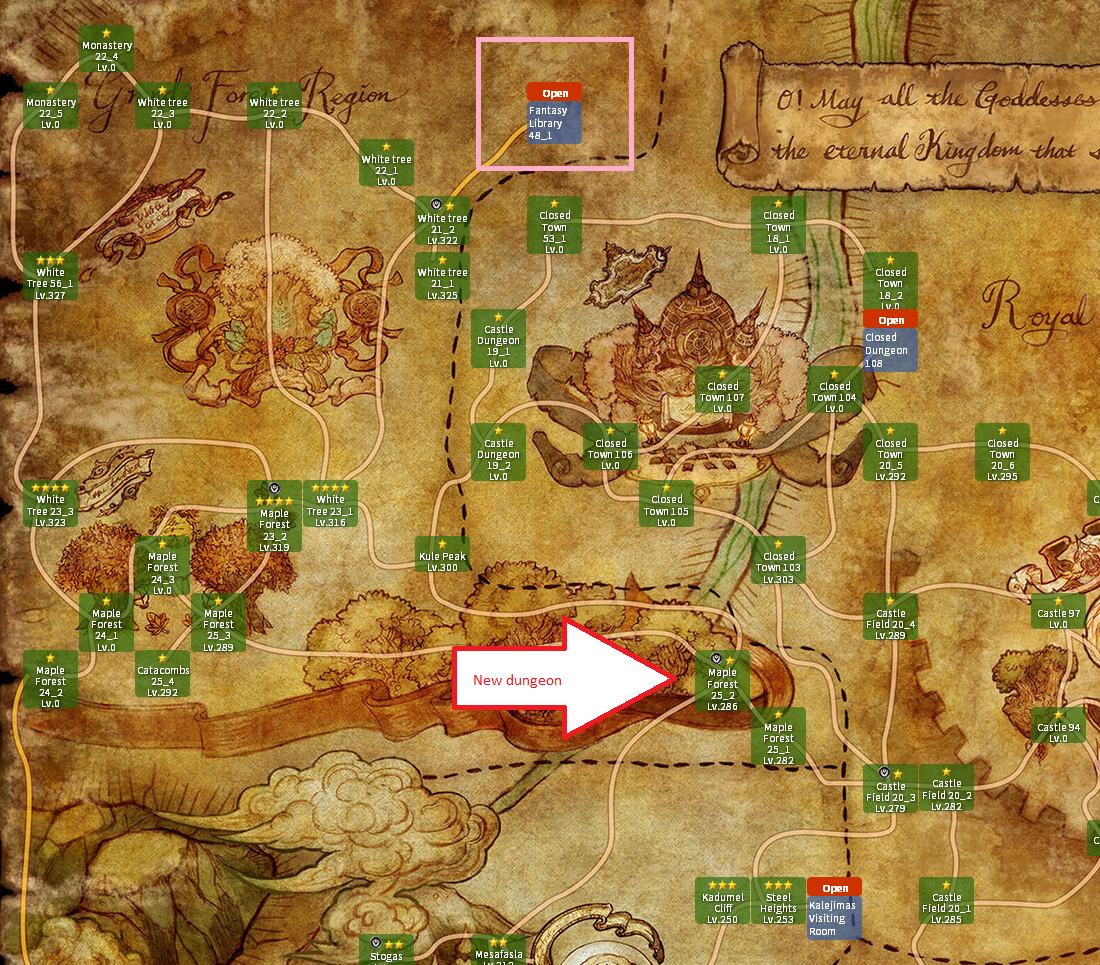
Dungeon Location
Click for text <<Click here
To navigate in Tree of Savior, use http://toscamp.com/map_en/map3.8.php
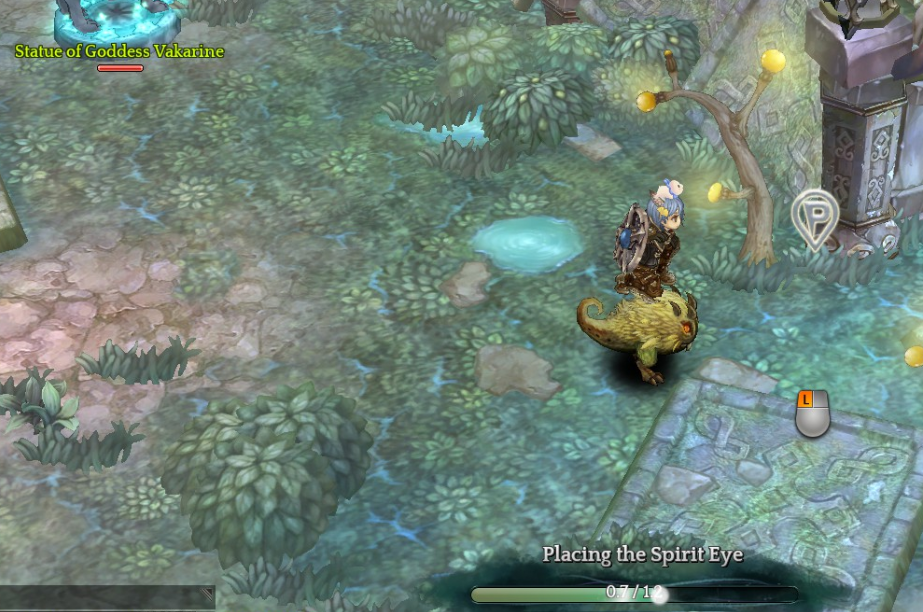
Tip! If you have (extra) quests near dungeon entrances, you don’t have to finish/complete the quest. You will have a free teleport to the dungeon entrance. You may complete the quest once you do not wish to (ever) do the dungeon anymore. This trick is nice for free teleports to the cities too.
Type /indung in normal chat to open the dungeon list & locations.
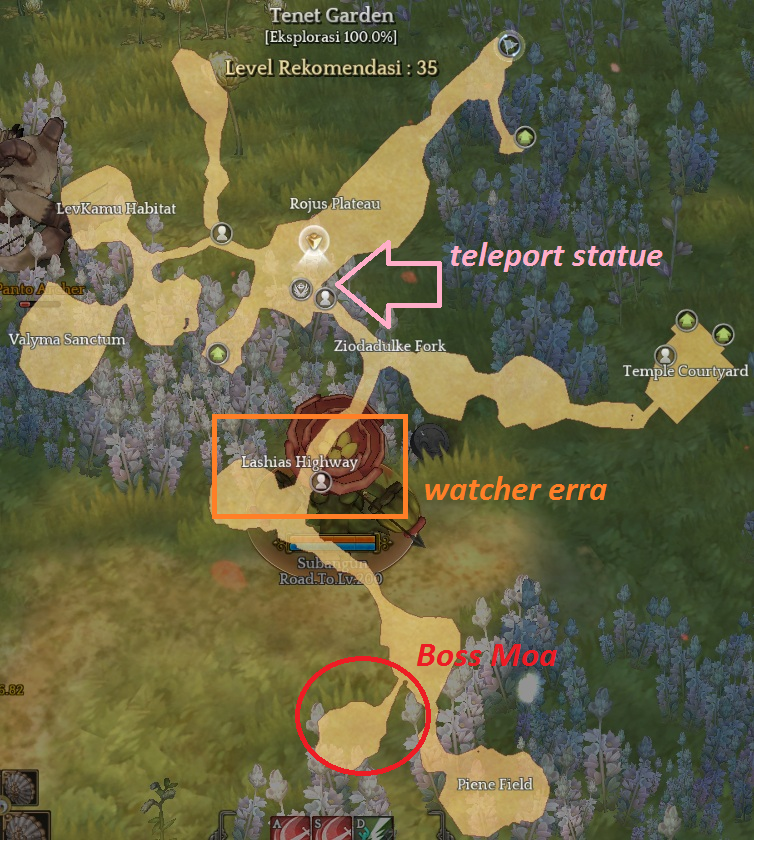
Lvl 50 dungeon = Underground Chapel Dungeon = Tenet Garden ( map Lv 35), Novaha Assembly Hall (map Lv 45)
This is level 80 dungeon now *** Lvl 90 dungeon = Historic Site Ruins = Zachariel Crossroads (map Lv 78), Bellai Rainforest (map Lv 92)
This is level 110 dungeon now Lvl 115 dungeon = Monument of Desire Dungeon = Fedimian Suburbs (map Lv 107)
This is level 140 dungeon now Lvl 130 dungeon = Fallen Legwyn Family Dungeon = Forest of Prayer (map Lv 130)
This is level 170 dungeon now Lvl 145 dungeon = Hollow Thorn Forest = Forest of Prayer (map Lv 130)
This is removed now Lvl 160 dungeon = Collapsed Residential Quarters = Greene Manor (map Lv 149)
This is removed now Lvl 175 dungeon = Thorny Vines Forest Dungeon = Nuoridin Falls (map Lv 168)
This is level 200 dungeon now Lvl 190 dungeon = Archmage Tower Dungeon = Fedimian Suburbs ( map Lv 107)
This is level 230 dungeon now Lvl 200 dungeon = Catacombs Underground Dungeon = Fedimian (City)
This is removed now Lvl 217 dungeon = Deep Underground Prison Dungeon = Inner
Enceinte District (map Lv 196)
This is level 260 dungeon now Lvl 240 dungeon = Blue Fortress Dungeon = Inner Enceinte District (map Lv 196)
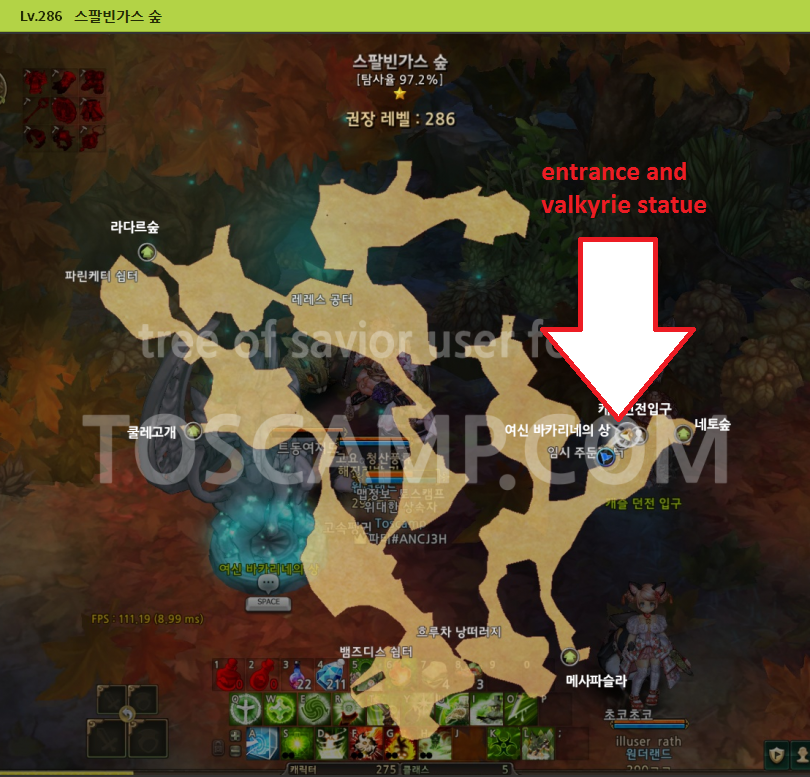
Lvl 290 dungeon = Castle Dungeon = Spalvingas forest (image below)
Some suggested dungeon routes, and videos, and bosses
Tip: try to stay alive when the boss is killed. If you are not alive, you will not receive the exp and drop. If you die in a dungeon, you will respawn at the start (inside the dungeon). Boss drop cubes disappear quickly, so be sure to stay alive or you may lose your cube due to distance, or time-out (kicked after 60 seconds).
Dungeon 50 <<Click here
Lvl 50 dungeon - boss: Shadowgaler
suggested dungeon route
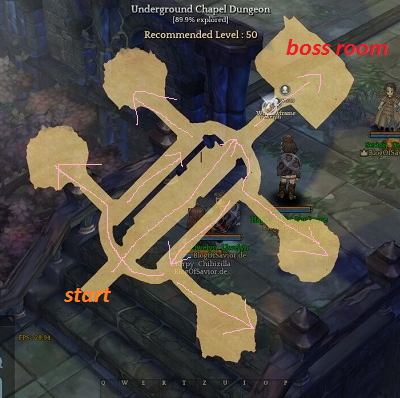
Click here for a video <<Click here
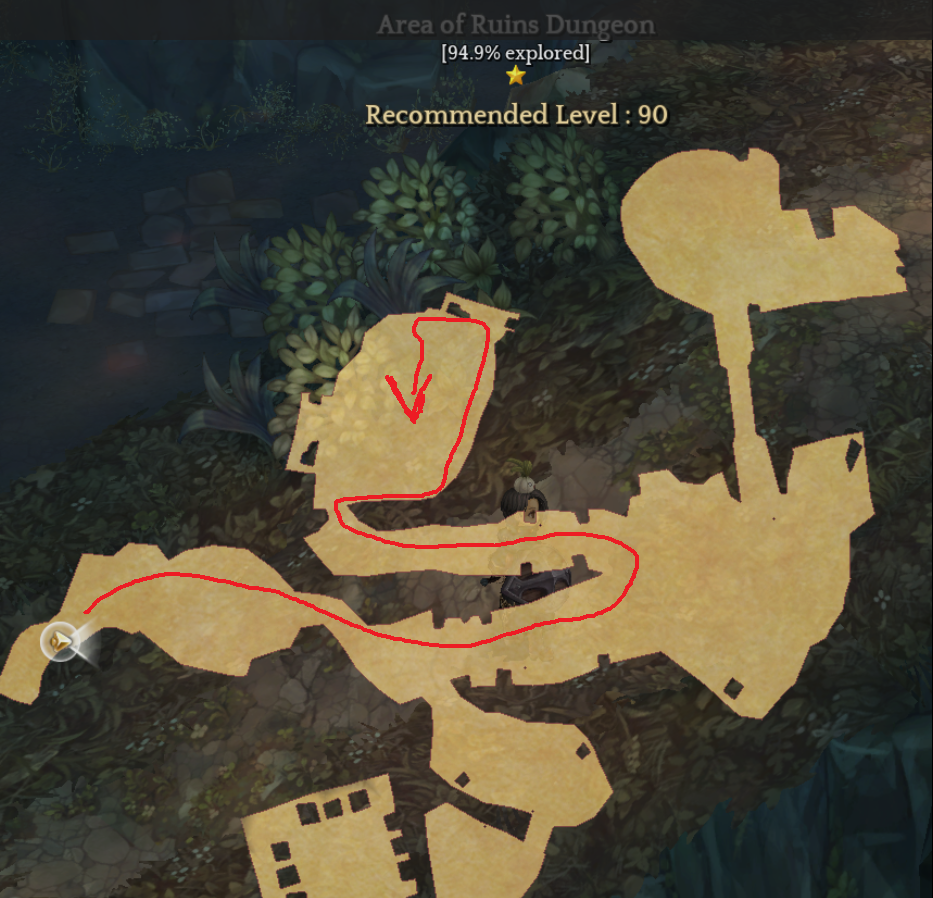
Video: https://www.youtube.com/watch?v=hXXjj6XOFLE**This is level 80 dungeon now** Dungeon 90 <<Click here
Lvl 90 dungeon - Boss: Necroventer
[image of suggested dungeon route inside]
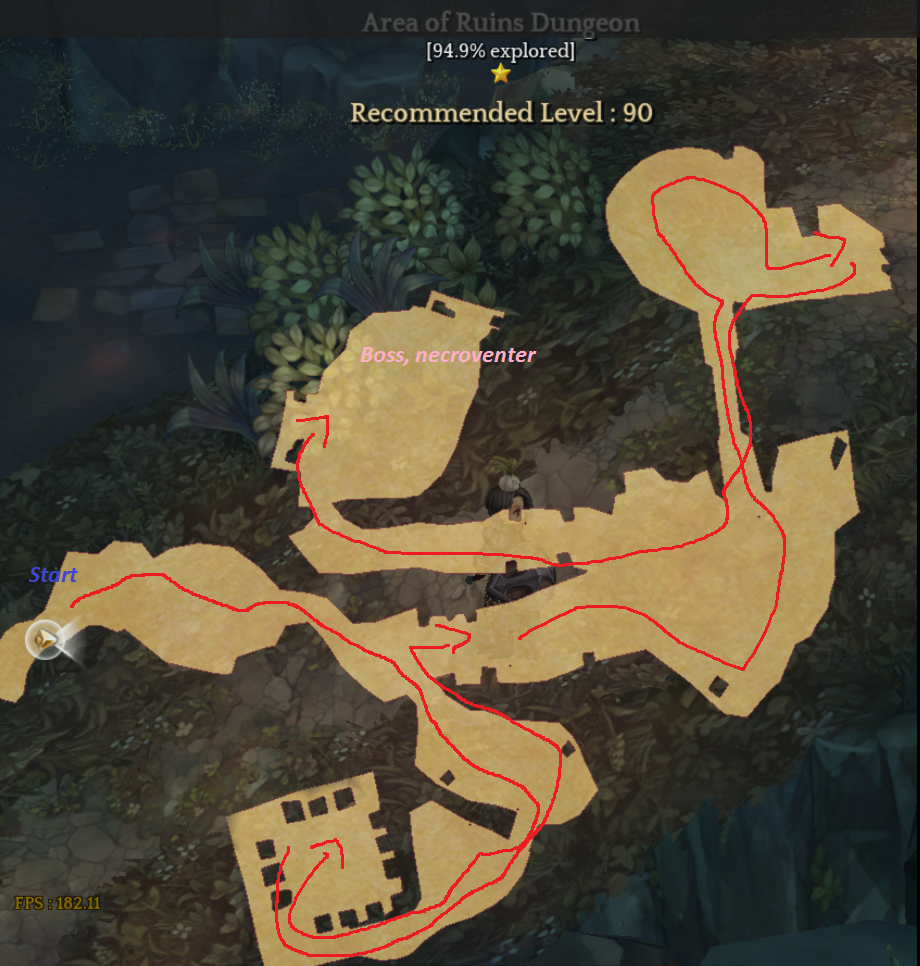
Click here for a full run video<<Click here
Video: https://www.youtube.com/watch?v=HXNSN4qLP44[Rush] a video of rushing
Video:
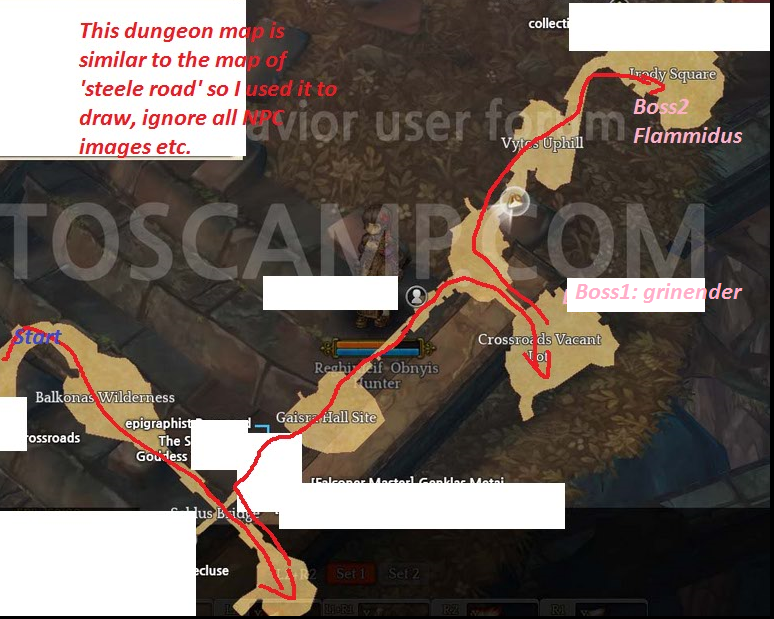
**This is level 110 dungeon now** Dungeon 115 <<Click here
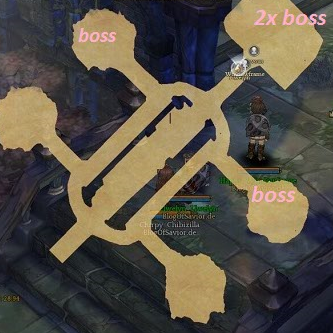
Lvl 115 dungeon - Bosses: Grinender + Flammidus (flammidus
is final boss)
This 115 dung cannot be rushed because you have to clear all mobs to progress! There’s a stone wall which won’t disappear if you don’t kill all mobs.
[Image]
video of dungeon run
Video:
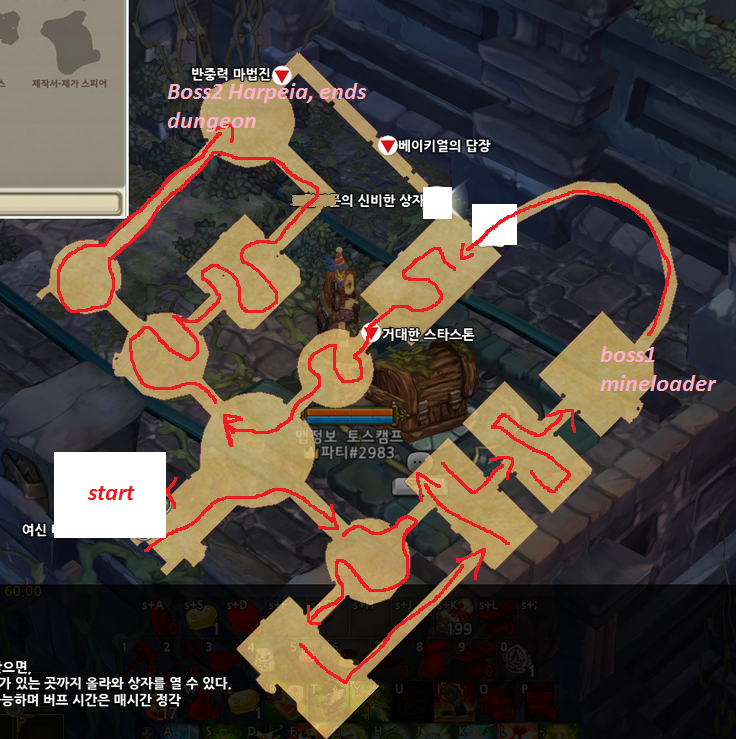
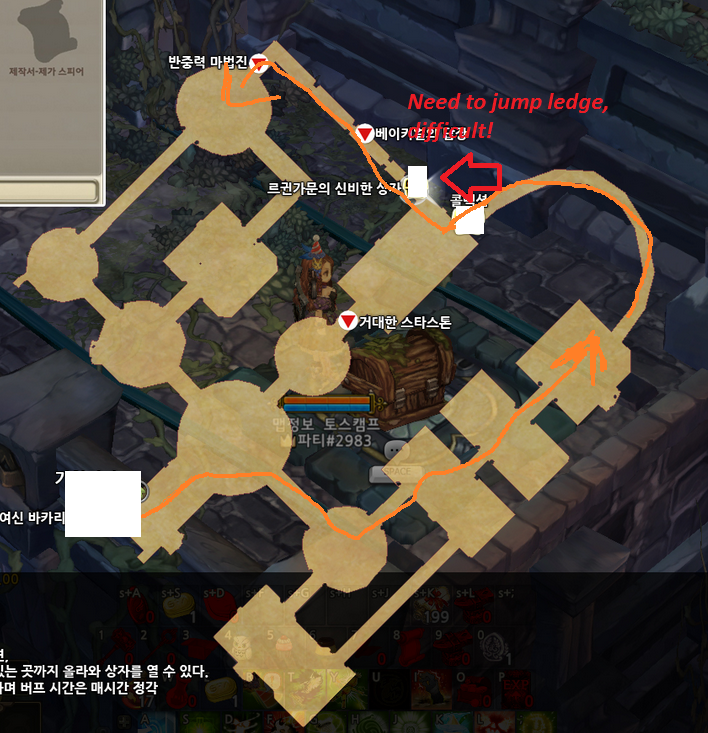
**This is level 140 dungeon now** Dungeon 130 <<Click here
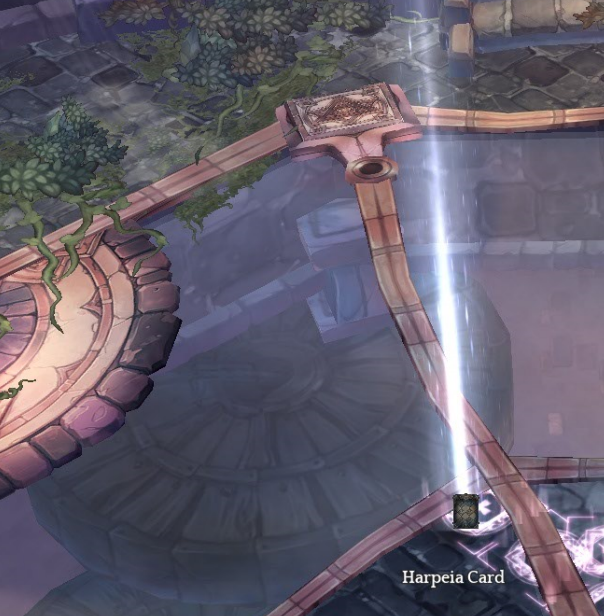
Lvl 130 dungeon - Bosses: Mineloader + Harpeia (harpeia
final boss)
The rush video shows the jumping required to rush efficiently.
[image of suggested route]
image
Click here for video of full run<<Click here
Video:
[Rush] rush videos
**This is level 170 dungeon now** Dungeon 145 <<Click here
Lvl 145 dungeon - Bosses: Merge + Mandara + Ravenzard (ravenzard
final boss)
This 145 dung cannot be rushed because you have to clear
mobs to progress! Thorny vines block your path.
[image]
image of suggested route
Click here for video of dungeon run<<Click here
Video: https://www.youtube.com/watch?v=dW0h1XmfV44Tip! A guide to solo dungeon 145 (for scout3):
**This is removed now** Dungeon 160 <<Click here
Lvl 160 dungeon
(unpopular) - Bosses: Igniting Jack O’ Lantern + Moldyhorn + Mothstem + Colimencia
- Moyabruka + Manticen (manticen final boss)
Cannot rush - you have to kill each boss to progress.
Same map as lvl 90 dungeon!
Click here for video<<Click here
Video: https://www.youtube.com/watch?v=gM7sOSQJIFk**This is removed now** Dungeon 175 <<Click here
Lvl 175 dungeon - Bosses: Honeypin + Molich (molich final boss)
Rushing this dungeon: (you don’t have to kill the first boss), run to the tini magician (see image below) and kill it to open the gate to Molich.
[image]
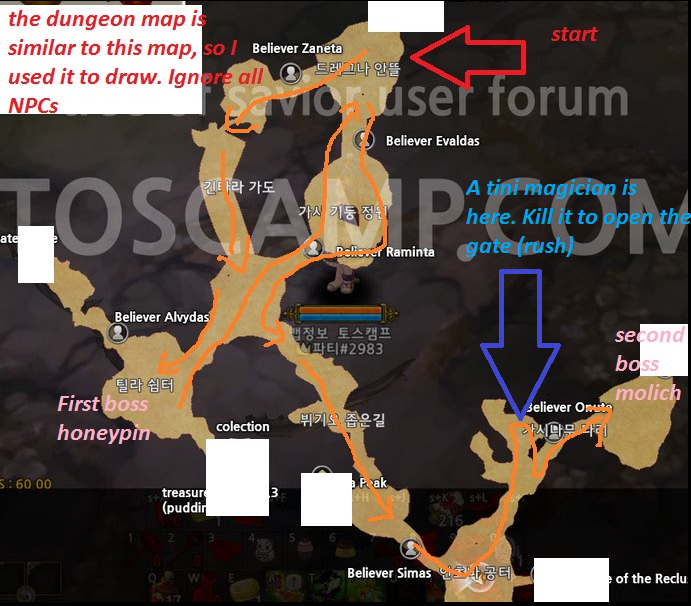
Click here for video of full run<<Click here
Video: https://www.youtube.com/watch?v=UVwAYvpeqhYClick here for video of rush <<Click here
Rush: https://www.youtube.com/watch?v=CwDe0tJ8Ebk**This is level 200 dungeon now** Dungeon 190 <<Click here
Lvl 190 dungeon - Bosses: Cerberus + Firelord (firelord
final boss)
[image]
image of suggested route
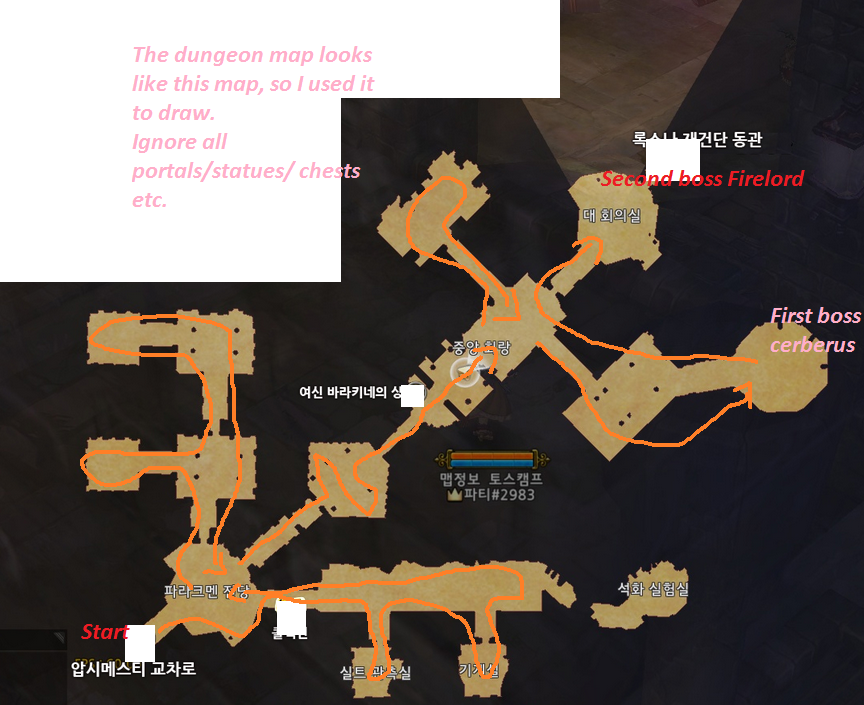
Click here for video of full run <<Click here
Video: https://www.youtube.com/watch?v=t1vBqPt96gIClick here for video of rush<<Click here
Rush: https://www.youtube.com/watch?v=IBSl9kPcjZE**This is level 230 dungeon now** Dungeon 200 <<Click here
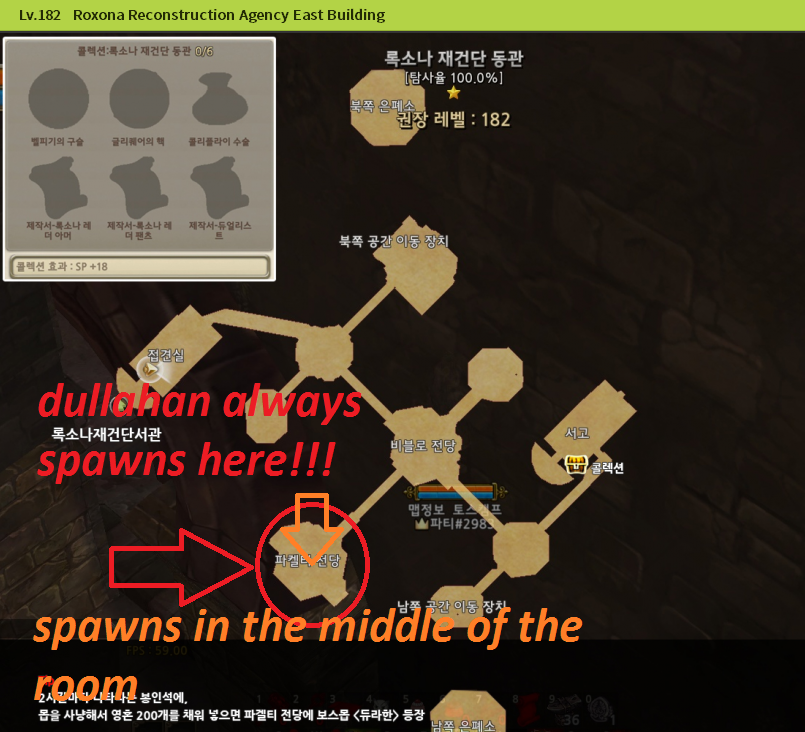
Lvl 200 dungeon - Bosses: Manticen
This dungeon is often rushed, however it is dangerous because the mobs use homing (magic) attacks. To rush this dungeon, you have to kill 2 mobs to open the door. The corrupt pyran at top right, and the rusty old hook at bottom left.
[image]

Click here for video of full run<<Click here
Video: https://www.youtube.com/watch?v=UrdX2l2vQtUClick here for video of rush<<Click here
Rush: https://youtu.be/rdFlNT-A8lI**This is removed now** Dungeon 217 <<Click here
Lvl 217 dungeon - Bosses: werewolf + Riteris (riteris final boss)
To rush, you have to clear mobs in several areas. Look at
the image.
[image]
suggested dungeon route

Click here for video of full run<<Click here
Video: https://www.youtube.com/watch?v=cijXWjOLvD0Click here for video of rush <<Click here
Rush: https://www.youtube.com/watch?v=tT6l88meKk8**This is level 260 dungeon now** Dungeon 240 <<Click here
Lvl 240 dungeon - Bosses: Prison Cutter + Rafene (rafene final boss)
You have to clear all mobs to get to the boss, so rushing is
hard.
[image]
image of suggested route
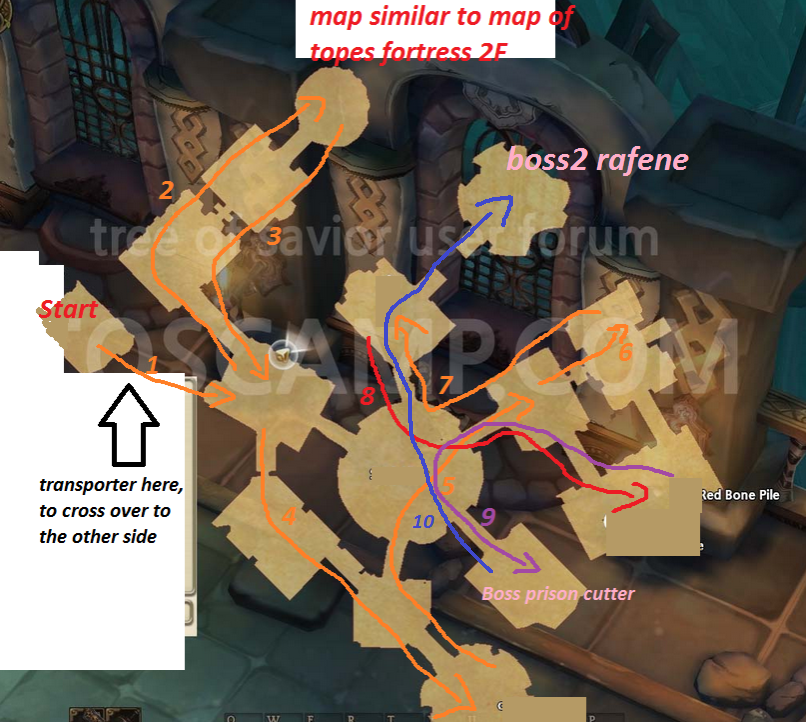
Click here for video of full run <<Click here
Video: https://www.youtube.com/watch?v=HWsGNbjheBgDungeon 290 <<Click here
Important: Destroying the incorrect orb will make you unable to reach & kill the dungeon boss. Just the 1st destroyed orb will count.
This dungeon features ORBS. Orbs are objects which you must destroy. Destroy the correct orb to activate a teleport magic circle to the bossroom.
Boss possibility 1 : red lavenzard.
Boss possibility 2 : sheepdog
Lvl 290 dungeon - Bosses: red lavenzard OR sheepdog
You may only kill 1 boss.
You only have to destroy the correct orb to rush the boss.
[image]
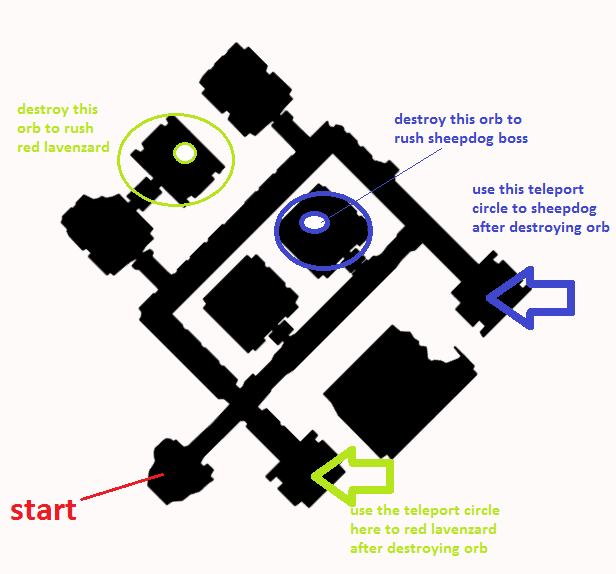
Click here for video of bossrush<<Click here
Video:
Rush red lavenzard (popular, most common rush):
Tip: use warpstone to teleport back to the entrance to rush red lavenzard after destroying the orb.
Rush sheepdog (unpopular):
Drops
Dungeon mobs may drop Artilonium, and Cardboard cube recipes.
Boss red lavenzard drops level 315 purple weapon recipe for Cleric & Archer classes.
Boss sheepdog drops level 315 purple weapon recipe for Swordsman & Wizard classes.
Dungeon mobs
To search monsters, use this: http://www.tosbase.com/database/monsters/
More text <<Click here
The magic mobs are the most dangerous, often have homing or
AoE spells, always ranged! Archer (ranged) mobs are quite difficult, their
attacks are homing. Melee mobs can be kited, less dangerous.
Dung50: Rodelin, Desmodus (explodes when it dies, knockback
and dmg), Pawnd (ranged), Pawndel , Glizardon, Banshee (magic, uses CC freeze),
Panto Wizard (magic), Panto warrior, Green Apparition.
Dung80: Green winged frog, Lizardman, Lizardman Magician
(magic), Tama, Infroburk (has ranged attack), Zolem, Gravegolem, Vikaras archer
(ranged), Temple Slave assassin, Temple Slave mage (magic), Mauros, Vikaras,
Madakia (steals your magic circles! and uses hexing).
Dung110: Pag Sawyer, Charog, Pag Doper (ranged), Pag
Shearer, Flak (has invincibility skill!), Flamme (magic), Flamme archer
(ranged, has smoke skill which silences you), Pag nat, Thornball, Black
Apparition.
Dung140: Black Pawnd (ranged), Blue Pawndel, Glizardon,
Malstatue (ranged), Pyran (magic), Dawn Maiden (magic, ice CC), Night Maiden,
Darkness Maiden (ranged, has smokebomb skill to silence you), Black Apparition
(uses Sleep CC around itself), Hallowventer, Hallowventer magician (magic, uses
magic missile - homing), Large Minivern.
Dung 170: Black Wood Goblin, Tripede (ranged), Green Eldigo
(ranged, magic?), Pumpleflap, Shardstatue (magic), Blue Kodomor, Coliflower
mage (magic, CC freeze), Infro Holder Archer (ranged), Wendigo Archer (ranged,
uses poison), Vubbe Chaser.
Dung200: Black Drake (magic, uses fire pillar), Coliflower
archer (ranged, uses multishot knockdown), Red cockat (magic, uses wind
attack), Red banshee (magic, explodes on death for massive damage on players,
explosion causes knockdown), Hohen Ritter, Hohen mage (magic), Hohen orben
(magic), Nuo (magic), Elet (absorbs all player fire skills to heal up), Cerberus
summons hogma shaman (magic), and hogma warrior.
Dung230: Lapasape, Cronewt magician (magic), Prison fighter,
Kepa rider magician (magic and physical ranged), Corrupt pyran (magic), Corrupt
velfiggy (magic), Rusty old hook (magic, uses magic missile and SLEEP around
itself), Minos mage (magic), Cronewt poison needler (ranged, uses poison), Loftlem
(magic and ranged), Capture loxodon, Meleech (uses burrow at low hp).
Dung260: Melatinun, Siaulav, Blue ticen crossbow soldier
(ranged), Terra imp mage (magic, uses hexing), Blue truffle, chromadog, blue elet (uses sleep around
itself, absorbs ALL ice magic to heal), lapa archer (ranged), lapfighter,
lapemiter (throws knockdown bombs, ranged), lapezard (magic, uses AoE knockdown
explosion).
Dung290 melee doggies, big melee doggies, magic doggies, archer doggies
This dungeon has been Removed Dung160: Gray winged frog, Hallowventer, Gravegolem,
Cockatrice, Green cockat.
This dungeon has been RemovedDung175: Tiny/Tini, Tiny/Tini archer (ranged), Tiny/Tini
Magician (magic), Operor, Merog Stinger (ranged, poisons), Spion archer (ranged,
uses knockdown multishot), Spion, Ticen, Ticen Crossbow soldier (ranged, uses
knockdown multishot).
This dungeon has been Removed Dung217: Red rondo, Wendigo escapee, pure loftlem (magic,
uses CC freeze), wendigo searcher (ranged), Blue harugal, red zigri, red socket
mage (magic), blue stoulet, terra imp, stoulet archer (ranged), big black
griba.
Dungeon silver
(solo clear)
text
Dun50: 60k, all mobs drop silver
Dun80: 90k, all mobs drop
Dun110: ???
Dung140: 230k silver, skip glizardon big mob they do not drop silver
Dung170: 320k silver, all mobs drop silver
Dun200:???
Dun230: 140k, all mobs drop
Dun260:???
Dung290 boss rush: 50k silver
**Dungeon Drops **
Text <<click here
d50 boss cube
Silver bar
Gold bar
Opal
Sapphire
Five hammer (mace blunt weapon)
Wide crossbow
Mandrapick (sword)
Ice rod
iron bow
dratt shield
Silver falchion (sword)
Boss card
Talt
d80 boss cube
Arde dagger
Auru medal
Auru bracelet
plants bracelet
magic talisman recipe
Boss card
Talt
d110 boss cube
Recipe: agny necklace
Random piece of Turn armour (level 120 armour)
Ledas shield
Valia (mace)
Boss card
Talt
Normal mob: broken anti-cold property bracelet
d140 boss cube
Recipe: petamion
Petamion
Tyla equipment (cloth, plate, leather)
Aston weapons (level 170 weapons)
Maledic (purple level 120 staff)
random lvl1 gem
Recipe: knotted armband
Boss card
Talt
d170 boss cube
Random blue weapon level 220 (however it cannot be a weapon which requires a terranium to craft)
random Recipe: seimos weapon (all types)
Mercury
Boss card
Talt
Normal mob: broken anti-dark property bracelet, recipe: anti-dark property bracelet
d200 boss cube
Random blue weapon level 220 (however it cannot be a weapon which requires a terranium to craft)
Recipe: sissel bracelet
Recipe: max petamion
Boss card
Talt
d230 boss cube
Random blue weapon level 220 (however it cannot be a weapon which requires a terranium to craft)
Recipe: Manamana (pistol)
Recipe: didel tower shield (and other didel equips)
Blue level 220 recipes which require terranium to craft
Recipe: Catacombs club
Recipe: Catacombs pike
Recipe: other catacombs weapons
Boss card
Talt
d260 boss cube
Random recipe: virtov equipment (cloth, plate, leather)
Boss card
Talt
d290 boss cube
Boss sheepdog: purple recipe for itemLvL315
Recipe for swordsman + wizard
Recipe: 1H sword, 2H sword, 1H spear, 2H spear, lionhead shield, lionhead dagger, rod, staff
Boss lavenzard: purple recipe for itemLvL315
Recipe for archer + cleric
Recipe: vienerazis mace, silver hawk (crossbow), aufgowle bow, double stack (pistol), dragoon piper (musket), lionhead cannon
Boss card: molich card, riteris card
Talt
Normal mob drop: artilonium, random cardboard cube recipe (cardboard cube recipe may give you a random Orange endgame weapon recipe)
## Continued in second post - second post: Mercenary post