Version: October 2018

Introduction - Builds & Discussed features
The discussed Farming builds are viable support&buffer hybrids for party play.
During solo play you are an excellent solo farmer. During party play you are an excellent support&buffer.
The weakness of these builds is big Area of Effect (AoE) damage.
| Build | Solo farm | Difficulty to level | Able to function during lag? | Party support (second function) | Important to know |
|---|---|---|---|---|---|
| Wiz2 Link2 Thauma3 Feather3 | very good | High | No. Lag = fail farm combo | Good | Requires additional AoE gear investment |
| Wiz2 Link3 Thauma3 Sage2 | very good | High | Yes | High | Sage is also a taxi class |
| Cryo1 Link3 Thauma3 Shadow2 | very good | High | Yes | High | Requires a quest to unlock shadowmancer |
| [Pyro1 or Cryo1] Link3 Thauma3 Enchanter2 | very good | Very high | Yes, but lag = slower damage | Very High | Auto-attack (Z-attack) based build, needs additional AoE gear |
| Wiz2 Link3 Thauma3 Runecaster [Sorc1 or Wiz3 or other filler] | good | High | Yes | Very high | Most popular party support, runecaster skills have cast times, runecaster requires an unlock |
| Wiz2 Link2 Thauma3 Onmyouji3 | good | Very high | Yes | Good | All Onmyouji skills have cast times, requires a quest to unlock onmyouji |
Ping
To check lag, you may type //ping in-game in normal chat. Press enter to get your ping. A //ping below 0.08~ 0.06 is sufficient to play featherfoot (0.06 = 0,06 seconds - or 60ms delay). With a ping of 1.0~1.3 you will barely finish the featherfoot farm combo and may fail.
//ping is usually higher if it is crowded. Luckily the farming builds are excellent solo farmers. Better ping check method << click
Reagents
Thaumathurge: magic powder, available at the wizard and thaumathurge class masters.
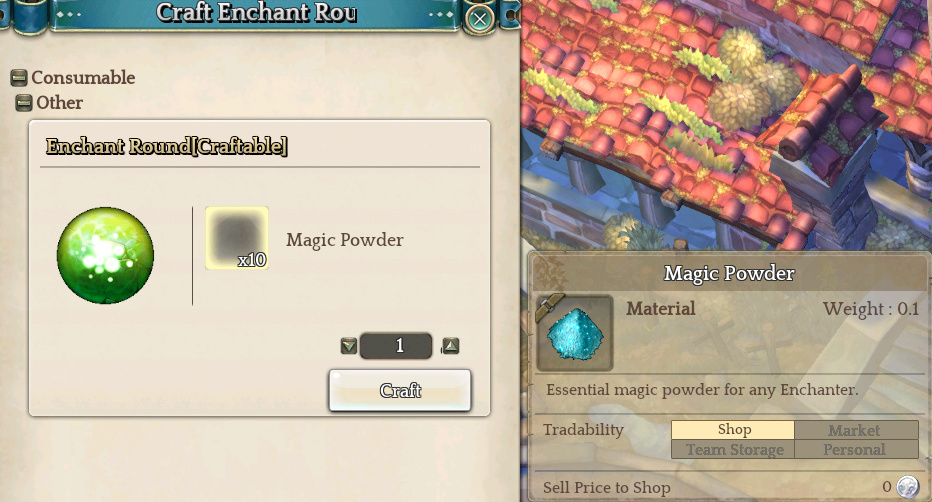
Enchanter: reagents available at the enchanter master.
Sorcerer requires a boss card to insert into the grimoire to summon (drop from bosses) and reagents (available at the sorcerer master).
Runecaster: runestones (at the runecaster master).
Onmyouji: paper dolls (onmyouji master).
Linker—Thaumathurge based farm builds
Thaumathurge: Swell Body increases mob size by 1 size, doubles mob’s HP, and doubles mob’s silver&exp&drops. If a mob would drop an item, Thaumathurge’s Swell Body debuff doubles that drop. Swell body does not affect the % drop rate. Swell body’s hit area is a small circle in front of your character.
Images to show Swell Body's hit area <<< click here
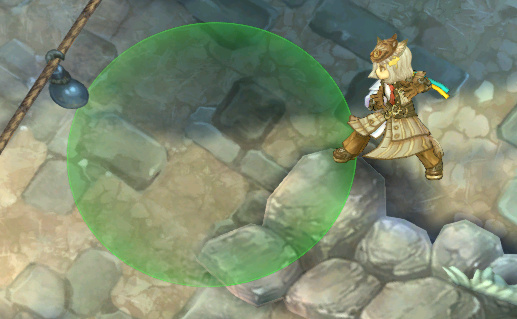
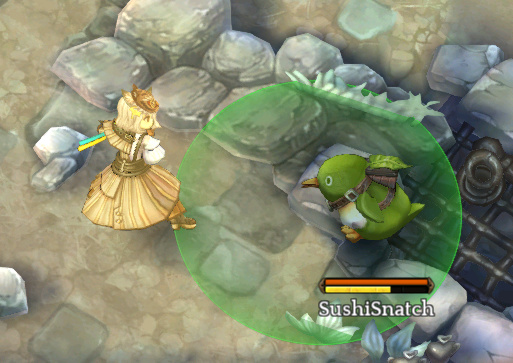
.
Linker: joint penalty spreads damage to all linked mobs to kill swollen mobs faster & hangman’s knot gathers mob into a small area in front of you (to swell body).
Farm to fund
Farming wizards specialize at getting doubled silver and doubled drops. You may use your own farmed drops or sell them. Some drops sell really well on the market of your server. When starting out, your farmer requires some investment. Farm to fund your farmer, then farm to fund your other characters.
Difficulty to level
All farming builds are difficult to level. Builds with featherfoot, sage, shadowmancer, onmyoji become strong after reaching rank 8(+9) because those ranks unlock the strongest offensive skills.
The enchanter build is the most difficult. The enchanter build does not unlock a strong offensive buff skill (Lightning Hands) until enchanter2 at rank 9.
Order of build
If you like to level fast, please pick your damage classes as soon as possible. Your last rank will be the slowest to level-up, so keep that in mind when you decide your build order.
General recommendation (farming purpose) << click here
Featherfoot:
.Wiz2 -> linker2 -> thaumathurge2 -> featherfoot3 -> thaumathurge3 (easier to farm/AoE early),
or linker1 -> thaumathurge3 -> featherfoot3 -> linker2 (stronger buffs early, less farm early).
Note: you may play Linker3 + Thaumathurge2 version, it works too. Warning: you cannot use spiritual chain during levitation. You must use spiritual chain + lifeline before levitation. Also at some maps, due to height difference + levitate, the spiritual chain will break.
Sage:
.Wiz2 -> linker2 -> thaumathurge3 -> sage2 -> linker3,
or linker3 -> thaumathurge2 -> sage2 -> thaumathurge3.
Shadowmancer:
.Cryomancer1 -> linker2 -> thauma3 -> shadowmancer2 -> linker3,
or linker3 -> thauma2 -> shadow2 -> thauma3.
Enchanter:
.[Pyromancer1 or Cryo1] -> linker2 -> thauma3 -> Enchanter2 -> linker3,
or linker3 -> thauma2 -> Enchanter2 -> thauma3.
Runecaster:
.Wiz2 -> linker2 -> sorcerer1 -> linker3 -> runecaster -> thaumathurge3 (faster level-up), or
Wiz2 -> linker3 -> runecaster1 -> thaumathurge3 -> sorcerer1 (earlier support for party play).
.Wiz2 -> linker3 -> runecaster -> thauma3 -> wiz3
Onmyouji:
.Wiz2 -> linker2 -> thauma3 -> onmyouji3.
On linker3 + thauma3 builds, picking linker3 first allows you to more easily kill bosses with the Spirit Shock skill (mental pressure attribute). Picking thauma3 first allows you to buff stronger (solo farm).
.
Overview Farming Builds - Power
| Build | Link + Burst damage | Cooldown of burst skill matches link? | Able to cycle skills to match cool down? | AoE without link | Bossing damage |
|---|---|---|---|---|---|
| Wiz2 Link2 Thauma3 Feather3 | Very High | Yes | - | Low | High |
| Wiz2 Link3 Thauma3 Sage2 | Very High | No | Yes | Average | High |
| Cryo1 Link3 Thauma3 Shadow2 | High (vs ground), Average (vs flying) | Yes | - | Low | Very High (vs ground), High (vs flying) |
| [Pyro1 or Cryo1] Link3 Thauma3 Enchanter2 | Average | - | - | Average | Average (low speed), High (high attack speed) |
| Wiz2 Link3 Thauma3 Rune [Sorc1 or Wiz3] | Average | No | Yes | Average | Average |
| Wiz2 Link2 Thauma3 Onmyouji3 | Average | No | Yes | Very High | Low |
Recommendation for ease of farm:
-Sage
-Featherfoot
Requires higher magic attack (& more investments):
-Shadowmancer
-Enchanter
-Runecaster
-Onmyouji
Videos - Combo
Show rank 10 farming
Wiz2 Link2 Thauma3 Feather3 click here <<< <<
Cryo1 Link3 Thauma3 Sage2 here <<< <<
Cryo1 Link3 Thauma3 Shadow2 here <<< <<
Cryo1 Link3 Thauma3 Enchanter2 here <<< <<
Wiz2 Link2 Thauma3 Onmyouji3 here <<< <<
(New) Alchemist farmer here <<
Combo
Base skill sequence:
lure mob -> joint penalty -> hangman’s knot (cancel animation) -> swell body (cancel animation) -> burst skill.
Animation cancel:
option 1: release directional movement key and press it again
option 2: jump+directional movement key
Burst Skills
Featherfoot: kundela slash
Sage: micro dimension, ultimate dimension
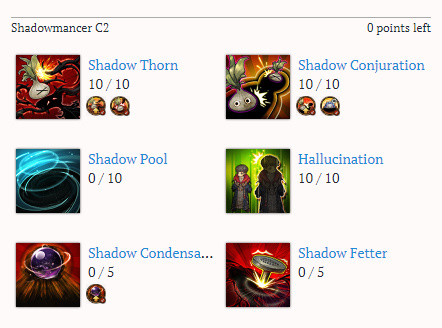
Shadowmancer: shadow conjuration, shadow thorns
Enchanter: no skill, just lightning hands buffed Z-attacks
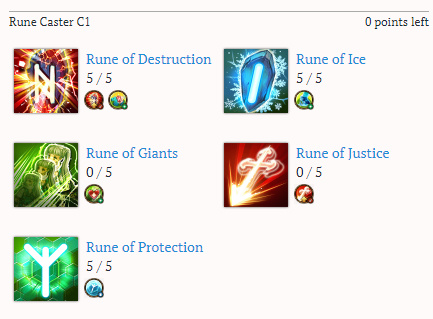
Wizard & Rune caster: rune of destruction, magic missile
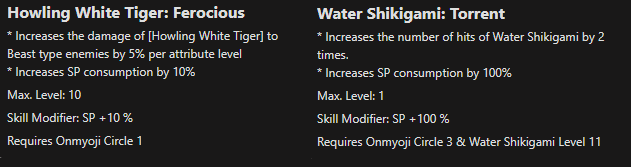
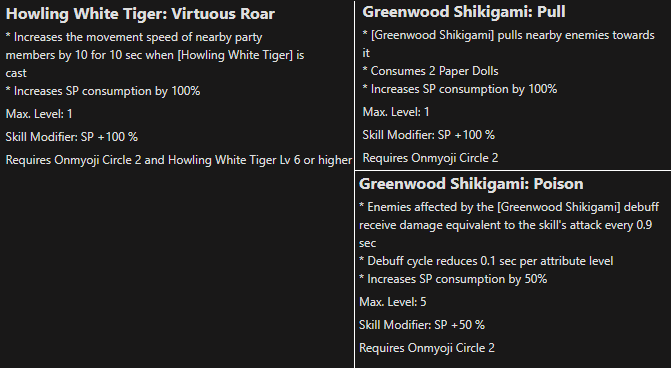
Onmyouji: water shikigami, toyou, white tiger howling, ying yang harmony
Gameplay - Weak points
| Class | Annoyance |
|---|---|
| Featherfoot | Must combo within 3s after casting hangman’s knot --> combo fails with lag. Unable to take Heal Tiles when levitating |
| Sage | Slow and long skill animations |
| Shadowmancer | Weaker vs flying mobs. When linking a mix of ground + flying, must properly target the ground mobs |
| Enchanter | High ping = slow attacks. Requires 660 attribute points to unlock craft: enchant round (required to cast buffs) |
| Runecaster | Must charge skills |
| Onmyouji | Must charge skills. Multi hits of skills breaks link fast |
.
Cards
Green card: Gorkas Card (+50 looting chance at 10 stars, per card)
(recommended): purple card: Tutu card to increase inventory weight.
(optional) purple cards: % chance to restore SP vs specific elemental-type enemies. Pick your most-farmed enemy.
(feather & enchanter) red card: Centaurus card 10 stars.
(optional for enchanters) red card: froster lord card inflicts a debuff (with a % chance) which increases Lightning damage by 50%. This debuff does not proc vs bosses.
AoE attack ratio for Featherfoot & Enchanter
Featherfoot requires 8 AoE attack ratio to hit 8 mobs affected by linker2’s level 10 hangman’s knot. The base AoE of kundela slash is 3, and wizard’s base AoE is 3. Therefore you need to gain +2 AoE attack ratio. Some options: vubbe fighter gloves (+2 AoE attack ratio), or centaurus card 10 stars (+2 AoE attack ratio).
Enchanter works similarly. More AoE = more mobs hit with Lightning Hands during hangman’s knot.
If you are unfamiliar with AoE attack ratio, please read the explanation of Tree of Savior’s Area-skills below.
Explanation of Tree of Savior's Area-skills
AoE mechanics of skills
Tree of Savior skills use 2 different Area of Effect (AoE) mechanics:
- AoE attack and AoE defence mechanic (AoE mechanic)
- Amount-of-Targets mechanic (targets-mechanic)
–1.AoE mechanic explanation
.A.Depends on your AoE attack ratio (F1 status window). Wizards have 3 AoE attack ratio (AoE-atk) base. AoE-atk may be increased by equips, buffs, and potions.
.B.Uses enemy AoE defence (AoE-def) ratio:
Small enemies have 1 AoE defence ratio.
Medium size enemies have 2.
Large have 4.
Bosses have 5 AoE defence ratio.
Calculation of targets hit =
.I. Inside your skill AoE area, the target with the highest AoE-def will be hit first.
.II. Substract their AoE-def from your AoE-atk.
.III. If your remaining AoE-atk is sufficient, your skill will hit the next enemy.
If your AoE-atk is 0, no more enemies will be hit by the skill.
–2.Target mechanics explanation
.The skill will ignore AoE mechanics.
.Skill will always hit the amount of indicated targets (on skill description), 1 enemy = 1 target.
Advantage: ignores enemy’s AoE-def.
Disadvantage: you cannot increase the amount of targets hit with equipment, buffs or potions.
.
English skill planner site
View skills and skill power at several skillplanner sites. Click on the class icons to select a class. Click on the skill icons (left click or right click) to add skillpoints.
(English, recommended) NEW Steam Server skill simulator site: click here <<<
(English) by Thai-TOS skill simulator site: here << click
(English) by TOSCAMP skill simulator site: here <<
Important Skills for farming
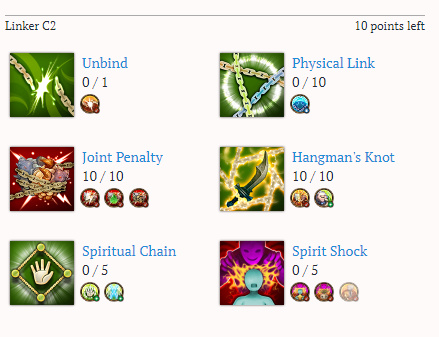
Linker <<< click here
Linker3:
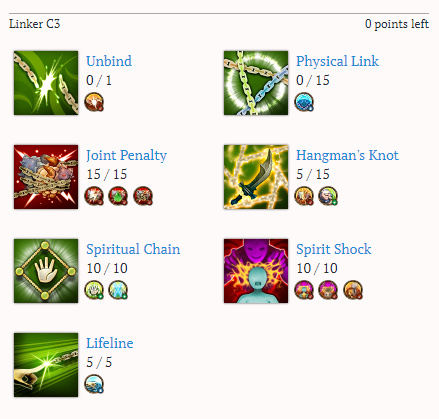
Linker2:
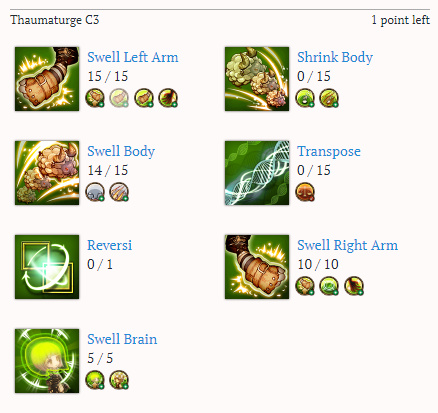
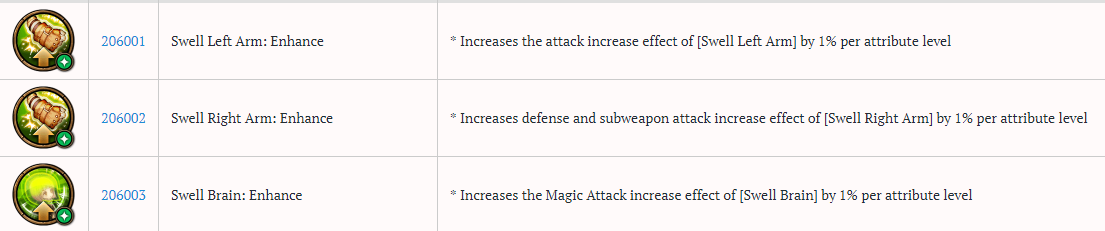
Thaumathurge <<<
Priority: strongest buffs + amount of linked targets must match swell-body targets. This is the basis for the skill distribution.
Linker2 + Thaumathurge 3:
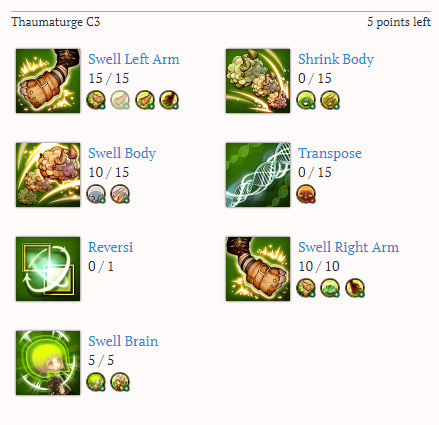
Linker3 + Thaumathurge 3:
Sage <<
Offensive skills are maxed. Dimension compression is used vs bosses. Combo: spirit shock -> dimension compression (full charge).

Shadowmancer <<
Offensive low cooldown skills are maxed, and shadow hallucination is maxed to provide a longer duration clone (shield).
Enchanter <<
Minimum skill requirements:
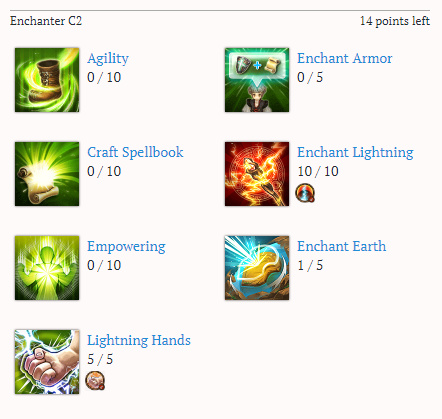
Fill remaining skills according to your preference.

.
Attributes
Linker << click here
Max when possible, order of priority:
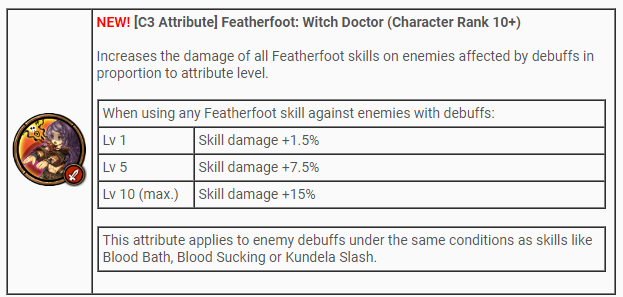
(featherfoot) Hangman’s Knot - Focused attack
(featherfoot) joint penalty: poison
(enchanter) joint penalty: Lightning
(onmyouji) joint penalty: Earth
(linker3 vs boss) spirit shock: mental pressure
Finally, you should max all listed attributes of linker, list:


Shadowmancer <<
Priority:

The shadow hallucination attribute increases HP by 6% per attribute level.


Onmyouji <<
Priority:
Then:
For genbu armour users:

.
Filler classes - skills and attributes
Wiz2 & Rune Caster <<
Wizard
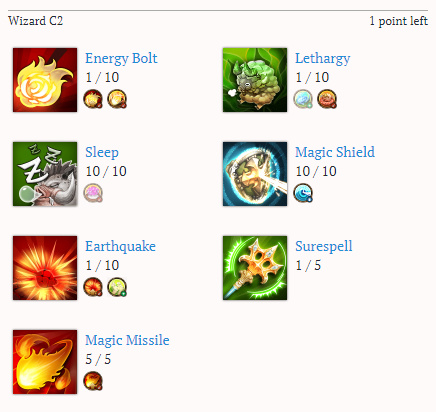
Sleep: dream eater for rune caster and sage builds. Combo: Sleep + [Rune of Destruction or sage skills].
Rune Caster
Tip:


.
Choice of second ranks
Text << click here
. [Sage, Rune caster, Featherfoot, Onmyouji] + Wizard2: surespell
Sage: Dimension Compression (bossing skills) requires 3s charging for max damage.
Featherfoot: blood sucking is a channeled skills. Without surespell it cancels when you receive damage.
Rune caster, Onmyouji: skills require charging. Without surespell, charging cancels if you take damage.
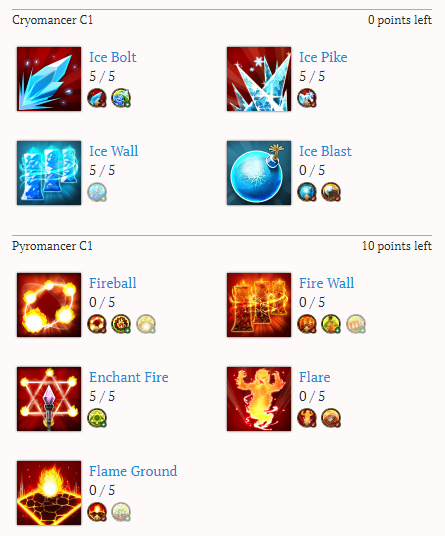
.Cryomancer or Pyromancer + Shadowmancer
Pyromancer provides enchant fire. Enchant fire adds a small amount of fire damage to each hit. Shadowmancer’s hitcount on skills is low. Cryomancer provides a shield-passive attribute. Farming builds should wear a shield to increase survival.
.Pyromancer or Cryomancer + Enchanter
Pyromancer advantage: free enchant fire (may be replaced by skill scrolls from market), craft enchant fire scrolls to sell
Cryomancer advantage: fill missing enchant fire with skill scroll, frozen mobs take 50% bonus damage from Lightning attacks (Lightning Hands). An alternative is using (red card) froster lord cards, however the chance to apply Frostbite through froster card is lower than the freeze chance of cryomancer’s skills.
.Sorcerer1 or Wizard3 + wiz2-link3-thauma3-runecaster
Sorcerer advantage: a summon to tank some damage, summon automatically attacks to provide consistent damage. Cat buff is very strong.
Wizard3 advantage: unlock lethargy-Strike attribute to boost strike-type damage, stronger magic missile filler skill, free quickcast (instead of thaumathurge3’s swell brain-quick cast attribute), longer Sleep debuff.
Sorcerer's Cat buff information << click here
The Cat provides the following buffs, for each skill lvl (each buff’s duration = 300s):
Lvl 1:
+10% of your SP regen as bonus SP regen,
-6 seconds between each SP recovery tick when standing,
-3 seconds on each recovery tick when sitting.
Lvl 2:
+20% of your SP regen as bonus SP regen,
-6 seconds between each SP recovery tick when standing,
-3 seconds on each recovery tick when sitting,
+2 AoE attack Ratio.
Lvl 3:
+30% of your SP regen as bonus SP regen,
-6 seconds between each SP recovery tick when standing,
-3 seconds on each recovery tick when sitting,
+3 AoE attack ratio,
+0.5 stamina recovery every 2 seconds when not moving.
Lvl 4:
+40% of your SP regen as bonus SP regen,
-6 seconds between each SP recovery tick when standing,
-3 seconds on each recovery tick when sitting,
+4 AoE attack ratio,
+0.5 stamina recovery every 2 seconds when not moving,
+40 Magic defence.
Lvl 5:
+50% of your SP regen as bonus SP regen,
-6 seconds between each SP recovery tick when standing,
-3 seconds on each recovery tick when sitting,
+5 AoE attack ratio,
+0.5 stamina recovery every 2 seconds when not moving,
+50 magic def,
+50 dark property attack.
More options for wiz2-link3-thauma3-runecaster’s final rank
.Warlock1: mastema debuff boosts Holy damage, useful for rune of justice and useful to support clerics. Dark theurge spirits block some hits. Pole of agony is a high multi hit skill to apply card effects.
.Cryomancer1: shield passive and freeze mobs.
.Sage1: missile hole buff. Micro dimension and ultimate dimension to add to combo cycle.
Feather, Sage, Shadow, Enchanter: circle choice
Sage’s strongest burst skill Dimension Compression unlocks at sage2 and maxes at 5. Sage3 only increases the levels of micro dimension and ultimate dimension. Sage2’s level 10 skills are strong enough to farm.
Similar reason for shadowmancer and enchanter.
By leaving out their third circle, you gain linker3. Linker3’s spiritual shock attribute (mental pressure) is very valuable vs bosses. Linker3 unlocks additional support skills for party play. Disadvantage of linker3: difficult to aggro 10 mobs (especially on regular maps) to match joint penalty 15’s target-count.
Featherfoot3 + linker2: featherfoot gains very strong attributes at its third circle. Thaumathurge3 is kept to gain the strongest buffs. Same reason for onmyouji3.
.
Overview Farming Builds - Utility
Farming builds are similar. Therefore you could make a decision by looking at its remaining skills and party-play skills:
| Class | Survival | Support | More |
|---|---|---|---|
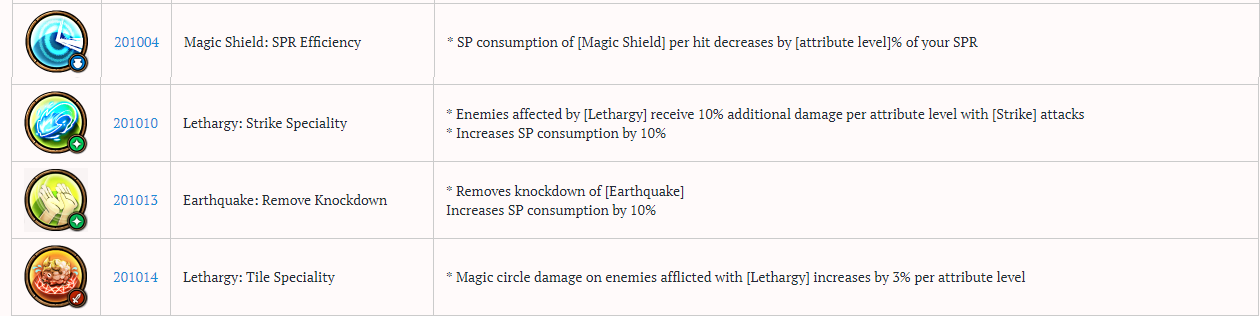
| Wizard2 Wizard3 | Magic Shield reduces 20% incoming damage, Sleep debuff on ground mobs, Earthquake knock up, Energy bolt knockback | Lethargy (and attribute wiz2) increases damage of tile-based skills, (wiz3) lethargy attribute increases strike-type damage (wiz2) Surespell, (wiz3) quickcast | - |
| Cryomancer1 | Freeze mobs, Shield passive attribute increases magic defence and ice resistance | Frozen mobs receive +50% Lightning damage | |
| Pyromancer1 | - | Enchant fire is shared through spiritual link | Pyro-enchanter builds may craft enchant fire scrolls |
| Linker2 Linker3 | Joint Penalty + attributes increase damage, Hangman’s Knot + attribute increases damage on mobs, Spiritual chain shares several buffs and attribute buffs magic damage, Spiritual chain + lifeline shares party stats, (linker3) spirit shock’s attribute decreases magic def by 25% | - | |
| Thaumathurge3 | Transpose swaps INT and CON | Thaumathurge buffs | Requires magic powder |
| Sorcerer1 | Summon is able to tank some mobs, some summons have CC | Each summon may be targeted by 5-8 enemies, Cat buff | Requires Boss card for Grimoire |
| Runecaster | Rune of Giants increases HP & Def (for 1 player, recommend yourself) | Rune of Destruction’s 15% magic defence decrease, Rune of Protection+Linker’s Spiritual Chain prevents knock-effects for party, Rune of ice to support ice skills of party | Requires runestones to cast skills |
| Warlock1 | Dark theurge spirits block some hits | Mastema debuff boosts holy damage, pole of agony’s high hitcount to apply card effects | - |
| Featherfoot3 | Drain HP of beasts, demons and insects. Levitate vs melee | Bone Pointing (and Kurdaitcha) debuffs with Curse, which increases Dark-Elemental type damage by 50%. Bone pointing decreases magic def. Blood Curse debuff heals allies for a % of the damage they deal | - |
| Sage2 | Missile hole blocks magic & ranged | Missile hole vs magic & ranged for party | Able to save up to 6 warp-points, open warp-shop |
| Shadowmancer2 | Shadow Hallucination’s (with attribute) clone is a temporary max HP increase and blocks flinch effects (using bonfire + sit with clone works) | Shadow Fetter binds bosses | Quest to unlock bonus costumes |
| Enchanter2 | Enchant Earth provides players and summons the ability to block without a shield | Buffs: Agility, Empower, Enchant Lightning, Enchant Earth | open spellshop, craft skillscrolls |
| Onmyouji3 | Genbu Armour redirects damage to SP pool, tiger briefly stuns mobs | Tiger easily taunts mobs, tree pulls mobs, toyou (attribute) may knock down mobs, high multi-hit AoE skills proc card effects easily | Big AoE allows you to easily farm lower level maps and Hunting Grounds without requiring link |
Tips
Aukuras tip
Instead of using any blue cards, my farmers use Level 1 Aukuras scrolls (have pardoner to make scrolls). The HP recovery is surprisingly high due to high SPR (or INT) builds of Farmer Wizard. Aukuras scrolls are cheaper than potions and replace HP potions. Aukuras scrolls are sold at the market too.
Gem tip
Bring a gem to level (warning: gems drop when you die at Hunting Grounds). Whenever mobs drop (blue) equips, feed it to the gem to decrease inventory weight. Move to a safe spot in the map (regular maps), or exit the map to a safer map if it is impossible to find a safe spot. Sit and feed blue equips to gem. Keep primus (weapons), feed blue, and dismantle bad purple-identified (more powder than blue). The gem exp per item matches the item’s required level to wear (level 380 item = +380 gem exp).
Warpstone tip
Use a warpstone to travel instantly to your current map’s entrance. The warpstone is not consumed (15 min cooldown). Find it at your inventory - quest item section. You may combine this tip with the ‘gem tip’ mentioned above.
Warp Scroll Hunting Grounds tip
Some hunting ground maps take long to walk to. Use TP to buy warp scrolls at the TP shop (Letitia NPC). You receive 1 free TP every 4 hours - up to 5 TP max. Each warp scroll costs 2 TP. Use the warp scroll inside the hunting grounds to create a warp-point. Warp to town (or any other statue) and next time you may warp back to the inside of the hunting grounds again.
Regular map + Basecamp
On regular maps, use basecamp to increase buff duration and get a free warp. Look for the Camp-icon near your character’s name-HP-SP bar. Basecamp is a Squire (swordsman class) skill. Build a basecamp to make a warp-spot (free telepor --without cooldown – for you and party members to the basecamp). Buffs cast near the basecamp are tripled in duration. Optional: squire’s may build a food table at the base camp. Eat (maxed attribute) food to gain various buffs. The buffs lasts for over 30 minutes and do not disappear when you leave the map.
Food buffs << click
Each food provides a different effect:
+32.5% max HP (useful for entering difficult Hunting Grounds: Nazarene Tower and Baubas Cave)
+32.5% max SP (useful if SP pool is low --low SPR+high SP cost builds)
-10 seconds of HP recovery cycle (useful)
-10 seconds of SP recovery cycle (useful)
+3 AoE attack ratio (recommended for featherfoot)
+AoE defence ratio (never take this buff), a higher AoE defence ratio means mob’s AoE attacks hit you first
Rubbing Buff
Pay silvers to the Fishing-Statue at the left-side of the very North of Klaipeda to gain a Looting Chance buff.
Unbuff tip
Right click your buff icon to remove the buff. Useful for: thaumathurge’s transpose, featherfoot’s levitate (cannot take heal tiles).
Cast-cancel tip
Applies to skills which require casting. When you have charged your skill but would like to cancel it, use jump. Useful on: onmyouji, runecaster, wizard.
Skill after-animation cancel
Press a skill to activate it and immediately jump to shorten the skill animation. Useful on: thaumathurge buffs, and most skills.
Thaumathurge
.Swell body also doubles EXP and Silver drops. Always swell glowing mobs, you will get a lot of drops, silver & exp.
.Swell does not affect elite mobs or bosses.
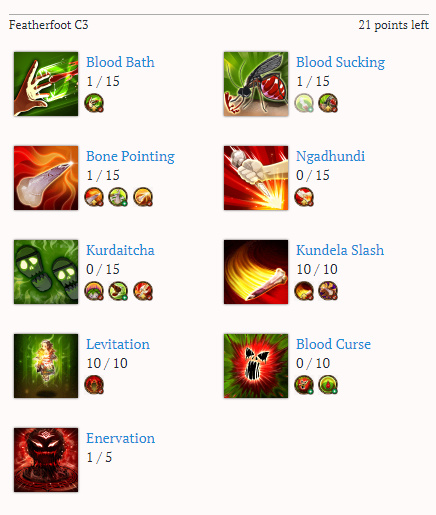
Featherfoot tips
.Level 1 Bloodsucking is sufficient to recover HP to full - just keep channeling. Once you have hit your bloodsucking skill and started the channel, mobs still get damaged by bloodsucking when they move away from you.
.The Enervation skill does not hit flying mobs. Find a ground-mob to cast it, and drain it to recover HP. The remaining featherfoot skills hit flying enemies.
.Enervation debuffs mobs. Debuffed mobs become aggressive and walk to you. Used as a soft-taunt vs mobs.
.During Levitation you cannot recover HP with Bloodbath. During levitation you cannot get heal tiles from clerics.
.Bone Pointing inflicts a Curse (hex) debuff. This debuff increases Dark Damage by 50% on the debuffed enemy, and decreases their magic defence by a %. The % magic def decrease is unknown, but I think it is the same as Bokor’s hexing (cleric class). Level 15: decrease magic def by around 10%.
Sage
.Save your most-farmed locations with the portal skill. Each location becomes a free warp, on a 30 minute cooldown. Sage warp-shop does not have a cooldown, but you cannot use your own warp-shop on the selling character.
.(vs boss) wait properly after each micro dimension cast video explanation here<<
Sage & Runecaster
Use Wizard2’s Sleep:Dream-Eater attribute after linking ground mobs to double damage of sage skills and Rune of Destruction.
Enchanter
With Lightning Hands buff, jump and attack to move&attack simultaneously. Lures mobs faster.
Sage & Enchanter: shops
Open shop when you log off.
Shadowmancer
.Use shadow hallucination and sit + place bonfire. Your character will not get interrupted and continue to recover HP & SP through the bonfire until the clone dies. With high SPR, your SP pool fills in 3 seconds. Bonfires are cheaper than potions. Maxed attribute clone’s HP is 80% of your maximum HP.
Onmyouji
.Ying Yang Harmony does not hit when mobs move too close to your character. Move back to create a bigger distance after using Swell Body to properly hit the Ying Yang skill.
.Use Tiger to easily Taunt and lure mobs.
Hunting Grounds - Farming spots inside map tip
Hunting Grounds 340: Nazarene Tower easy farm spots
Recommended Magic attack after buffs: 3000+
Click to view map <<click
.
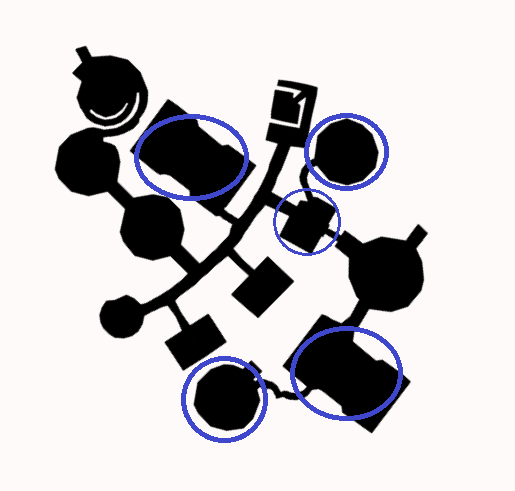
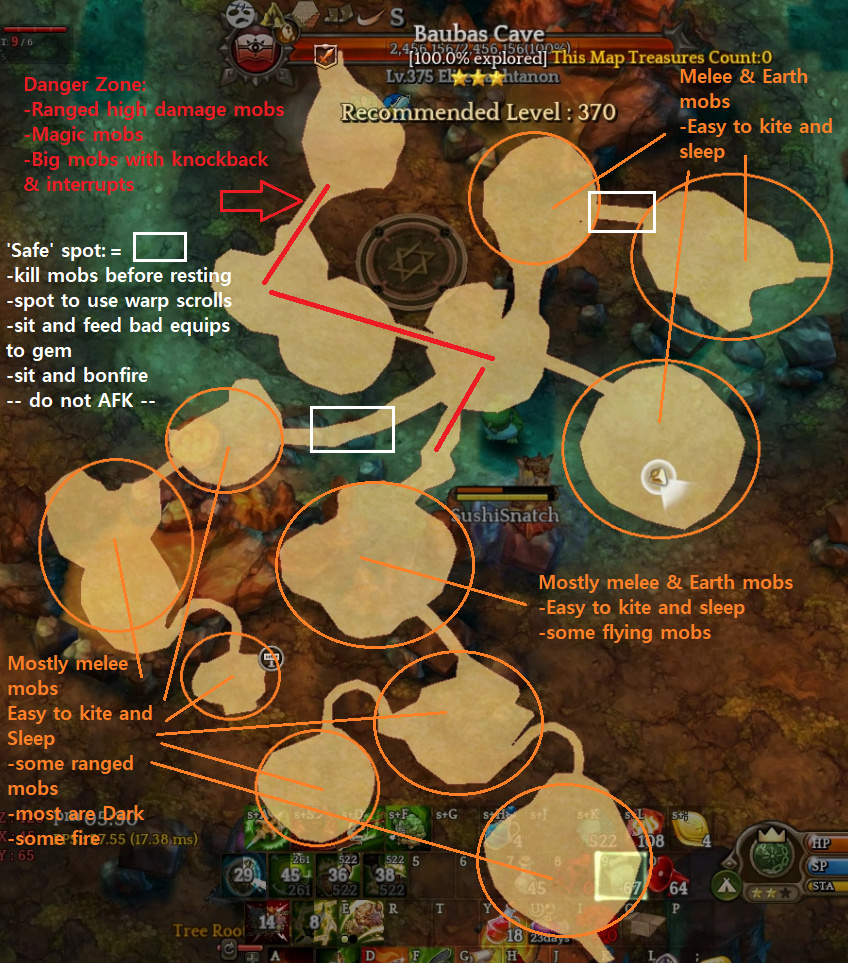
Hunting Grounds 370: Baubas Cave farm spots
Recommended Magic attack after buffs: 4500+
Other info
Hunting Grounds
Information << click here
Locations : to enter a hunting ground, find the warp-orb portal and use spacebar to interact. You will be teleported to the hunting grounds map. Everyone may enter the hunting grounds, even if your level is too high or too low. Use this tosbase world map<< to find locations.
-Tavorh Cave Lv 100+’ . Video, entrance at Seir Rainforest.
-Narcon Prison ‘Lv 150+’. Video, entrance at Gytis Settlement Area.
-Natarh Watchtower ’ Lv 170+’. Video, entrance at Dina Bee Farm.
-Tatenye Prison ’ Lv 190+’. Video, entrance at Ruklys Street.
-Neighport Church East Building ‘Lv 210+’. Video, entrance at Stogas Plateau.
-Sjarejo Chamber ’ Lv 230+’. Video, entrance at Woods of Linked Bridges.
-Netanmalek Mausoleum ’ Lv 240+’. Video, entrance inside Sjarejo Chamber.
-Rancid Labyrinth ’ Lv 280+’. Video, entrance at Grynas Hills.
-Balaam Camp Site ’ Lv 300+’. Video, entrance inside Rancid Labyrinth.
-Michmas Temple ’ Lv 320+’. Video, entrance inside Balaam Camp Site.
-Nazarene Tower ’ Lv 340+’. Video, entrance inside Natarh Watchtower.
Rank 10: Baubas Cave ‘Lv 370+’ . Video, entrance at Mochia Forest
.
More resources
How to Unlock Shadowmancer & Runecaster guide here <
Rusiky’s forum guide -Farm end game equips with farmer build- here <<
Level 170 Hunting Grounds - Natarh Watchtower detailed Guide here < click
Linker overview + Old rank 9 farm builds here <
[Level 370+] Materials (farming spots) for new Novaha & Nicopolis raid guide here <
[Level 350+] Materials for Masinios items here <
[Level 300+] Materials for 315 orange items here <
 You could pick thauma1 but your link-target-count will not match your Swell-body count so you will swell 5 out of 10 linked mobs if you are linker3. Without thauma3 buffs you need a stronger weapon to compensate for the loss of magic attack, especially if you would like to farm at higher level Hunting Grounds (340 & 370). Compared to thauma3-farm builds, farming at regular maps is easy for linker3 + thauma1 as well, just less doubled drops.