Updated on July 25 2018
This patch is LIVE on Steam Tree of Savior.
Dungeon level rework
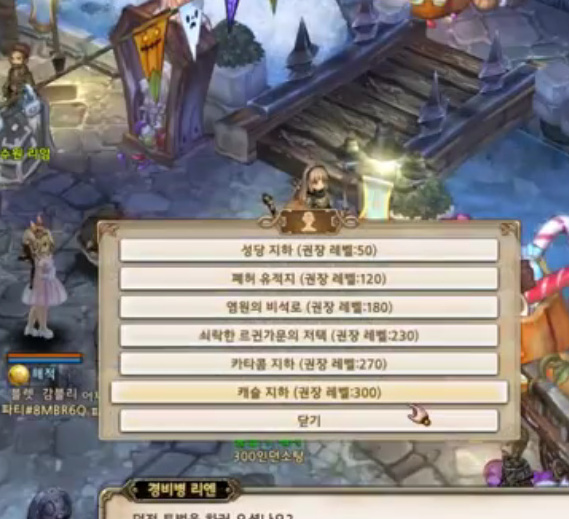
Dungeon was reworked. All dungeons are accessible at Klaipeda now. It is still a daily.
Level 50 Cathedral dungeon.
Level 120 Historic site Ruins dungeon.
Level 180 Monument of Desire dungeon.
Level 230 Fallen Legwyn Home dungeon.
Level 270 Underground Catacombs dungeon.
Level 300 Castle dungeon.
Level 330 Ranko Waters Dungeon
Instanced Dungeons
-Instanced Dungeons include the following minimum Rank entry limit:
Underground Chapel Dungeon (Lv 50) - Rank 2
Historic Site Ruins Dungeon (Lv 120) - Rank 3
Monument of Desire Dungeon (Lv 180) - Rank 4
Fallen Legwyn Family Dungeon (Lv 230) - Rank 5
Underground Catacombs Dungeon (Lv 270) - Rank 6
Castle Dungeon (Lv 300) - Rank 7
Ranko Waters Dungeon (Lv 330) - Rank 8
Click for image of the dungeon selection screen
Note: the npc will show your ’ most optimal dungeon ’ on top, in the User Interface.
Example: your character is level 60, the NPC will show the lvl 50 dungeon on top of all the other dungeons. Press space bar repeatedly to easily open it.
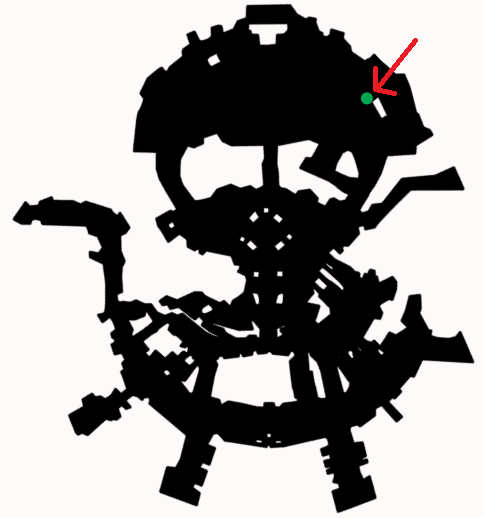
Dungeon NPC location

Dungeon Mechanic
Mobs do not give any exp or silver anymore (a very long time ago they did). Killing mobs will give you bonus ‘score’.
If you have a lot of score, defeat the boss to receive extra cubes. Please defeat the Boss AFTER you clear mobs.
Cubes cannot be rerolled anymore. Once you defeat the boss, you will receive all EXP and Silver at once, during the reward screen, based on your score. When you defeat the boss, 1 dungeon run count is subtracted.
Tip: use your experience buffs or vouchers right before the boss dies. You only receive rewards and EXP from the boss (boss reward increases with your % clear). Do NOT activate exp buffs when you are clearing mobs, you will waste precious exp buff timer.
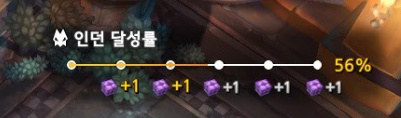
Example: defeated several mobs (56% of mobs cleared) = +2 cubes (if you defeat the boss).
The yellow inside the white bar indicates progression.
Once you clear the boss, you will receive your final results and the rewards (left side of image):
Silver reward, cube amount reward, exp, class exp. The red button is Return to Town.
Note: highest rank is S rank (100% clear). If you have 100% clear and kill the boss, you will get 6 cubes.
Please note this image shows 99% clear rate, which means I missed 1 mob. 

Tip:
- After reaching a completion rate of 95% inside an instanced dungeon, the map will show the location of the remaining monsters.
Dungeon run
Most effective parties will demand to split and each member will clear one area of the dungeon, and one member clearing the boss once you have 100% clear. This will be a lot faster, because the mobs will not give exp or silver anyway. Once the boss is defeated, all party members will receive the same amount of rewards (depending on the clear % rate). To receive the rewards, you do not have to be near the boss when it is defeated.
Note: S = start point , B = Boss (kill boss to receive rewards)
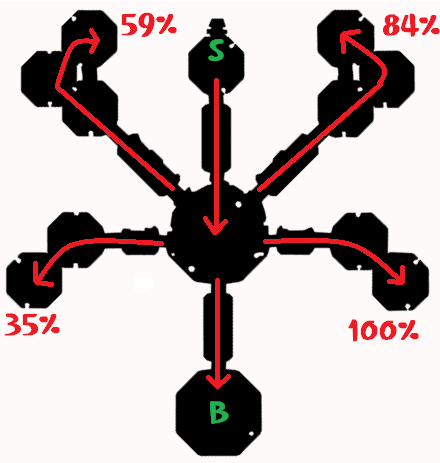
Level 50 dungeon route
Each arrow indicates 1 party member (solo clear). The middle path is fastest, so this player could clear some mobs around the boss. There are mobs around the boss, please try not to accidentally kill the boss before you have cleared those mobs.
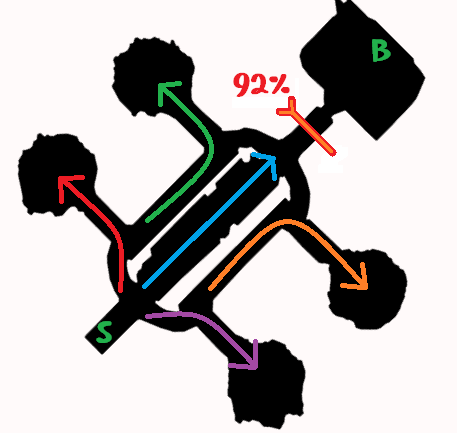
Mob specific tip: the flying desmodus on the middle path will explode when they die. They inflict a bit of damage to you if you are at melee-range. The ghost mobs on the West-side of the map can freeze. The panto wizards on West-side use Slow. On the East-side, the archer mobs will throw spikes (caltrops). If you touch those caltrops, your character will be knocked down.
Level 120 Dungeon route
Split into 2 groups, have a group take the blue route and another group the red route.
There are mobs around the boss, please try not to accidentally kill the boss before you have cleared those mobs.
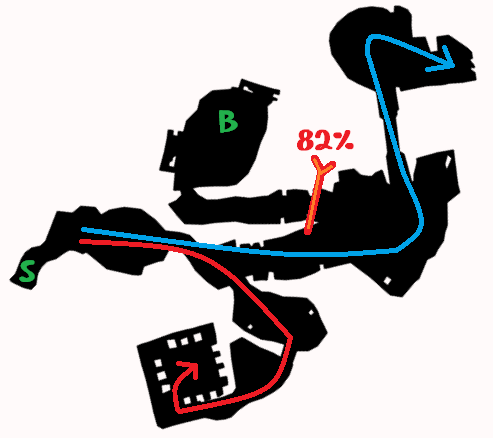
Mob specific tip: the birds on the South are most dangerous. They use a multi-hit knockback flame attack which interrupts and cancels skills.
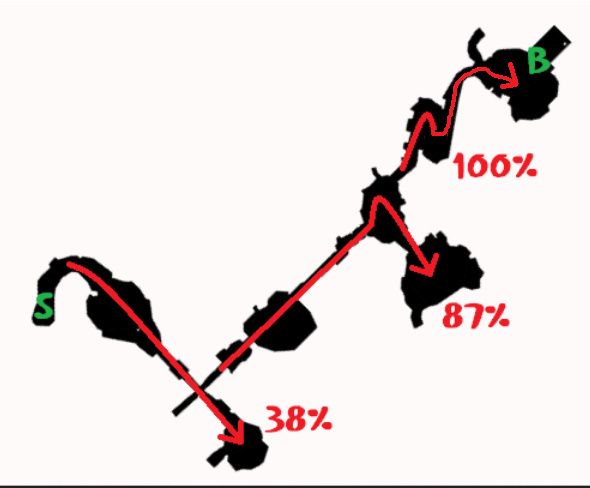
Level 180 Dungeon route
There are 2 bosses in this dungeon. The first boss is at the ’ 87% clear’ spot. Killing the first boss does not end the dungeon. There are mobs around the last boss (at the 100% spot), please try not to accidentally kill the boss before you have cleared those mobs. Killing the last boss will calculate your score and end the dungeon.
Level 230 Dungeon route
The location of mobs has been changed since the rework. The arrows shows the path you should take to encounter all mobs.
For the Legwyn dungeon (level 230 dungeon), you don’t have to kill the mineloader boss (at the 44% spot) to get any extra rewards. Clear all mobs (100%) -> defeat harpeia = full cube, silver, exp rewards.
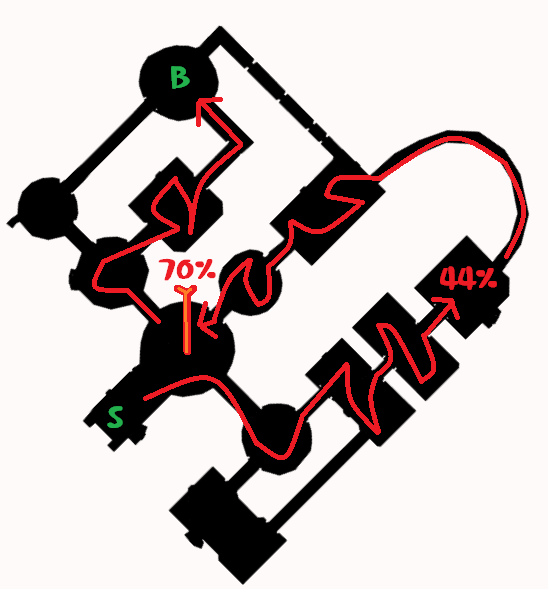
Mob tip: the Maiden mobs at the middle of the map use Freeze. They can perma-freeze you if you are surrounded. The mobs at the West-side use Sleep around them (the flying dark reaper mobs). They will only use Sleep once, during their first receival of damage. Wait a bit to avoid it (on melee characters).
Level 270 Dungeon route
Split each member and clear the areas.
Mob tip: the flying ghosts use Sleep when they are attacked. They use Sleep once. Wait a bit to avoid it. The Worm mobs use Burrow to become invisible and avoid targeted-skills. Use non-targeted or AoE skills at their hiding location to kill them. Or wait until they re-appear.
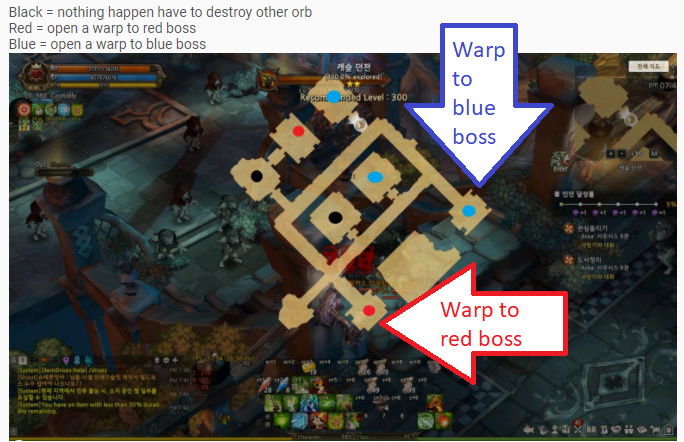
Level 300 Dungeon route
About dungeon 300: this dungeon boss is different. There are 2 separate bosses: flying lavenzard, and armaos. You cannot defeat both bosses, you must select 1 boss. Inside the dungeon you will see objects named ‘Orbs’. You can damage the orbs to destroy the orbs. If you destroy the correct orb, you can go to the bottom South-East of the map (Lavenzard), or go to the upper North-East (Armaos) to find a warp to the boss. Once 1 magic teleport circle to a boss has appeared, another one will not appear even if you destroy more orbs.
About orbs: it does not fail the dungeon if you destroy the wrong orb. Just get the right orb to open warp to boss after destroying the wrong orb. The boss you pick does not affect the cube because there is only 1 type of cube (dungeon 300 cube). Pick the easiest boss for your class & party! Usually players pick the Lavenzard boss.
The image shows the recommended orb. This orb will open a teleporter magic circle to the flying lavenzard boss.

Orbs and teleports
Teleporter magic circles appear after you destroy the correct orb.
Teleporters: bottom South-East of the map for Lavenzard, or upper North-East for Armaos.
Tip: if you are far away from the Lavenzard teleport magic circle, use the Warp Stone inside your inventory (quest items). Your character will be teleported to the starting point of the dungeon, it is closer to the teleporter.
Warp stone:

Image modified, tip from @arkgolf
Level 330 Dungeon Route
Dungeon Silver reward
If you have 100% clear, and then defeat the boss, you will receive the max amount of silver. Example: 100% clear on dungeon 50, and defeat the boss = 40k silver reward (and more cubes).
Note: the silver is no longer shared, because it is not dropped by mobs, but a direct reward after you finish. Everyone will receive the same amount of (silver) rewards!
On 100% clear:
Level 50 Cathedral dungeon: Max 40k silver.
Level 120 Historic site Ruins dungeon: Max 90k silver.
Level 180 Monument of Desire dungeon: Max 134k silver.
Level 230 Fallen Legwyn Home dungeon: Max 167k silver.
Level 270 Underground Catacombs dungeon: Max 200k silver.
Level 300 Castle dungeon: Max 220k silver.
Level 330 Ranko Waters dungeon: max 250k silver.
Instanced Dungeons Silver Penalty
- Similar to EXP penalties, Instanced Dungeons will now include a silver penalty according to the player’s character level
-The silver penalty will be applied separately to each party member according to their level.- 100% silver can be acquired if the level difference is no more than 30.
- If the difference is over 30, the amount of silver that can be acquired will decrease 2% per level.
- No silver will be acquired if the level difference is 80 or higher.
Drops from dungeon cube
Cube cannot be re-opened.
Dungeon 50 Cathedral Cube << click
Weapons:
Level 40 blue weapons
Silver Falchion, view item
Mandrapick, view item
Ice rod, view item
Iron bow, view item
Wide crossbow, view item
Five hammer, view item
Secondary hand:
Recipe - beetleback, view here
Arde dagger, view item
Dratt shield, view item
Recipe - knotted armband view here
Armour: none
Accessory:
Recipe - Magic Talisman, view here
Recipe - Strength Pendant, view here
Auru medal, view item
Platina medal, view item
Plants bracelet, view item
Recipe - control bangle, view here
Broken anti-dark property bracelet, view item
Slightly Broken Anti-Cold Property Necklace, view item
Other drops:
Instanced dungeon clear voucher (1 star), view item
Talt
Opal
Zircon
Enhance hair accessory scroll, view item
1 star gem (yellow, red, blue, green)
silver bar
gold bar
mercury
shadowgaler card view item
Sapphire
Dungeon 120 Historic site Ruins cube <<<click
Weapons level 120 blue, purple, red/orange:
Maledic, view item
Recipe - Valia view here
Recipe for Tilly weapons view here
Recipe for Seimos weapons view here
Secondary hand:
Ledas shield view item
Armour:
Turn items view here
Accessory:
Recipe - petamion view here
Petamion (yes this is separate drop) view item
Recipe - Agny necklace here
Recipe - Anti Dark Property Necklace view here
Recipe - Anti Cold Property Bracelet view here
Others:
Instanced dungeon clear voucher (1 star), view item
Talt
Opal
Zircon
Enhance hair accessory scroll, view item
1 star gem (yellow, red, blue, green)
silver bar
gold bar
mercury
Necroventer Card view here
Dungeon 180 Monument of Desire Cube Drops <<<
Weapons level 170 blue, purple, red/orange:
Recipe - Hell and Heaven view here
Recipe - Grajus view here
Recipe - Viper view here
Recipe - Drake tail view here
Recipe - Isbality view here
Recipe for Khasti items view
Recipe for Catacombs items view here
Recipe - Ignition view here
Recipe for Magas items view here
Recipe for Maga items view
Aston weapons view here
Recipe - Brandish view here
Vienie items view here
Secondary hand:
Recipe - Manamana view here
Recipe - Aias view here
Rcipe - Venom view
Recipe - Otrava Shield view here
Superior Aston pistol view item
Armour:
Tyla items view here
Recipe for Roxona items view here
Accessory:
Recipe - Max Petamion view here
Recipe - Sissel Bracelet view here
Recipe - Animus view
Other:
Instanced dungeon clear voucher (1 star), view item
Talt
Enhance hair accessory scroll, view item
silver bar
gold bar
mercury
Flammidus Card view item
Mithril ore view here
Dungeon 230 Fallen Legwyn Home cube drops
Weapons
Recipe - Magi Shamshir, view here
Recipe - Vienie Twin blade, view here
Recipe - Light Gorithos, view here
Recipe - Didel kracked shooter, view here
Recipe - Didel burawa, view here
Recipe - Vienie Corseca, view here
Recipe -Artie Snake Staff, view here
Recipe - Slaake Dual rapier, view here
Recipe - Vienie musket, view here
Recipe -Artie snake rod view here
Recipe - Duris Twin blade view here
Recipe - Hell’s demon pike view here
Vitt corona rod view item
Vienie koperon sword view item
Duris Twin blade view item
Hunting Wreech Bow view item
Light Kracked shooter view item
Dark Burawa view item
Slaake Corseca view item
Duris Demon Pike view item
Coro Epee view item
Tevhrin weapons view here
Secondary hand
Recipe - Vienie revolver view here
Recipe - Enhanced Vista cannon view here
Recipe - Didel tower shield view here
Alemeth tower shield view item
Vienie revoler view item
Critti Cannon view item
Armour
Elkosh set items view here
Ibre set items view here
Intasurta gloves view item
Recipes for Virtov items view here
Accessory
Kranto Bracelet view item
Other
Instanced dungeon clear voucher (1 star), view item
Mineloader card
Harpeia card
Talt
Ruby
Zircon
Opal
1 star gem (yellow, red, blue, green)
silver bar
gold bar
mercury
Lvl 3 gem abrasive view item
Dungeon 270 Underground Catacombs Cube <<
Weapons
None
Secondary hand
None
Armour
None
Accessory
None
Other
Instanced dungeon clear voucher (1 star), view item
Manticen Card
Talt
Mithril
Ruby
1 star gem (yellow, red, blue, green)
silver bar
gold bar
mercury
Lvl 3 gem abrasive view item
Dungeon 300 Castle Cube
Practonium weapon 315 recipes
Recipes for all level 315 weapons which require 1 practonium to craft and 2 practonium to craft:
Recipe - Pierene Sword
Recipe - Abdochar
Recipe - Gale Slasher
Recipe - Sarkmis
Recipe - Windia Rod
Recipe - Heart of Glory
Recipe - Vienarazis Staff
Recipe - Regard Horn Staff
Recipe - Aufgowle Bow
Recipe - Astra Bow
Recipe - Silver Hawk
Recipe - Regard Horn Crossbow
Recipe - Vienarazis Mace
Recipe - Skull Smasher
Recipe - Pygry Spear
Recipe - Wingshard Spear
Recipe - Sacmet
Recipe - Regard Horn Pike
Recipe - Double Stack
Recipe - Aspana Revolver
Recipe - Dragoon Piper
Recipe - Emengard Musket
Recipe - Lionhead Shield
Recipe - Emengard Shield
Recipe - Lionhead Dagger
Recipe - Emengard Dagger
Recipe - Blood Stealer
Recipe - Lionhead Cannon
Recipe - Emengard Cannon
Recipe - Elga Rapier
Recipe - Black Horn
Recipe - Vienarazis Two-handed Mace
Recipe - Skull Breaker
Find them here
Accesory & Armour: none
Others
Talt
Artilonium, view item
Lavenzard card
Armaos card
Riteris Card
Molich card
Dungeon 330 Ranko Waters Cube<<<click
this dungeon does not drop any equips or accessories.
Droplist:
-Talt
-Andesium (red round ore item)
-Ionium (yellow round ore item)
-Pheltremin (the green bar)
-Ulstermite (the red bar)
-Terranium (red ore)
-Phydecium (green ore)
-Bosscard Barle King (+5 Healing Power per star) image here
Tip: to open cubes faster, put your cube on a hotkey (such as keyboard key A). Repeatedly press the Key to open many cubes. You do not have to close the pop-up of your reward, just keep pressing.
Credits: Dungeon images from KTOS Inven forum
 I got aspana recipe there haha


