Hello, this is a thread to compile and share information about the dark wizard builds. This covers Warlock, Shadowmancer, Featherfoot, and Bokor. Dark wizards are my favorite kind of wizards and it is very hard to find any info about how they work, so I hope this thread will help newer players and that you’ll help me too by adding the info I don’t know about.
Note that I won’t cover the Summoner build (FF Sorc Necro) as there is already a very comprehensive guide there : Crevox's Summoner Build Guide 🦇
Quick Classes Overview
 WARLOCK
click here
This class revolves around spawning evil spirits and using them to damage your enemies, along with some small but powerful aoe spells.
Important Attributes
- Warlock: Darkness buffs all dark damage done by 20%. Free damage buff to all your classes’ skills
- Darkness Fear makes your aoe spells apply the Fear debuff which reduces block, evasion and crit resistance by 10%. Very strong late game but increases your SP consumption by a lot so you can disable it against trash mobs
- Invocation: Demon Spirit gives a chance to spawn a red spirit that hits twice. Though the in game description says 10% max chance it is in reality 50%
- [Arts] Evil: Expand removes the chance of red spirits but makes every spirit hit up to 5 targets. It also makes spirits attack faster
- Evil Spirit: Darkness give a 50% chance for all spirits to inflict blind. All Warlock skills (and some other dark mage skills) gain bonus damage on blind targets so it is an easy way to get a nice damage buff
- [Arts] Pole of Agony: Evil Spirit makes Pole of Agony spawn spirits. Those spirits count as Pole of Agony hits so they hit twice (red spirits deal 4 hits), they are considered magic circles (which means their damage is buffed by Lethargy and other magic circle buffs) and they apply the Fear debuff.
Skill Overview
- Invocation: spawns 1 spirit per second up to a maximum of 10. Killed enemies also spawn a spirit. A cool quirk is that the spawn limit of 10 is cumulative so if you cast the skill, have 10 spirits spawn then cast it again the cap raises up to 20 spirits. It isn’t very practical in most content but can be used to create a spirit bomb in uphill defense or in level dungeon when you have the -90% cooldown buff. Note that it doesn’t work with Pole of Agony spirits. Recommended level: 14+1 skill potion (max)
- Dark Theurge: spawns 5 spirits that rotate around you and explode if they come in contact with an opponent. The worst skill of Warlock because it costs too many skill points. Recommended level: 0
- Evil Sacrifice: sends all the spirits near you towards random enemies Recommended level: 1 (max)
- Ghastly Trail: Buffs the damage of your spirits for 6s. They will follow you during the channel but since they make a line, have a tendency to stop following you, and you can’t run it’s usually more effective to transport your spirits by using Evil Sacrifice regularly. Recommended level: 5 (max)
- Pole of Agony: magic circle that deals a damage over time to the targets. Pushing the enemies outside of the pillar will extend the dot damage, this can be done with Energy Bolt or Demon Scratch for example. Recommended level: 10 (max)
- Mastema: AOE spell that applies a curse and a dot. It forces the spirits to attack for 6s after a short delay, so you have the time to cast Ghastly Trail after Mastema to buff the spirits right before they attack. Recommended level: 10 (max)
- Demon Scratch: line AOE spell that bring the enemies closer to you. hits between 3 and 7 (?) times depending on how far the target is from you. Recommended level: 5 (max)
Damage Attribute Enhance Priority
1- Pole of Agony
2- Invocation
3- Mastema/Demon Scratch
Important Items
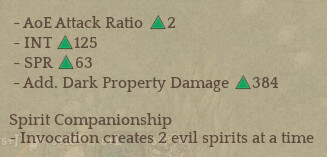
Vaivora Vision - Demonische
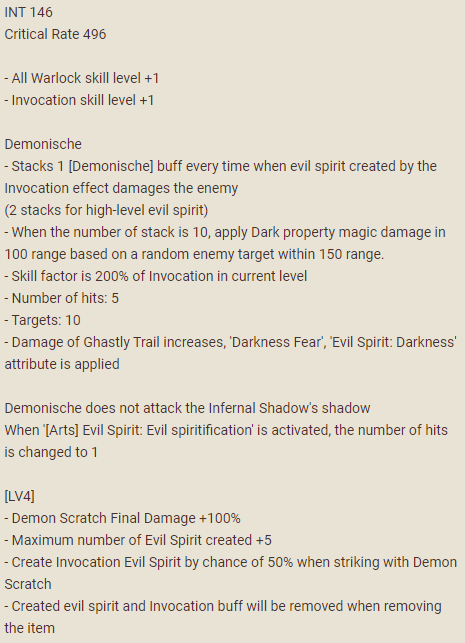
Large AOE every 10 spirit hit (spirits spawned by PoA do not count) that scales on Invocation damage and can be buffed by Ghastly Trail. Very strong, especially at level 4
Skiaclipse Staff
Not very good but useful before level 460. Makes the Invocation stack gimmick twice as effective.
 SHADOWMANCER
click here
A class with a lot of utility and survivability but which requires its Vaivora Vision (Diffuse Reflection) to have its damage dealing skills work properly. It plays around building Shadow Absorption stacks and using them to buff the damage of their skills.
Important Attributes
- [Arts] Infernal Shadow: Drain Vitality gives you a shield whenever you use Infernal Shadow, and since monsters often have more HP than you it’s a 100% HP shield in PvM
- [Arts] Shadow Pool: Shadow Armor changes the skill from an invulnerability to a damage reduction. You can only use SM skills during its duration but skills from other classes that were cast before activating the armor will still work
Skill Overview
- Shadow Conjuration: AOE skill that deals a damage over time and gives a Shadow Absorption stack per tick. Only useful if you don’t have the Vaivora Ichor otherwise its damage is too low and it requires too many points that are more useful elsewhere. Recommended level: 1 if you don’t have Diffuse Reflection, 0 if you do
- Shadow Pool: become invulnerable for a moment but you can’t cast skills. You can cancel the effect early by re casting the spell. Recommended level: 3+2 skill potions (max)
-
Hallucination: Get a shield of your % max HP that protects you from crowd control. The skill description says it doesn’t protect from knockback but it does. You get some iframes
when you summon the shadow. Recommended level: 12+3 skill potions (max) - Shadow Fetter: roots the targets and shreds their magic defense, using up to 10 Absorption stacks to double the mdef shred, and applies a debuff that doubles the number of Absorption stacks you gain per hit. It also grounds enemies, allowing you to use grounded spells like Featherfoot’s Kurdaitcha on flying opponents. Recommended level: 5 (max)
- Shadow Thorn: single target spell that hits grounded opponents twice. With Diffuse Reflection it becomes AOE and doubles the amounts of hits (2 on flying, 4 on grounded) and gets a shortened cooldown. Gives 2 Absorption stack per hit (8 per cast on a grounded target). Applies blind. Recommended level: 10 (max)
- Shadow Condensation: AOE spell that becomes bigger and more powerful if you have 20 Absorption stacks. Applies blind. Recommended level: 10 (max)
- Infernal Shadow Clones the targetted enemy at your location. If you’re standing close to the target you’ll be able to hit it and its shadow both, effectively doubling the damage of your AOE spells. If you’re standing far away from the target it allows you to damage it from a safe distance. Recommended level: 5 (max)
Damage Attribute Enhance Priority
1- Shadow Thorn
2- Shadow Condensation
3- Hallucination
Important Items
Vaivora Vision - Diffuse Reflection

This item singlehandedly transforms the Shadowmancer from an utility class to a damage dealing one. Shadow Thorn becomes self sufficient to get stacks for both Fetter and Condensation.
Against group of mobs 1 cast of Thorn gives you max stacks.
Against a boss you can do Infernal Shadow > Thorn x2 > Fetter > Thorn x1 > Condensation > Thorn x1, this combo gives you carry over stacks for the next rotation where you’ll be able to do Infernal Shadow > Fetter > Thorn x2 > Condensation > Thorn x2 and thus benefit from the mdef shred of Fetter on your 4 Thorn casts.
Diffuse Reflection is your number one priority item to get as a dark mage.
 BOKOR
BOKOR
click here
A class that revolves around applying damage over time skills and building dark force stacks to use on various other skills. it also has a very powerful mdef reduction effect.
Important Attributes
- Zombify: Large Zombie and Zombify: Wheelchair Zombie allow your summoned zombie to apply Decay or Curse of Debility respectively. The debuff lasts for 10s but is renewed every 2s as long as the zombie is around, making it last for 30s in total. You can’t have both at the same time so you have to choose between applying debility to a large amount of targets or decay for a longer period of time.
- Curse of Debility: Darkness gives you 10% guaranteed crit chance against targets with the debility debuff
Skill Overview
-
Curse of Debility: applies the debility debuff to one target which deals damage over time, reduces their mdef and gives you dark force stacks. The debuff lasts for 30s but the skill only has a 10s cooldown so you can apply it to multiple targets. Leveling up the skill doesn’t increase the damage but increases the mdef debuff, which means that when leveling up you don’t have to max it right away and can spend your points on other skills first. Recommended level: 15 (max)
-Effigy: applies the pollution debuff to your target if they have the debility debuff, else it doesn’t do anything. It has a very small aoe so if you manage to group your targets well you can use it on multiple monsters at once. With the Bokor Vaivora at level 4 it becomes twice as powerful. Recommended level: 15 (max) - Zombify: consumes 1 Zombie Capsule (can be bought at the wizard master) to summon a zombie that raises your dark force stacks for 20s, and with the attributes applies either debility or decay to become a strong aoe dot. The zombie will follow you but isn’t very fast so you might have to wait for it sometimes. Recommended level: 5 (max)
- Mackangdal: use all your dark force stacks to reduce incoming damage for up to 10 seconds. Could be useful but since you already get very good survivability from the other classes of the tree it feels like a waste of points. Recommended level: 0
- Bwa Kayiman: consume 10 dark force stacks to create a circle that damage to enemies and buffs the defenses of your allies. It deals pitful damage even with the stacked bonuses and removes your dots from the targets so it is a really bad skill. Recommended level: 0
- Samediveve: applies the decay debuff in an aoe which deals increased damage depending on the number of other Bokor debuffs the targets have. It also increases the dark force stacks. Very powerful but has a very long cooldown and can only hit 5 targets. Recommended level: 5 (max)
- Damballa: consumes 10 stacks of dark force to deal damage to one target. Recommended level: 5 (max)
Damage Attribute Enhance Priority
1-Effigy
2-Damballa
3-Samediveve
4-Curse of Debility
Important Items
Vaivora Vision - Lewa Advent
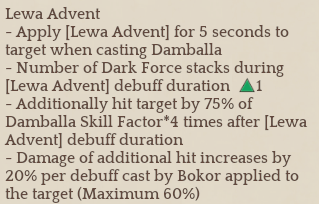
Gives Damballa a dot effect that deals damage and increases your dark force stacks. At level 4 it also doubles the damage of Effigy, making it your most powerful skill.
 FEATHERFOOT
click here
A class based on applying curses to amplify dark damage and using powerful close range spells and capable of regenerating HP. It relies on Kurdaitcha combined with the Dahlia goddess armor set to deal most of its damage.
Important Attributes
- Featherfoot: Increased Recovery increases the effectiveness of potions
- Levitation: Cursed Blood gives you 40% increased dark damage while in levitation status
- Levitation: Control transforms Levitation into a 30 minutes buff at the cost of its melee invulnerability. What it basically does is give you access to the Blood Curse skill and Cursed Blood attribute 100% of the time, so the trade off is very worth it.
- Featherfoot: Witch Doctor gives you a +50% dark damage buff on cursed targets. Curse spells are : Bone Pointing, Ngadhundi (with hexing attribute), Blood Curse, Enervation, Mastema, and Curse of Debility.
- [Arts] Levitation: Nullify removes every debuff when you cast Levitation
- [Arts] Bone Pointing: Bone Necklace transforms Bone Pointing into a 100% uptime close range curse aura. The curse only lasts 2 seconds (down from 7 without the arts) so you need to stay close to the target if you haven’t applied another curse. If you have cursed an enemy with Ngadhundi (Hexing) it will be overwritten by Bone Necklace.
Skill Overview
- Blood Bath: applies a dot on a single target and heals you of 1% hp 10 times. Damage is extremely low for a single target skill, don’t take it unless you enjoy stabbing stuff. Recommended level: 1 to unlock the Increased Recovery attribute
- Blood Sucking: AOE channeling skill. It can be very powerful because it is a channeling skill but realistically you will not be using the 10 seconds. The description in game says it heals 6% max HP per second but it’s actually 3% so don’t expect this skill to keep you alive. Recommended level: 1 to unlock the Increased Recovery attribute or 15
- Bone Pointing: places a turret that curses enemies and reduces their magic defense by 7% for 7s. It chooses monsters at random but can hit multiple targets at once if they’re close enough. Using the Arts is better unless you don’t want to get close to your target. Recommended level: 1
- Ngadhundi: good close range AOE skill. You can use it to apply the decay debuff if you have a team mate that deals physical/poison damage, switch the attribute on to apply the 7% mdef reduce curse. At max level it deals decent damage so it’s purely up to your preference if you want to max this or Blood Sucking. Recommended level: 1 or 15
- Kurdaitcha: channeling skill that spawns up to 10 footsteps. The footsteps are small magic circles that all deal damage over time, and with good maneuvering you can apply the skill factor up to 50 times to a target, making it the most powerful Featherfoot skill. The footsteps spawn each 0.5s, and it’s important to learn to turn between their spawn cycle. With good training it’s possible to put all 10 footsteps under the practice post of the highlander master’s training hall. Note that it’s a grounded skill and will not hit flying opponents unless you nail them to the ground with Shadow Fetter. Recommended level: 10 (max)
- Kundela Slash: waste of skill points. Does less damage than Ngadhundi even if you get the 3 debuffs + curse stacked. Recommended level: 0
- Levitation: Makes you fly to avoid melee attacks but take more damage from ranged and magic attacks. You cannot dash or jump but you will climb cliffs of any height without any problem. It’s mostly used with the Control attribute for convenience but it has its uses sometimes. Recommended level: 1 (max)
- Blood Curse: Large AOE spell. Sacrifice 20% of your HP to heal 60% over 5 seconds, making it a very good healing method. Remember to get the Drop of Blood attribute to not kill yourself. Recommended level: 10 (max)
- Enervation: Curse that applies its skill factor every time the target gets hit. Has a limit of 10 targets even though it’s not in the description.Recommended level: 5 (max)
Damage Attribute Enhance Priority
1- Kurdaitcha
2- Blood Curse
3- Enervation
4- Ngadhundi/ Blood Sucking (whichever you decided to max)
Important Items
Goddess Dahlia Set - Infinity Blessing
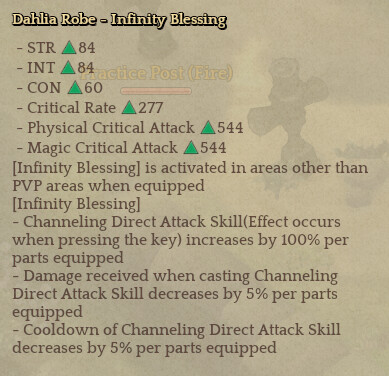
Having this set on all your armors gives Kurdaitcha and Blood Sucking a damage boost of +400% and -20% cooldown, and those boosts can be further enhanced by leveling up the ichors. If you have Featherfoot in your build and you plan on dealing damage to bosses you need these over the Overload Raid set. It is possible to mix and match the 2 sets but Infinity Blessing is the most powerful damage boost by far.
Synergies Between Classes
click here
- Featherfoot’s Witch Doctor Attribute gives a 50% damage bonus to all dark skills against enemies under a curse debuff. Curse skills are Enervation, Blood Curse, Bone Pointing, Ngadhundi (with attribute) for FF, Mastema for WL and Curse of Debility for Bokor
- Warlock and Shadowmancer skills deal bonus damage on blind enemies. You can inflict blind with SM"s Shadow Thorn and Shadow Condensation (100% chance), WL’s Evil Spirits (50% chance per hit) and Bokor’s Effigy (50% chance). Hole of Darkness from Sage can also apply blind for 15s to 10 targets but that’s the only synergy Sage has with dark wizard as the skill isn’t even dark damage.
- Shadow Fetter can be used to keep enemies rooted and prevent them from leaving the dot AOEs like Kurdaitcha, Blood Sucking or Pole of Agony
- Use dark AOE skills like Mastema, PoA and Damballa to make the most out of SM’s Infernal Shadow
- Between Mackangdal, Hallucination, Shadow Pool, Infernal Shadow attribute and Levitation, dark wizards have a lot of choice to mitigate or avoid damage
- with Teleport, Shadow Pool and Hallucination you have access to 3 different iframes
Builds
click here
[Warlock-Featherfoot-Shadowmancer]https://itos.tavernofsoul.com/planner/?d={2001}055011{2015}ae0a155{2016}0f11a01a5{2019}a03ca55)
Warlock-Shadowmancer-Bokor
Shadowmancer-Bokor-Featherfoot
Items
click here
Weapon Ichors:
- 1-2 Vaivora of the classes you have, priority order is Diffuse Reflection > Lewa Advent > Demonische
- Coordination Vaivora on the left over slots
- Level up priority is Coordination > Demonische > Lewa Advent > Diffuse Reflection
Armor Ichors:
- if you have Featherfoot in your build get Dahlia - Infinity Blessing
- if you don’t have Featherfoot in your build get Ziburynas - Overload Raid
Accessories: Karaliene/Luciferie Triukas set
Ark: Divine Retribution for the most damage, Thunder for increased mobility (lv 3 is enough)
Cards:
- Reds: Eclipse Ubik (+10% dark damage) or race cards
- Blue: Zaura (def+10%= or Nuaele (mdef+10%)
- Green: Lucia card (int+40) or Pyroego (int+10)
- Purple: Gazing Golem (chance of hitstun immunity)/Stone Whale (chance of reduced damage)/other
like SP recovery on monster kill - Legend: check Legendary Card Guide by Crevox
- Goddess: check [Guide] Goddess Card - What, when and how?
Assisters
click here
Main assister:
- Moringponia = Magical Crit damage
- Blut = Dark damage
- Organ = Dark damage
Assister Synergies:
- Insect: INT
- Demon: SPR
- Lightning: Crit (Mothstem / Solcomm)
- Holy: Dodge (Tantalizer / Nauele)
- Dark: Accuracy (Ignas / Helga / Baby Berk / Rexipher / Reaper)
- Fire: Block Pen (Fire Lord / Velcoffer)
- Poison: Aoe Attack Ratio (Moringponia / Mirtis)
Combo Examples:
- Moringponia Mirtis Nuaele Tantalizer
- Moringponia Ignas/Blut/Mothstem Velcoffer Fire Lord
- Moringponia Mirtis Mothstem Solcomm
More info: -TOSkemon - Assister Tips (updated day 1, month 2, year 2021)
Thanks for reading, and if you have any info that I’m missing please share it.
 . So using Ghastly Trail till the end ? or just to trigger then cancel