__________________________________ INTRODUCTION/CLASS BUILD _________________________________________
SR has been my main build in the late 2016. Before I played this build, I was just a sorc-warlock using invocation at Royal Mausoleum Chapel, Lodge, and West Siauliai Woods to farm for the things I need, all while helping the community power level their alts back when gaining XP was pretty slow, at the time. Since then, this method of farming has been nerfed and I decided to start farming using a character that I wanted to main at first but messed up when I was new at the game. I wanted to play a class that can farm mobs easily and efficiently, and this build is the right choice, for me.
Please bear in mind that you need a good amount of funding for this build.
In the past, my build was this during rank 8:
Archer 2, Ranger 3, SR3
During the Appraiser patch, I rank reset to the following shortly:
Archer 2, Ranger 2, Appraiser, SR3
I found that Appraiser gave a lot of potential in this build because of Devaluate, Overestimate, Blindside and Forgery (will talk about this skill later.)
After Rank 9 patch hit, my build is as follows:
Archer 2 Ranger 2 Appraiser SR3 Bullet Marker
Since the Ranger buff patch is coming soon, I have now changed to:
Archer 1, Ranger 3, Appraiser, SR3, BM2
**_Stat Distribution_**
CON: 0-100
DEX: Rest of the points.
Here’s a picture of my stats, I have 100 points into CON, with the rest being DEX:
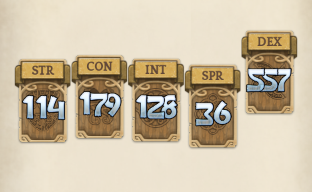
With the DEX stat, you get: Critical Attack, Block penetration, and Evasion and Attack Speed. As you get into your SR build, Limacon will be one of your main skills. Auto-attacking with Limacon not only depends on your DEX, but also your ping.
![]()
**_Squire Synergy with SR_**
If you decide to make SR your main build, it is recommended that you also make a Squire 3. Squire’s Base camp is very valuable to an SR. Not only that, the Refreshment Table skill helps your SP pool if you don’t want to use SP pots in the lower levels.
If you manage to get a Divine Might on your Squire Skill, you will receive:
220% Base camp duration buff at level 11
35% Maximum HP and SP, 11 Second less to restore HP and SP Recovery, and 5 AoE Attack Ratio from the Refreshment Table at level 11.
Level 16 Repair shop.
Base Camp will buff the following important skills with DM:
Steady Aim at 16 minutes
Limacon at 16 minutes
Swift Step at 16 minutes
Silver Bullet at 95 seconds
Overestimate at 2 minutes and 24 seconds
SP pots at 48 seconds
Elixirs at 35 seconds
The Refreshment Table buff is especially useful to you if you plan to share it with your party members during raid preparations.
**_Cards_**
Firstly, these cards are a little pricey to obtain and level up as you’re starting out. But, they will help you in the long run, especially legendary cards. Secondly, I will go over the cards you should use in a PVE/PVP environment.
**PVE**
Red: x3 Glass mole or 1-2x Frosters and/or Glass moles.
Blue: x3 Nuale or x3 Zaura. You should prioritize Nuaeles.
Green: x3 Ellaganos, Blut or Gorkas (for Hunting Grounds)
Purple: Tutu (Mainly for Hunting Grounds) or anything with property damage or HP. Can also use Gazing Golem. Marionette
Legendary: Marnox/Nuaele/Zaura/Rexipher/Pantorex.
With Glass moles, you don’t need to worry about SP usage as an SR, will go into more details on the guide.
For the Blue card category, in my opinion, you do not need to use Zaura cards because as an SR, you will be using leather armor IF you’re using Solmiki set. If you manage to get full Solmiki set, you will get a lot of evasion, which I count as a shield in my eyes. There’s no reason to go Zaura if you have your Solmiki leather set because you also need some defense against magic. You already have evasion helping you out. Furthermore, you cannot dodge magic attacks.
Green cards is self-explanatory. You can use Ellaganos to gain 30 DEX, Blut for 30 CON or Gorkas to gain 150 looting chance.
Purple cards, anything goes, honestly. Just don’t go for the resistance properties.
Legendary: Marnox should be priority since it adds Minimum Critical Chance +[★*2]% so it is really good. Alternatively, you can use either Nuaele or Zaura. Still leaning towards Nuaele for the magic defense. If you prefer movement speed, you can use Rexipher (I am currently using that legendary card, but again, it is my preference.)
**PVP**
Okay, for this section, it is important to note that Block is pretty overpowered in PVP right now against archers and swordsman (unless you are a lancer, Cannoneer, Musket.) Even though you stack on full DEX and have Solmiki Plate gloves (for PVP block pen purposes) with yellow gems, you will still get blocked by people stacking a ton of CON and block gems.
Red: x3 Glass mole.
Blue: x3 Nuaele or x3 Zaura.
Green: x3 Ellaganos or x3 Blut
Purple: Marionettes, anything with property damage or HP. Resistance cards such as Capria for sleep or Crabil for stun etc…
Legendary: Blut/Nuale/Zaura/Rexipher/Marnox.
Blue and red cards are self-explanatory. Also, Evasion is pretty huge in PVP. If your opponent doesn’t have that much accuracy, expect them to miss. They can get lucky hits on you, but it does feel good when dragoons miss their Dragon Fall on you. Again, you cannot dodge magic, so it’s best to prioritize on Nuaele cards. Keep in mind your opponents can circumvent your evasion by stacking Naktis cards and using accuracy headgears/green gems.
For Green Card, Ellaganos is still good, you can also use Blut, if you want. I would still stick with Ellaganos due to Block penetration, Attack Speed and Evasion you get from DEX. As long as you are comfortable with your HP.
Legendary card: If you have access to Blut, use that over anything else. If you plan on using Rexipher card, your card’s movement speed is halved. So instead of having 10 movement speed from 10 stars, you will have 5 movement speed.
**_Skills_**

Archer 1 only needs 2 skills. You max out swift step for the evasion, and you can put however many points you want into full draw. Full Draw is situational, you can group mobs together and link them to lower their defense. The rest of the points you spend is optional:
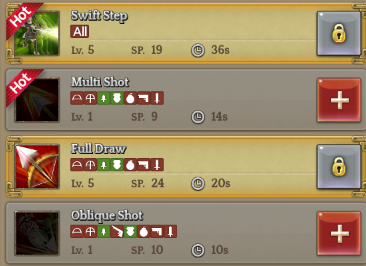
Multi shot isn’t really a reliable skill because it has a very low modifier, I did not end up investing points on it in the long run. Oblique shot is okay in the beginning, but in the end, Limacon surpasses it by a long shot. Save your hotkey spaces for the more important skill/items. Since you have the choice of using pardoner shops, you can just auto attack your enemies, instead.
You’ll have some pretty neat skills to use on your mid-level character. Barrage is pretty good for obstacle clearing.
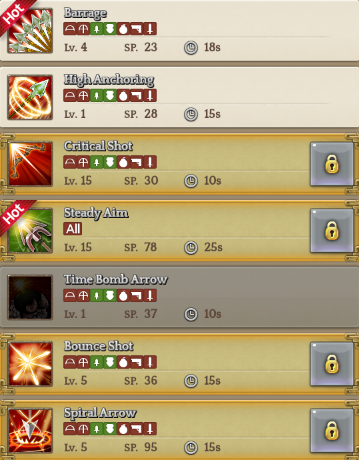
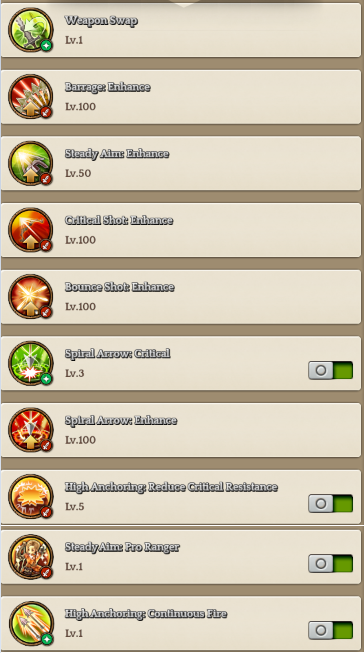
Since the Ranger buff came out, this build has gained a lot of advantages. First off, critical shot increases your critical damage by 50% when you get 5 stacks of the buff. You can keep this up 24/7 on a boss as long as you don’t get blocked or evaded (lol). Second, Barrage has the same modifier than spiral arrow once maxed, but does not have the 20% ignore defense passive. Also, you won’t always crit your barrages, so it’s better if you maxed out critical shot since you will always be consistent with your damages. High anchoring is a 1 pointer, you reduce the cooldowns of your Bounce Shot, Time bomb arrow, and Spiral arrow using this skill. Time Bomb arrow is underwhelming in terms of damage. In PvP, you can knock your opponents down. Although, sometimes they don’t get knocked down even though they’re hit with no knockdown immunity, so I find it unreliable.
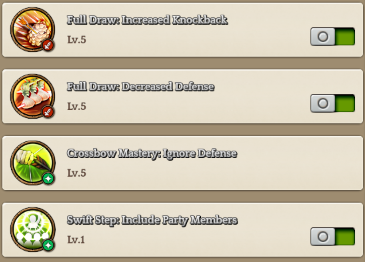
One of the best class to pick for your build. You have a lot of utility that helps you and your parties. Devaluate is especially useful in both PVE/PVP. In PVP, you take away multiple opponents transcendence values on their armors and weapons and reduce it to stage 0, as well as their enhancement values. Overestimate grants +3 or +4 enhancement on your pistol/shield if you swap. Identify can give you the option of appraising you or another player’s weapon/armor from Hunting Grounds. Forgery I would recommend to put this at 0 unless you have Frieno Bracelet/Solmiki Set/Nepagristas set and you wish to share your set bonuses to your party. Blindside is a really good skill. If you have a well-funded crossbow, it will deal massive damage to a single target, and will also grant them a debuff to increase your own minimum critical rate and increase your critical attack by 25% assuming you purchased the attribute.
[
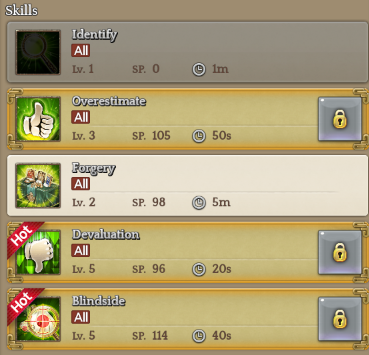
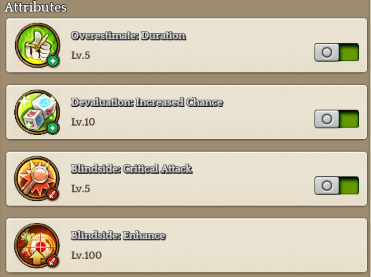
For my appraiser setup, I went 0 on Identify because I have another character that has lvl 5 Identify already. If you want to do the appraiser quest twice or buy the voucher twice, you can leave Identify at 0 points on your main SR build. Forgery is an optional skill you can put points on if you have good accessories like Solmiki, Frieno and Nepagristas which you can give to your party provided that you have these. This skill will also give them the set bonus for those items, so if you want your entire party to have the Frieno set, this skill will be useful to you. This is also VERY useful with the new Fantasy Library Raid accessories.

This is the main focus of the build. This class is mobile and powerful. It has great single target burst and very good AoE damage. Most of your main skill will start out with Steady Aim, Glass mole and Retreat shot while holding down Limacon.
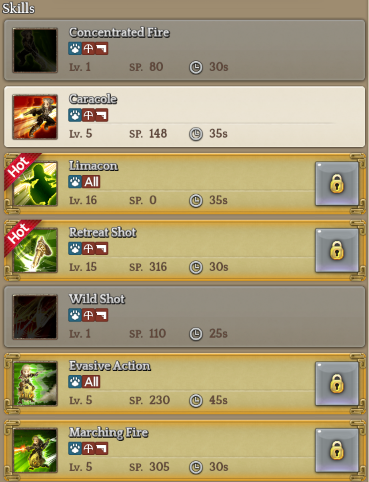

We don’t put any points in concentrated fire because the skill isn’t well-suited for SR. You’re standing still and it has a cast time, by that time, you would have done the same if not more damage using your Limacon. The more points you put into that skill, the more time you have to wait to charge it fully (although, you can cast it halfway, but with less shots.) You also don’t put any points on Wild Shot. This is basically the exact same skill as concentrated fire, where you have to charge it. You could only put at most 4 points max if you do invest in this skill, and it’s not worth it. Marching fire used to be one of the Best SR skills for clearing out large groups of enemies, but Retreat Shot + Limacon combo beats it. Evasive Action is a good skill to use in PVP, it’s a little underwhelming in PVE, but it still works, as long as you have a good amount of Evasion.
These are the last two circles to go on your SR build. You have some powerful skills even on the circle 1 version of this class.
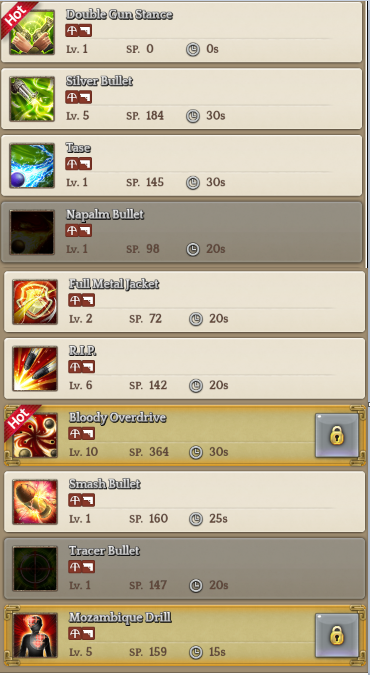
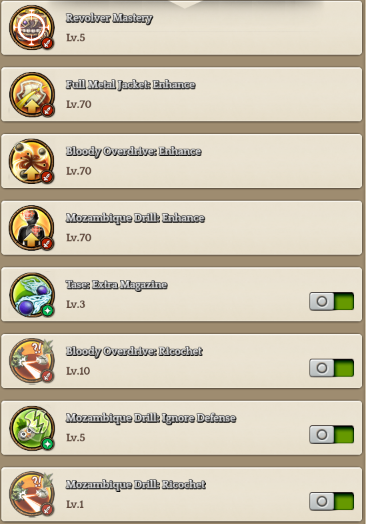
Tase, Silver bullet and FMJ are really good skills and are usable while riding. Napalm bullet isn’t that good of a skill because some enemies have AoE Defense Ratio so you won’t be able to hit every enemies on screen even though it says that the skill has 10 AoE Attack Ratio. For BM1, you’d want to pick skills that are suitable for riding, for now. Bloody Overdrive isn’t really worth it as a C1 class, but save your points until the C2 version of this skill. Mozambique is great for single target and hitting bosses hard, especially with the critical shot buff. If you’re doing Challenge Mode, you should be very careful using Bloody Overdrive because in instances such as Stage 6, your pet will instantly die. Unless you gear and attribute your pet, you will have to stay cautious after casting Bloody Overdrive/R.I.P… Only way to prevent this is having mounts such as the Christmas Sled. R.I.P. is really underwhelming for an AoE attack in my opinion UNLESS you have a ton of AoE Attack Ratio. You can use it as a filler, but in a CM, unless you have cat buffs (AoE +5), Food buff (AoE +3), and/or lvl15 AoE Attack Ratio potion (+3), Retreat/Marching fire followed by Bloody overdrive rotation is more reliable. You can still use this skill as a filler. I recommend R.I.P. in CM situations, otherwise, Bounce shot after a Retreat/Limacon usually finishes off mobs in a dungeon or field.
**_Pets_**
There are a variety of pets you can use in the game. Pets are integral with SR and you have to feed them to gain extra stats.
You get:
25% of your pet’s HP.
10% of your pet’s Defense.
8% of your pet’s Evasion.
Unfortunately, Premium pets are the best pets in the game which the only way to get is by spending TP. Fortunately, you’re able to buy some of these pets if someone offers them up via trade or AH with silver. Here, I will list some of the pets you can choose:
Velheider: This is one of the basic pet you can get from the companion shop via voucher/silver. This pet has only 1 slot for equipment which is the weapon slot. This pet has 60 Stamina.
Hoglan: This is another pet you can get from the companion shop. It’s more expensive than the velheider, but, it has 1 equipment slot for weapon and armor. This pet has 60 stamina.
Guinnea pig: This is a pet you can get by doing a guild mission. The guild mission is located on Mage Tower 4F once you activate it from the guild tower. Once you obtain the egg from the guild mission, you have to plant it inside the guild hangout’s farm. It takes a week to grow and the pet can die if you overfeed it or make it starve from hunger. This pet has 2 equipment slots for armor. This pet also has 60 stamina.
Leaf Penguin, Winter Penguin and Marine Penguin: These penguins can be obtained from events. These are the more useful pets because you can equip 2 armor and weapons on their slots. This pet has 600 stamina.
Penguin: You can obtain this pet from the TP shop and/or buy it with silver on the AH/trade. This is a premium pet that grants some buff when you are near them them. When mounted or near them, you gain a buff that grants you physical and magic defense. This pet has 2 equipment slots for weapon and armor and has 600 stamina.
BattleBird: You can obtain this pet from the TP shop and/or buy it with silver on the AH/trade. This is also a premium pet that grants you some buff when you are near them. When mounted or near them, you gain HP and SP recovery rate. This pet has 600 stamina.
Armadillo: You can obtain this pet by trading in 20 Armadillo companion tickets to Wings of Vaivora Lena from Klaipeda or Rosia from Orsha. To get these companion tickets, you have to obtain high ranking in the adventure journal monthly rankings. Additionally, you can buy these via AH/trade. This pet has 1 equipment slot for weapon and armor and has 60 stamina.
Pig: You can obtain this pet by trading in 20 Pig companion tickets to Wings of Vaivora Lena from Klaipeda or Rosia from Orsha. At the moment, you cannot acquire these companion tickets from the monthly adventure journal ranking. So your best best is to collect these tickets from someone who has been hoarding them. This pet has no equipment slot for weapon and armor and has 60 stamina.
Rocksodon: This is a premium pet from the TP shop that you can also obtain from AH/trading. Comes with 2 equipment slots for weapon and armor. This pet grants you a buff that increases your maximum HP and SP on your character if you’re near your pet. This pet has 600 stamina. This is the best premium pet in terms of buffs, stamina, and the food required to feed the pet.
Lesser Panda: This is a pet obtained from doing the uphill mission like a slave until you reach 20000 uphill points. This pet has 2 equipment slots for weapon and armor and grants critical rate and critical attack buff. Also has 60 stamina.
Christmas Sled: This is a mount that you can obtain from the Goddess Blessed Cube from the TP shop during December of 2017. This mount cannot equip weapon and armor, does not need to be fed, and you cannot gain stats when mounted. This is my favorite mount because not only do you get +6 movement speed, but it is immortal, and you can mount it from anywhere on the map. You cannot get this item, at the moment.
If you are a new player, you should start out with the Leaf Penguin since you have the Leaf Penguin egg available as you are new to the game. You do not have to worry about feeding the companion at this point of the game. Only start feeding your companion once you reach mid-game/End-game. The food required for the penguin is pretty expensive, and only recovers 15 stamina. If you have 3 TP to spare, just use the sardines. You can get food for your penguin by buying the corresponding food in the companion shop. If you want to use another pet, you have to be wary that you have to waste a character slot for your pets. And if you fill up your character slots (4/4), you have to spend 33 TP to buy up a slot, every time. Once you do make that decision, though, you can get any other pet you want. I would recommend buying the Rocksodon mount, as it is the best premium pet you can get in terms of stats and the food required to feed it. Rocksodon has the cheapest food to eat which is the regular companion food.
For experienced SRs, especially PVP SRs, you’ll find that the sled is very handy. If a lancer unhorses you, you can immediately get back on your mount without worrying about your mount dying. If you get revived during TBL or GvG, you can run away and get back on your mount immediately. This is very useful when you want to get out of a tough situation and you want to counterattack, right away. I’ve been using the sled for a while now.
**_Gear_**
Universal Headgear: Physical attack/HP/Critical Attack/any Elemental property Damage.
Starting out: Full Cafrisun set
Zachariel or Bearkaras bracelet
Agny necklace
Any Hunting ground xbow
Any shield around your level until you reach SR.
The Cafrisun set will help you out along the way, all the way until the 300s. You can choose to use the Hunting ground armor, if you want. Always remember to get pardoner buffs because you are squishy with Cafrisun. With Cafrisun and pardoner buffs combined, you will do 3 lines of damage.
Mid-Game: Any hunting ground armor around your level.
Sissel bracelet
Max Petamion
Any Hunting Ground xbow/pistol
You can also get Manahas to get an upgraded version of Cafrisun. But, if you’re planning to level up aggressively, there is no need to get these. It’s nice to have for objective clearing.
End-Game: Full Solmiki Leather set or Fietas/Primus armor/Velcoffer PLATE or CLOTH.
Regard Horn, Primus or Velcoffer Xbow
Masinios, Primus or Velcoffer Pistol
Frieno Accessories
Nepagristas Accessories
For Velcother set effect, either Kraujas, Gyvenimas, Tiksline or Mergaite.
The reason we have either Velcoffer plate or cloth is because if you choose leather, you’re losing out on the extra defense because plate is more on physical defense whereas cloth is more on magic defense. Also, you can choose what set effects and stats that you want on your Velcoffer armor. You also don’t really need to worry about leather mastery at this point, since it won’t make much of a huge difference since we have the Nepagristas accessories.
**_Gems_**
Gems are important for your gear, and they should only be socketed on gears that you’re going to invest in. Primarily, you should use the expensive lvl 7-8-9 gems on Primus, Solmiki, Masinios, and Velcoffer.
Main Armor (Solmiki Leather, Primus, Velcoffer PLATE or CLOTH)
The gems you should prioritize on your main armor should be:
Top & Bottom: Lvl 7, 8, 9 Red gem.
Gloves: Skill gem or Yellow gem (PVP).
Boots: Skill gem or Green gem (Evasion, but optional).
Currently, there are no useful skill gems on the SR class that we can use unless they introduce them. You can use Critical Shot gem if you want.
Looting Chance Armor (Primus)
Here, you will use looting chance gems. This will increase your chances of getting rare armor drop in Hunting Grounds and Challenge Mode:
All armor: White gem lvl 6, 7 or 8.
Main Weapon
Your SR’s main weapon should have:
Primus, Masinios, Velcoffer pistol: x3 Red gems lvl 7, 8, or 9.
Regard Horn, Primus, Velcoffer Xbow: x3 Green gems Lvl 7, 8, or 9.
For looting chance: any Xbow with x3 White gem lvl 7 or 8.
**_Grinding Spots_**
Level 1-15: West Siauliai Woods
You start out at West Siauliai Woods and head to the right side of the map where all the Infrorocktors are at. Kill them until you’re lvl 15, don’t forget to advance at Class level 15.
Level 15-35: Tenet Garden
Head to tenet garden, then go north of the Vakarine statue and kill the huge packs of Mallardu and pantos there.
Level 35-80: Tenet Church 2F
Go to Tenet Church 2F and kill all the mobs on the map. Be careful of Gesti if you have not completed the main quest line. She will take away half of your remaining HP and warp you to the front of the entrance of 1F. Don’t forget to class advance at around lvl 40.
Level 80-116: Sicarius 1F
Head to Sicarius 1F and kill all the mobs around the map. You should be able to advance before going here or after being level 81.
Level 116-200: Demon Prison District 2
Head to Demon Prison District 2 and kill mobs on the top corner of the map. If there aren’t spawning fast enough, go to the bottom left portion of the map and kill the mobs there, then head back to the top. Class advance at around level 125. Oh, and don’t bother doing the 120 dungeon, the experience there sucks major DooDoo.
Level 200-230ish: Cranto Coast/Alemeth forest
From Nahash Forest, head to Cranto. If you have a Squire, set up a base camp near the left portion where the mobs start off. Kill everything on the map, you should be at the top of the area when you do so. Use your base camp, if you have it, and repeat the process. If you don’t have a base camp, just kill everything anyways. Don’t forget to class advance before you move on to the next zone. If this spot is too crowded, head to Alemeth forest.
Level 230-Class advancement: Kalejimas Visiting Room/Storage/Solitary Cells/Workshop
Go to Steel Heights and make your way to Kalejimas. There are a bunch of mobs and the XP starts getting better at these levels. If there are too many players on one area, head to the next ones, or switch channels. Class advancement is around level 270.
Level 270-305: Rancid Labyrinth
You’ll have to go to Grynas Hills on the east side and you’ll see a portal. Rancid Labyrinth is a Hunting Ground map. At around the hour mark, there will be a chance that hundreds of mobs will spawn on parts of the map. This area is great to farm some HG weapons and armor around your level.
Level 305-342: Saucys Room 9
From Nobreer, head to the top left portion where Neringa is. There should be a red portal, there. A lot of people are always on channel 1 Saucys to open challenge mode portals. You can choose to stay on channel 1 because more mobs will spawn the more people are on the map, as opposed to the ones on the earlier maps that we grinded.
Level 342+: Astral Tower 1F
You can get there by using a Warp shop in Klaipeda, Orsha, or Fedimian. Or, you can head there by going to Barynwell 84 and head your way down to Astral Tower. You also want to do Challenge Mode for as long as you can here. I recommend avoiding places such as Spell Tome Town until the lag is gone since there are a ton of players doing challenge mode in that area. Plus, it’s a level 387 area.
_**Videos and links**_
Remnants of Bernice Stage 40:
Gemstone Feud:
300 Dungeon:
330 Dungeon(loud music sorry):
Spell Tome Town CM with Base Camp and Kraujas set.
If there are any questions feel free to ask. 