Tree of Savior Forum

Hidden Classes Unlock + Master’s Story Guide Compilation (Re:Build Forum Ver.)

Hidden Classes Unlock + Master’s Story Guide Compilation (Re:Build Forum Ver.)


This is a compilation of all the current hidden classes unlock guides for their prequest and advancement quests, including the quests for special titles of certain classes(Master’s Story Quests).

This compilation guide is made with the purpose of helping people who might need such info compiled together for ease of use and visibility.

Most of the guides have been re-written and/or edited by me for the purpose of making it easier to understand and easier to view.

Should you find any errors or mistakes in any of the guides of this compilation or have any inquiries/feedback, Please contact me at any one of the below measures:

Updated for Re:Build

Discord: Palemoon#3503
Tree of Savior (Klaipeda Server) team name: PaleMoon
Reddit: www.reddit.com/u/Luna_PaleMoon/
TreeofSavior Forums Nametag: Mikumo


Swordsman Classes

Nak Muay

Step 1: Unlocking the quests

Go to Fedimian, climb the stairs behind the warp statue and interact with the Bulletin Board to acquire information about a missing amulet belonging to the Nak Muay Master. Climb the stairs to the left and talk to Guard Leaper. Then, go to [Accessory Merchant] Joana and inquire her about the missing amulet. After that, you’ll need to go to Klaipeda to talk to [Wings of Vaivora] Lena. Finally, go to Poslinkis Forest and find Eimantas lying on the ground (southeast corner of the map). After talking to him, many tombstones will appear and you’ll also see an altar just below them. To unlock the Nak Muay class, you’ll need to complete 5 tasks which you receive from each tombstone after interacting with them. You’re free to do them in which order do you prefer. Here, I show how to complete each task from the easiest to the hardest one. Interact with all tombstones to know what they wish for (get a box by interacting with the fourth tombstone from behind), interact with the yellow glowing light just below them to exit Eimantas’ nightmare.

Step 2: Task 1 - Finding Asana

First, you have to find a NPC that tells you she moved to Tenants’ Farm and it seems like the NPCs that’ll tell you where she is are random (the other NPCs will say “I don’t know” or “please ask other people”). You’ll find those NPCs in Fedimian, Fedimian Suburbs, Escanciu Village, Goddess’ Ancient Garden and Stele Road (ask the townspeople, guards… anyone. Good luck!).
Then, go to Tenants’ Farm and talk to the NPCs in the center area about Asana, then tell Arijus (her father) a spirit in Poslinkis Forests wants to talk with Asana. He’ll tell you she’s away, but he’ll tell her about the spirit. Channel surf or move to other maps before coming back to Tenants’ Farm to check if Asana is there. When you find her, talk to her father before talking to her. She’ll say she has to prepare before going to Poslinkis Forest. (You need to finish all tasks first before proceeding. When you’re done, Asana will be at Poslinkis Forest waiting for you).
At Poslinkis Forest, talk to Asana, she’ll ask where can she go to see her mother. Talk to Eimantas to enter the dream world, then interact with the altar and ask Asana to go there, then interact with her mother’s tombstone and watch their conversation to finish this task.

Step 3: Task 2 - Dandelions

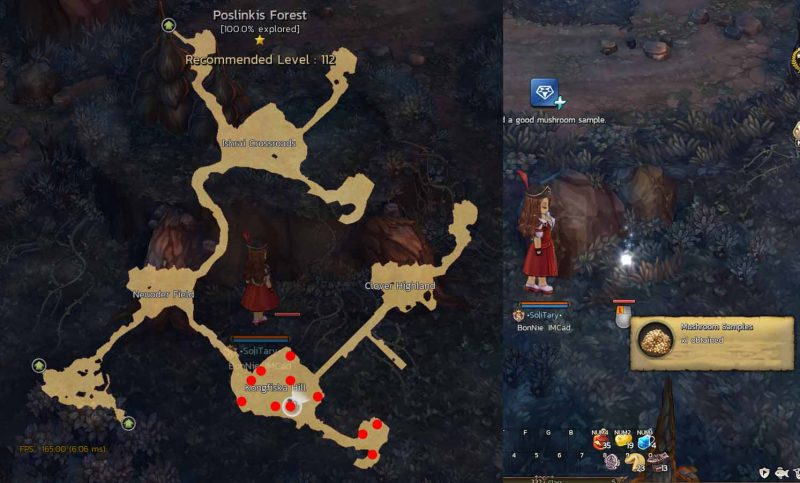
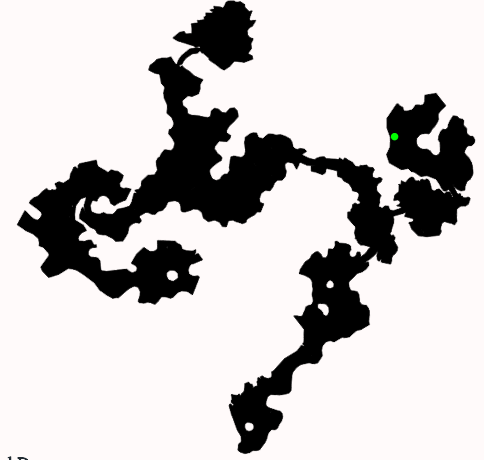
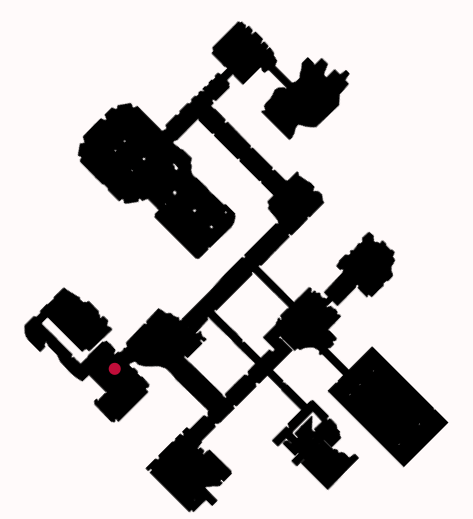
Go to West Siauliai Forest and talk to [Dievdirbys Master] Sculptor Tesla, he’ll ask you to bring him 48 Dandelions at Inner Enceinte District. Kill any monster in Inner Enceinte District to obtain Dandelion Spores, they have a low drop rate. You can plant them on any part of the map. After 10 minutes, they grow into a Dandelion (can only have 3 Dandelions planted at the same time). There’s a spot in the map (shown in the image below) where a fully grown Dandelion appears each 10 minutes in both channels.(Dandelions grown by you can’t be collected by other players, but the one that respawn at that spot is visible by anyone.) When you finish it, go back to West Siauliai Forest and deliver all 48 Dandelions to the Dievdirbys Master and receive a House Sculpture. Then, go back to Poslinkis Forest, place the sculpture on the altar and talk to the spirit under the tombstone of the homesick soul to finish this task.

Step 4: Task 3 - The Love Letter

The spirit from the fourth tombstone wants to hear a reply. Interact with the tombstone from behind it, you’ll receive a box containing a letter. Read it; it’s a love letter from Laimutis. In this task, you’ll play cupid by delivering that letter to his lover, Iona. Go to Dina Bee Farm and you’ll find her in the center/east region. She’ll love that letter and will ask your help to prepare a gift for Laimutis.
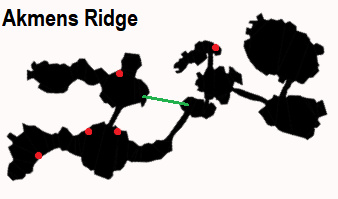
You’ll have to collect many flowers for her: 60 Stonecrops from Akmens Ridge (10~30 min respawn time at fixed 5 different spots) and 84 Statices from Cranto Coast (10~20 min respawn time at 8 different spots). Statice and Stonecrop flowers spawn in all channels at the same time in the spots mentioned. You can collect all flowers from each channel, then surf to the next one and, while waiting for them to respawn, you can travel from Akmens Ridge to Cranto Coast and vice-versa to finish this task faster. After collecting all those flowers, go back to Iona at Dina Bee Farm to deliver the flowers and receive Iona’s Box that you need to put on the altar in Poslinkis Forest to finish this task.


Step 5: Task 4 - The Special Medicine

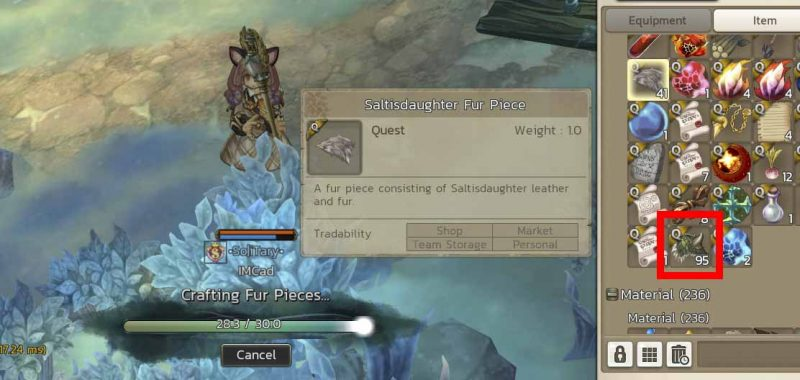
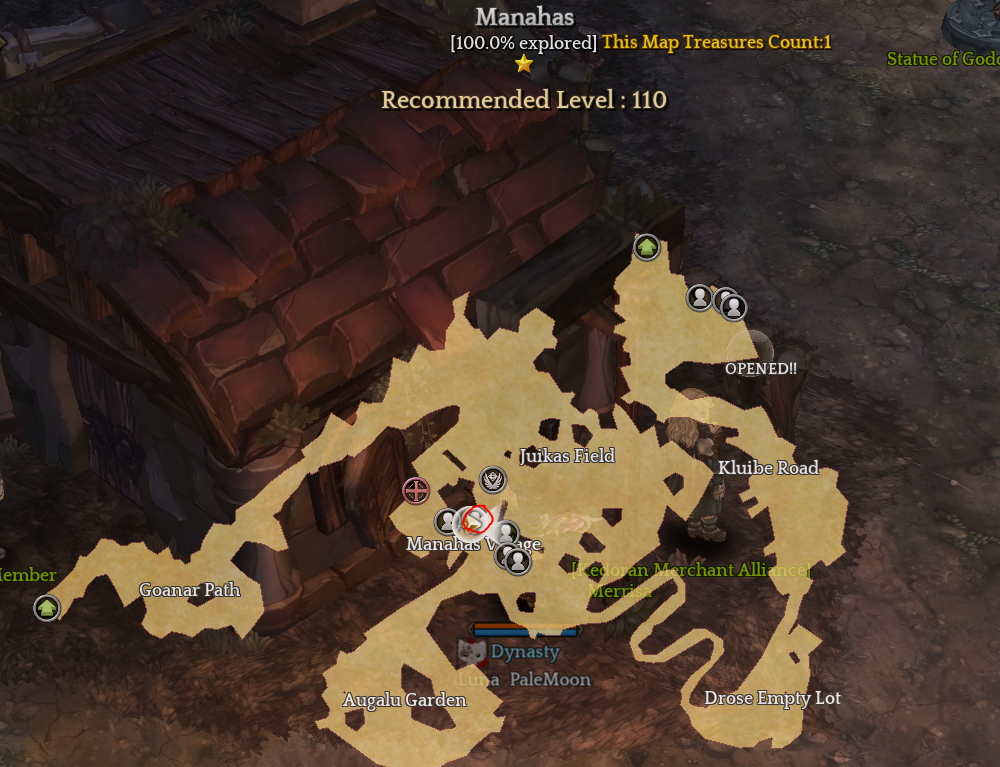
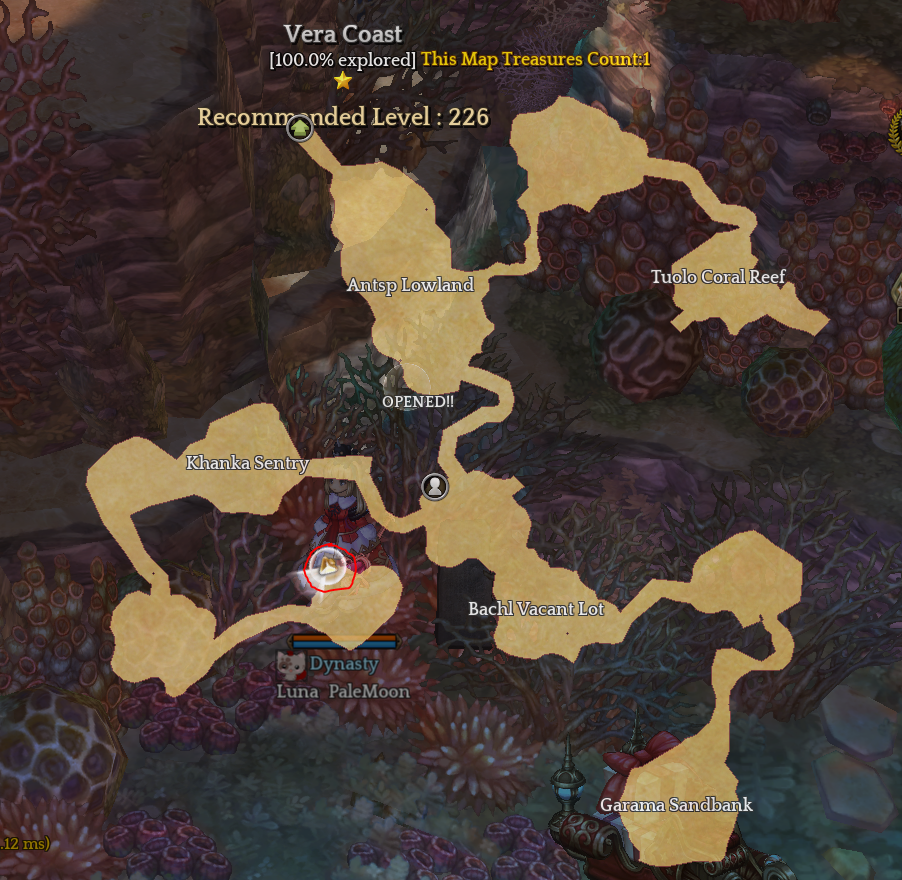
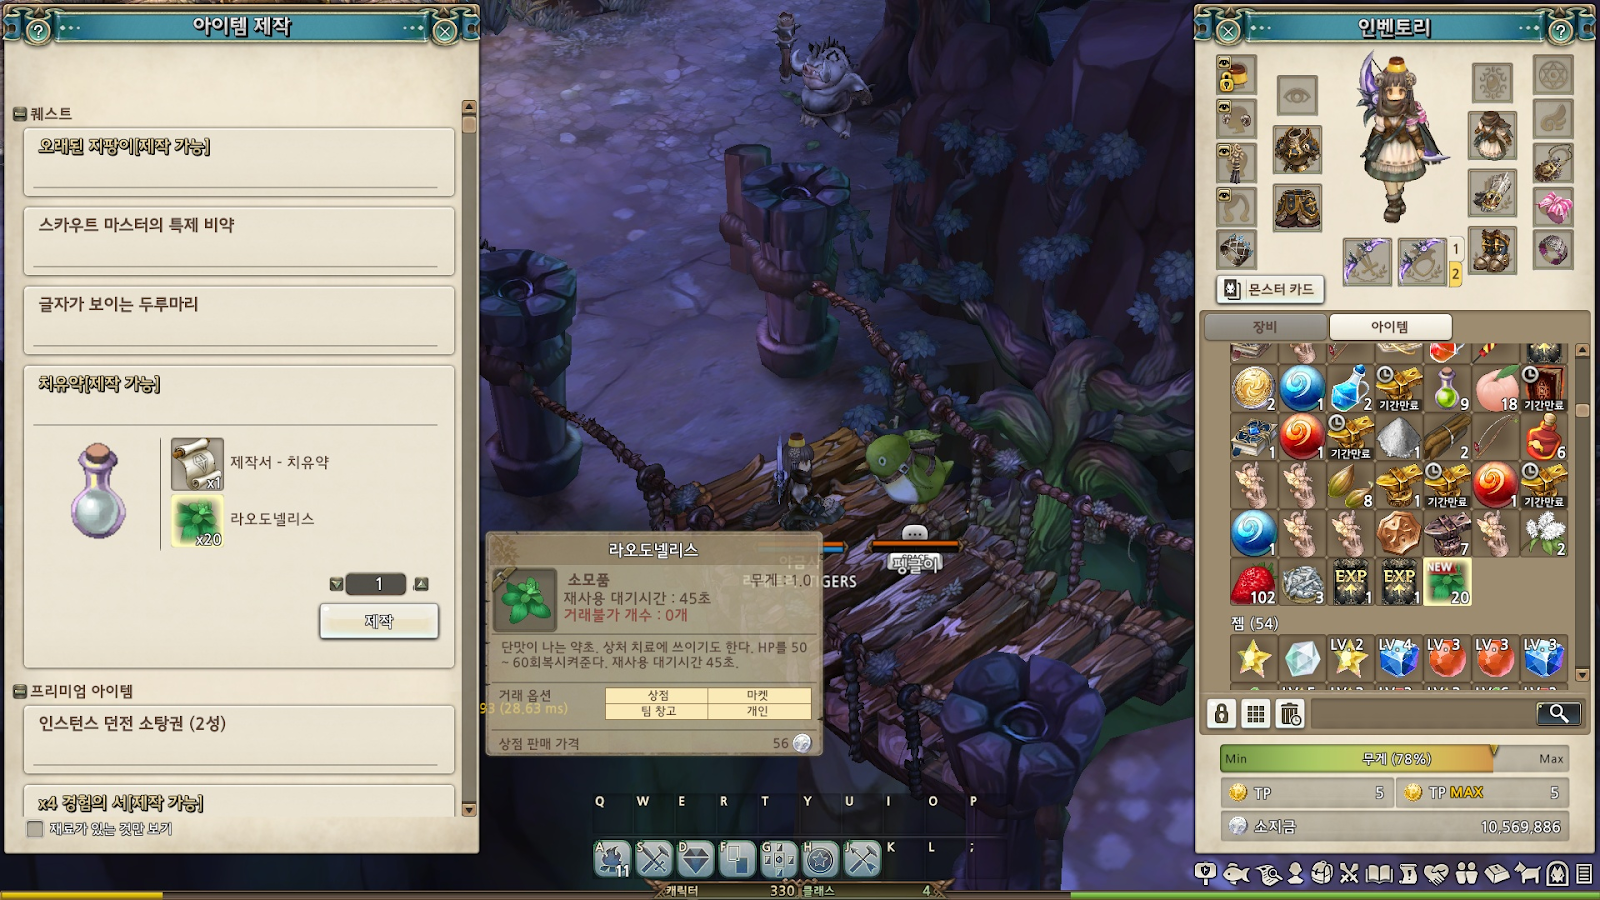
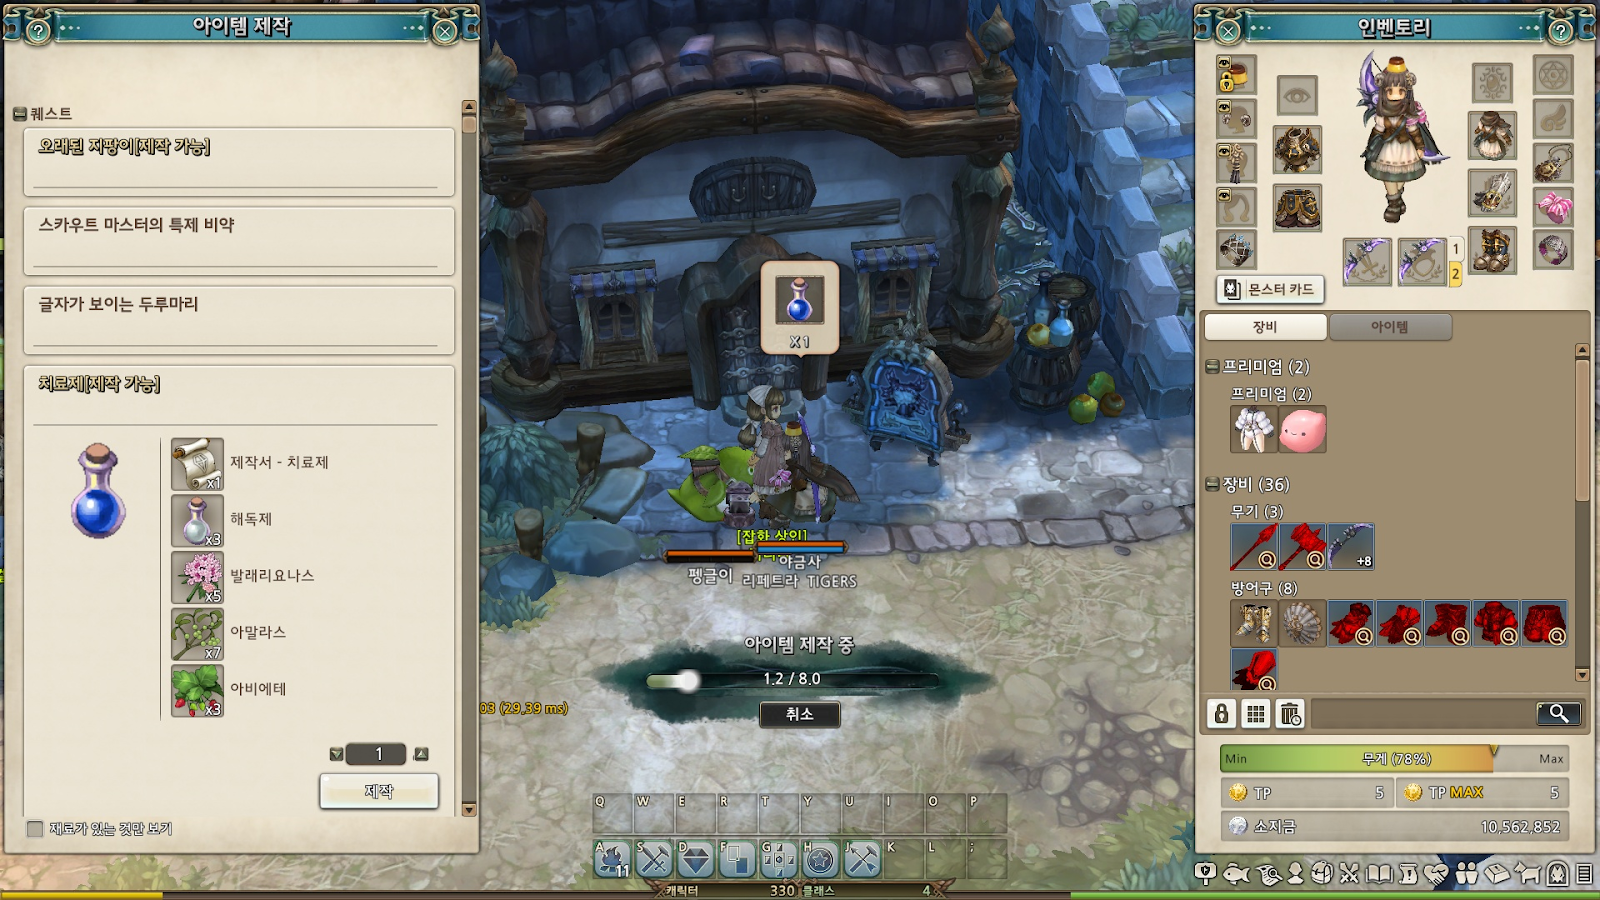
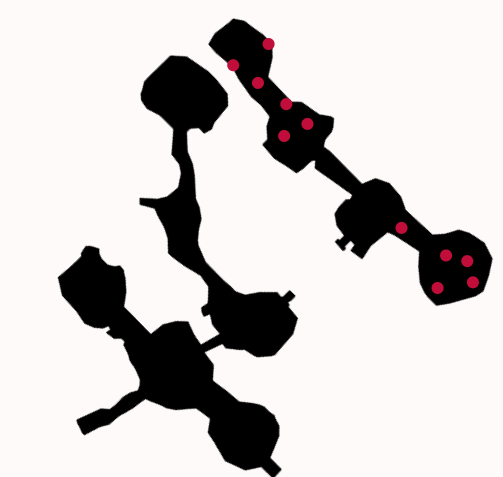
Go to Klaipeda and talk to [Priest Master] Boruble to know how to prepare a special medicine. Buy Holy Water from him and Antidote from the General Merchant. Now, go to Entrance of Kateen Forest and commit an Ellom genocide (picture below shows the hotspot for Elloms) until you have 100 Bright Ellom Bells in your inventory (even though Bright Ellom Bell is a quest item, farming it with a party with other players doing the Nak Muay unlock quest won’t make this faster. The quest items don’t drop for all members in the group). Deliver all items to the Priest Master and receive the Medicine. Go back to Poslinkis Forest and place the bottle on the altar and talk to the spirit under the tombstone of the fighting soul to finish this task.

Step 6: Task 5 - The Strawberry Cupcake

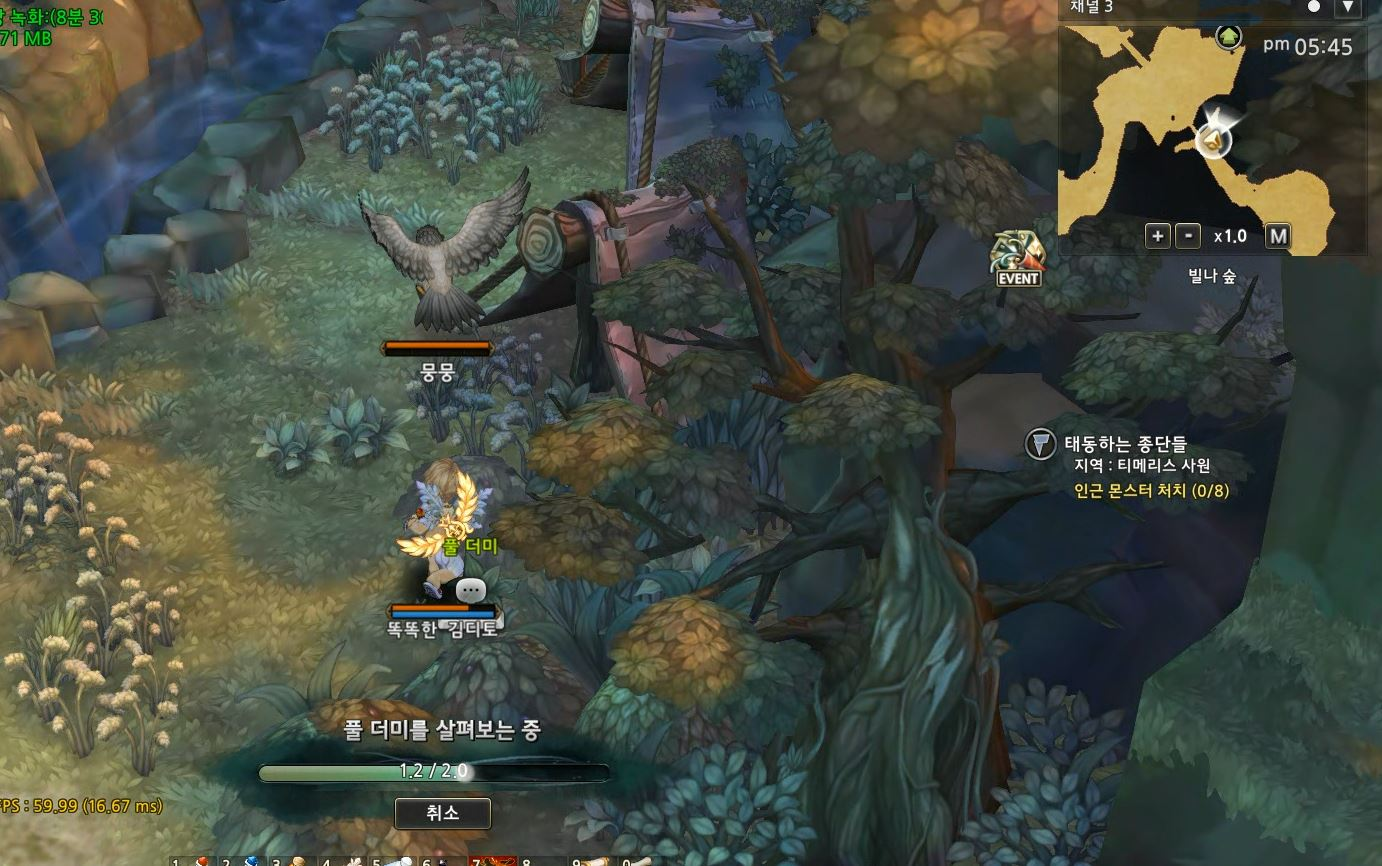
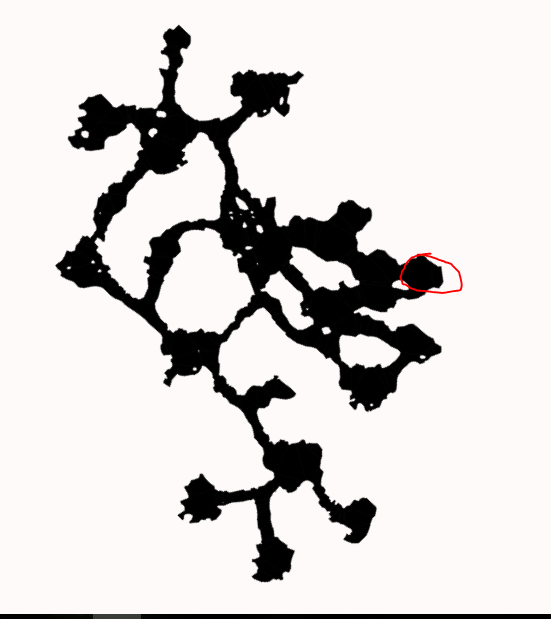
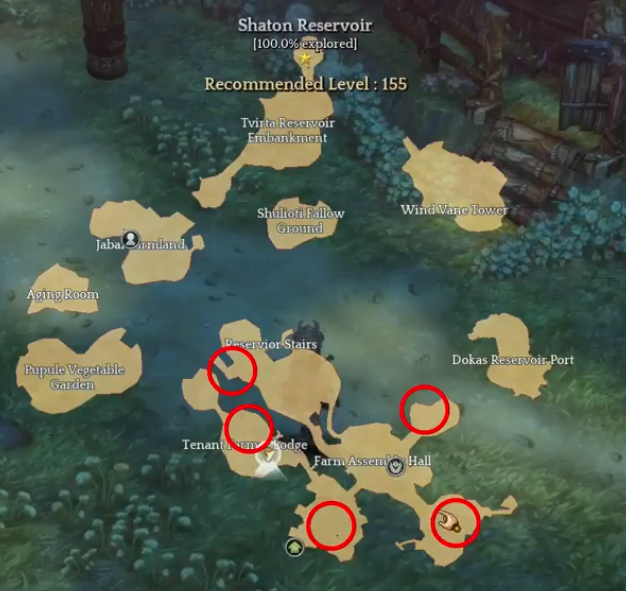
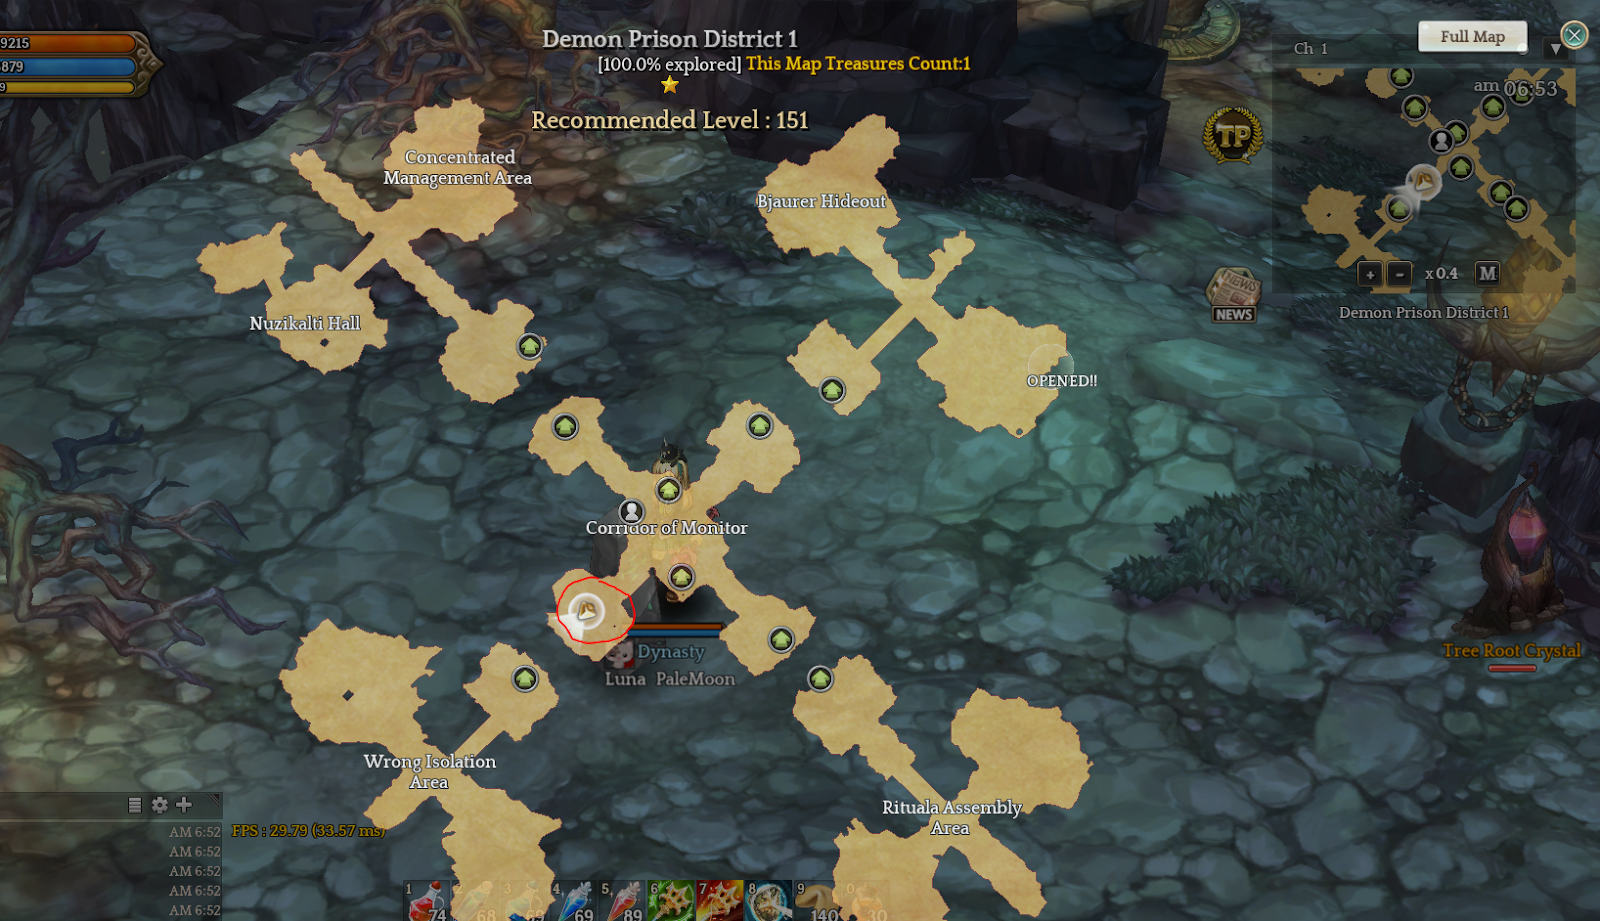
Go to Klaipeda and talk to the Mother of a Soldier, she’s at the main plaza near the warp statue. You’ll need to collect some ingredients for an exotic strawberry cupcake recipe. First, go to Gateway of the Great King and farm 100 Strawberries (25% drop rate) from Dandels. You don’t need to buy them from the market, they’re easy to drop. Now, for the hardest part: go to Owl Burial Ground and commit another genocide; this time your victims are the Red Medujas. Kill them until you have 100 Red Meduja Essences (if you can’t get anyone to help you, I suggest the following routes in the picture below; make sure you have all those quest warps to make travelling faster). Now, go back to the Mother of a Soldier and deliver the items and receive the Strawberry Cupcake. Back to Poslinkis Forest, place the cupcake on the altar and talk to the spirit under the tombstone of the starving soul to finish this task.

Step 7: Finding [Nak Muay Master] Khanom Caolaw

After finishing all 5 tasks and interacting with the spirits at Poslinkis Forest, you’ll return from the dream world with Eimantas awake now. Talk to the Unidentified Spirits, they’ll ask you to return the amulet in Eimantas possession to Khanom. After that, talk to Eimantas, he’ll give you the Amulet, which acts like a detector to check if you’re close to Khanom’s location. Now you can find [Nak Muay Master] Khanom Caolaw and become a Nak Muay (if you’re a Swordsman, of course). He’s in Tenet Garden (near Guards’ Graveyard entrance). After talking to him, Nak Muay will become available in the Class Advancement info interface.

(Taken from / Based on Pokart’s Post on tos forums)
([Class] Nak Muay thread - welcome to the Muay Thai gym!)

Matador

Step 1: Learning about the Matador Master

Travel to Orsha town and look for the Matador Notice Board, you can find the location of it shown in the image below.

Interacting with it prompts a message about the Matador Master looking for an assistant in Escanciu Village. Head over to Escanciu Village and look for 3 villagers. Naglis , Litis, and Linas. After speaking with them you will be prompted to go look for the Matador Master. An image of the villagers locations are shown below.

Step 2: Receiving a request from the Matador Master

Go to Fedimian town and look for [Matador Master] Kridella Otero, an image map is provided below to show her exact location.

After talking with her, you will get a request to help her with some tools.

Step 3: Retrieving thorns from Accessory Merchant Joana

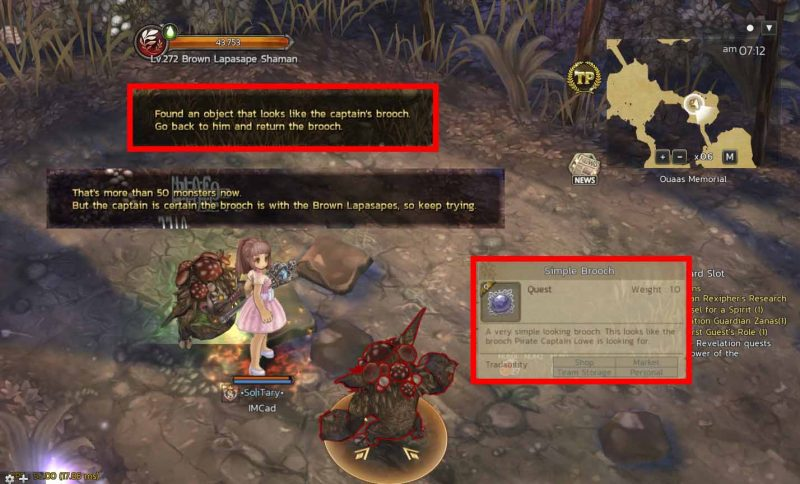
Go and speak with [Accessory Merchant] Joana in Fedimian town. She will ask for 6 intact blue hohen gulak horns which are obtained at Kadumel Cliff. Travel to Kadumel Cliff and hunt Blue Hohen Gulaks for these items. After you have done so, turn them back in to [Accessory Merchant] Joana. The image map below shows the monster’s spawn points.

Step 4: Creating Weapons

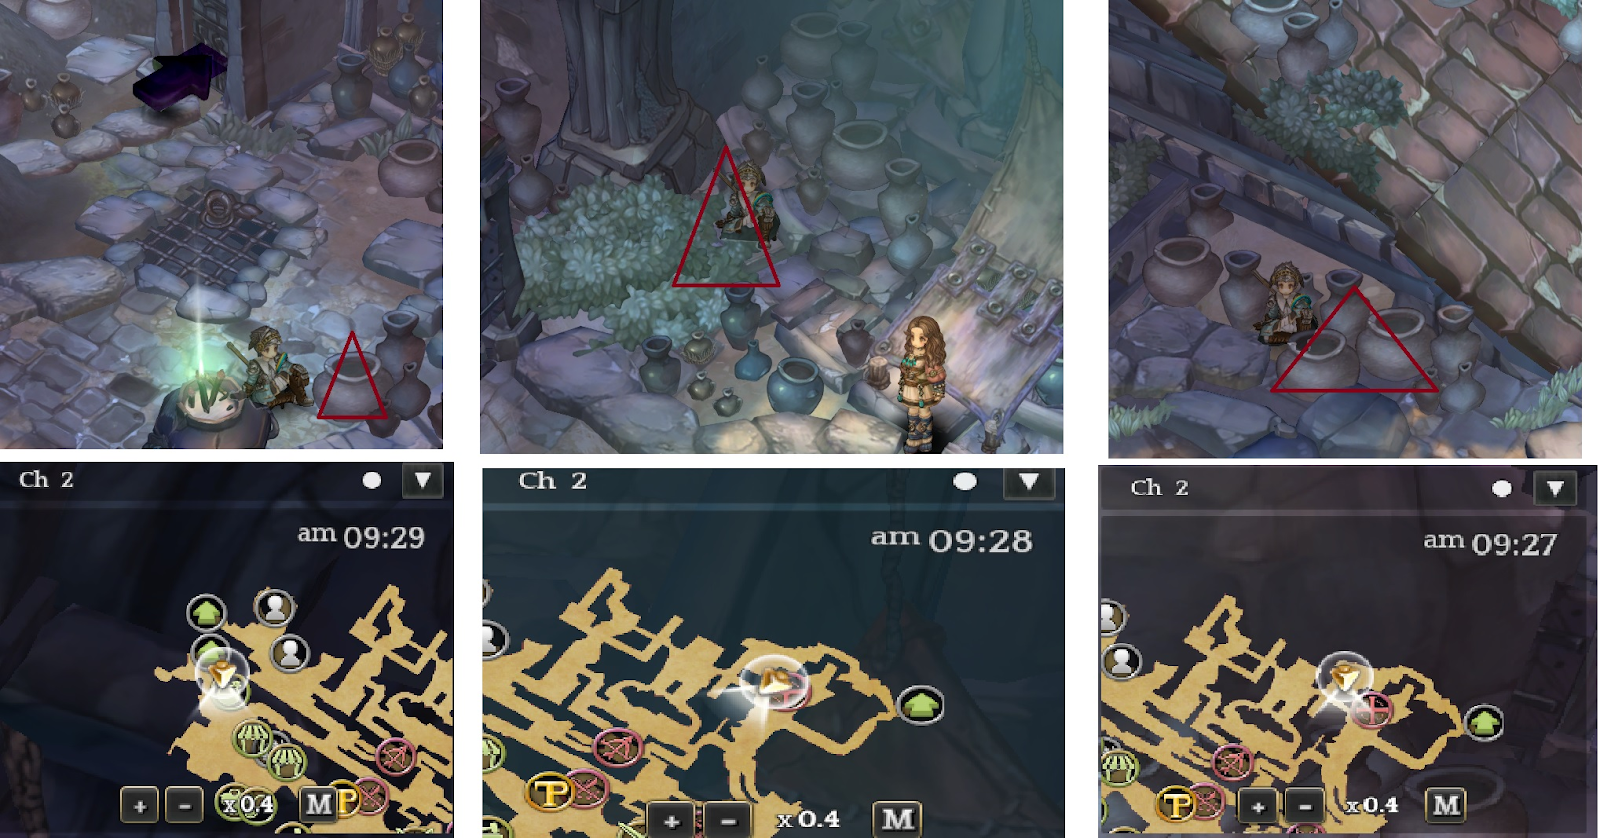
Head over to Orsha town and speak with [Blacksmith] Ilanai, she will ask for 2 high quality ores. You can obtain the ores from Nevellet Quarry 1F. You will need to look for obscure looking black rocks to interact with and mine the ores from. They can be found around the map and an image of what they look like is provided below. After obtaining them, go back to Orsha town and hand them in to [Blacksmith] Ilanai.

Step 5: Crafting Companion Armor

Go and talk to [Companion Trader] Toras in Orsha town. He will tell you to find an NPC named Rimantis. Travel to Lemprasa Pond and speak to Rimantis. An image showing the NPC’s location is shown below.

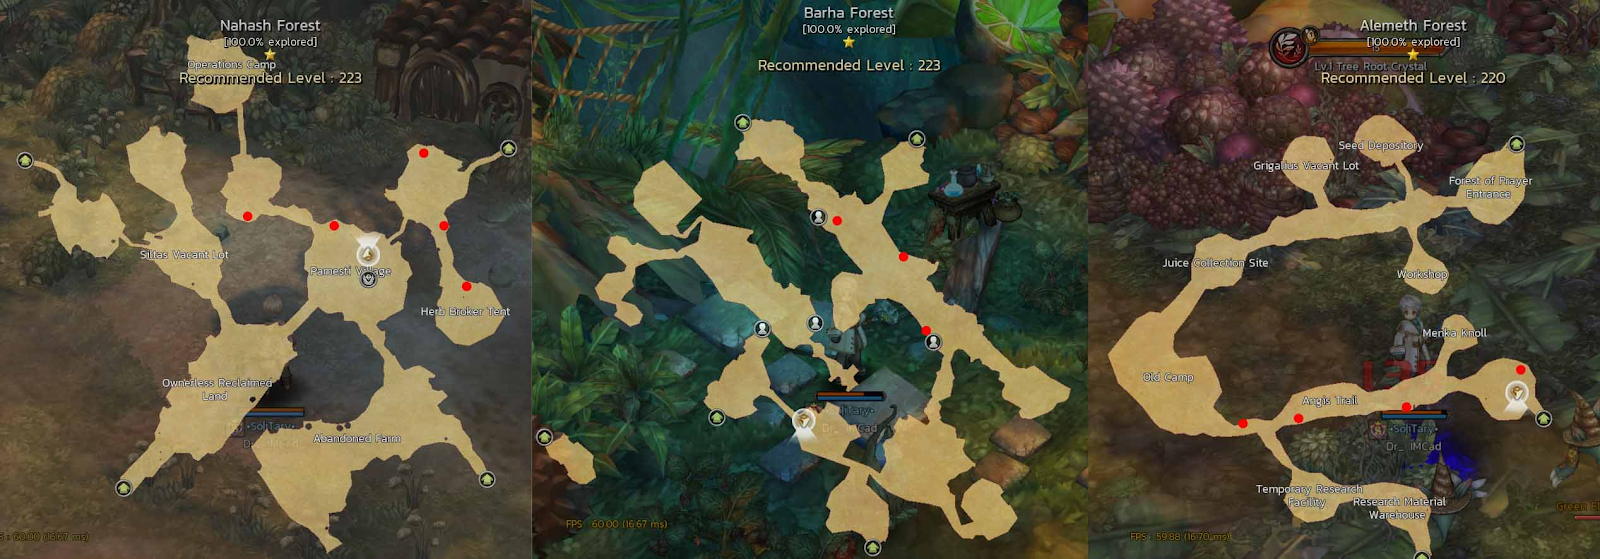
Rimantis will ask for 10 x Fine Cockatrice Leathers, 15 x Solid Minivern Hides and 12 Tough Beetow Feelers.The images below show the current best places to farm for each materials and where the monsters spawn.

Fedimian Suburbs - Kill Cockatrice for Fine Cockatrice Leathers

Mage Tower 4F - Kill Miniverns for Solid Minivern Hide, Miniverns will usually walk around so they will be spread out on the topside of the map.

Veja Ravine - Kill Beetows for Tough Beetow Feelers

After collecting all the materials, you can turn them back in to Rimantis at Lemprasa Pond.

Step 6: Creating the Capote

Head over to Klaipeda town and speak with Rima. You will be able to find her location shown in the image map below.

She will prompt you to get a cocoon from Emmet Forest for her. You can find cocoons from Emmet Forest inside small bushes, an example of them is shown in the image below.

After obtaining the cocoon, you will need to go back to Klaipeda town and turn it back in to Rima.

Step 7: Finishing the Matador Master’s Request

Finally, you can head back to Fedimian town and speak with [Matador Master] Kridella Otero again. This will complete the Matador Master’s Story Quest and you will be given the special title “Romantic Matador”.

(Taken from / Based on Source’s youtube vid guide)
(https://youtu.be/38fwp6x3Rxw)

Retiarius

Step 1: Training of the Retiarius Master

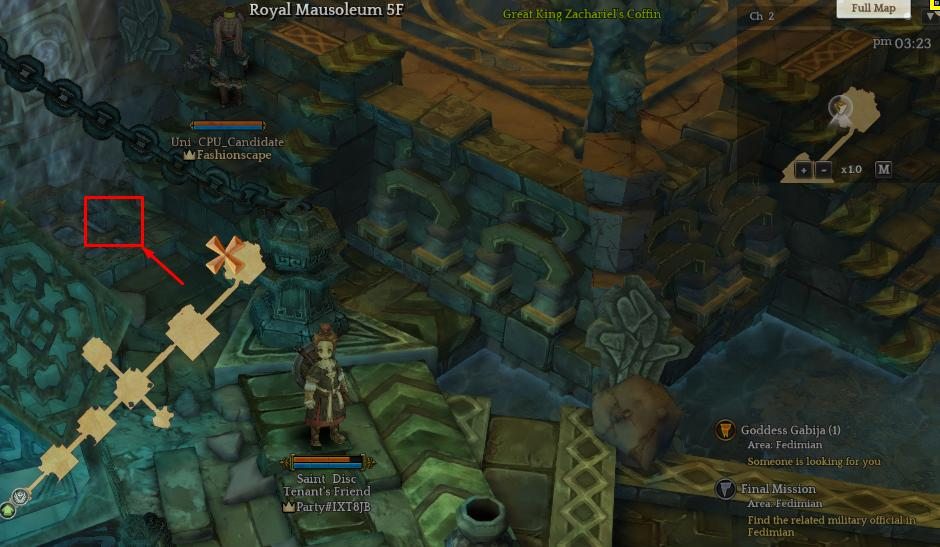
Go to Tenant’s Farm and speak with [Retiarius Master] Caecilia on the left side of the goddess statue. She will tell you that she will train you to be a Retiarius. You will need to complete 4 different training sets to become a Retiarius. Notice that you have a yellow hp count shown on the top of your character, doing training sets will decrease that count. To increase the HP count back again after reaching HP 0, talk to [Retiarius Master] Caecilia and eat the food that she gives you. If you sit down after eating the food, you can recover all your HP counts in 1 min, if you decide to stand after eating then you recover in 3 mins. Talk to her and select each of the options to gain a set of items for each training type.

Step 2: Strength Training

Select the Training Dumbbell in your inventory and use it. Each use will decrease your HP count so remember to restore the HP in the method explained in the previous step. You will need to use the Training Dumbbell 25 times to complete the Strength Training.

Step 3: Stamina Training

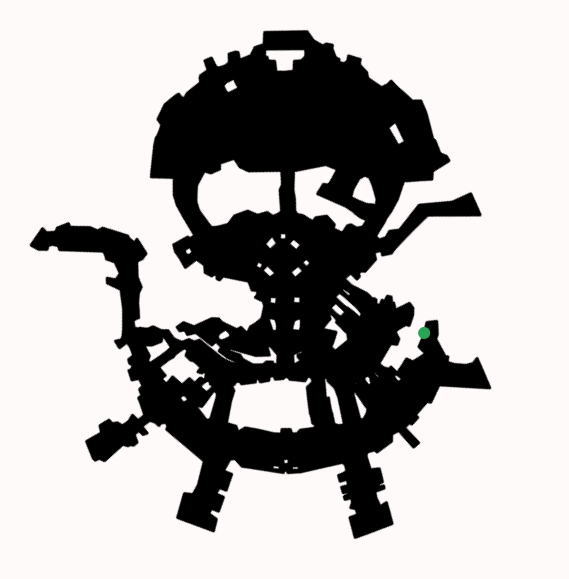
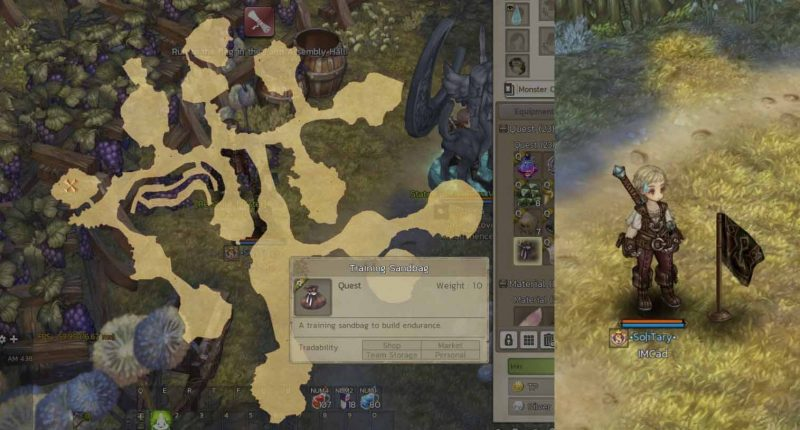
Use the Sandbag item in your inventory near [Retiarius Master] Caecilia to get a point shown on your map to go to.Your move speed will be reduced and you will need to move to the point marked on the map. Once you reach that point, you will get another point in the map to go to. Keep repeating this until one of the points of the map show a place near [Retiarius Master] Caecilia. You will need to do this 3 times to finish this Stamina Training.

Step 4: Agility Training

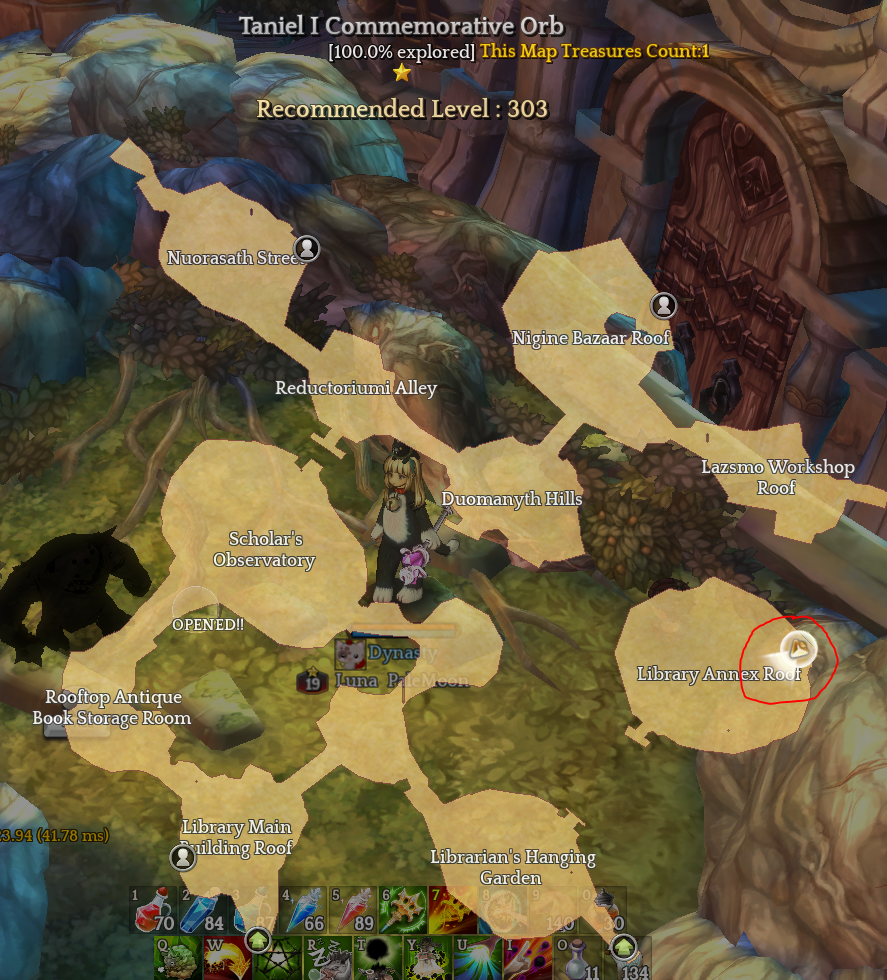
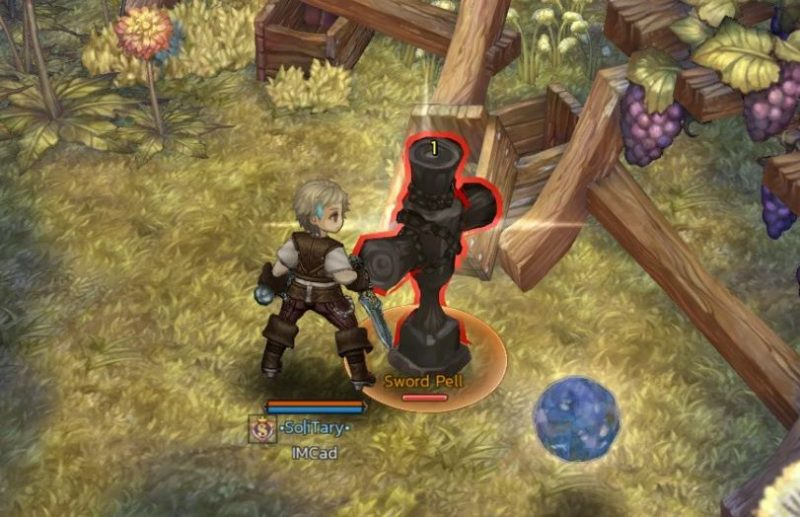
Interact with the Management Orb on the right side of the goddess statue near the wall. You will need to hit the Training Dummy every time it sparkles a bit. Hitting it 3 times in a row will complete one time of the Agility Training, you will need to complete 20 times of the Agility Training to finish this step.

Step 5: Gladiator Training

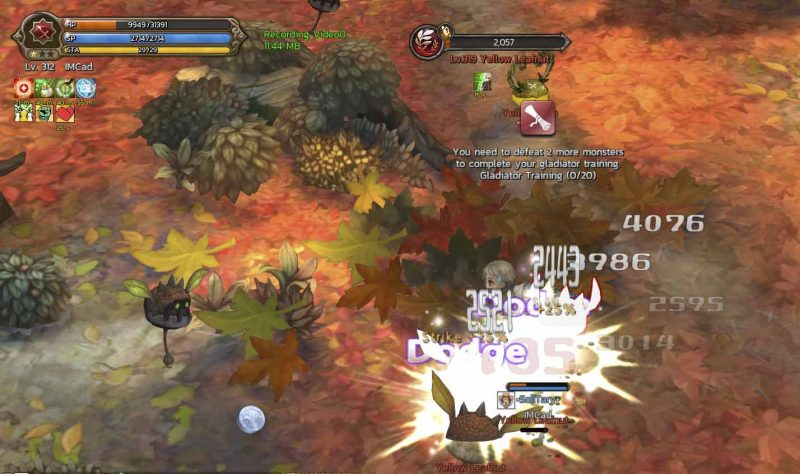
In this step, you will need to get your hp low to about 1/3rd of your max hp and then find and kill any monsters which are around your character level. You will need to kill an amount of enemies while your hp is low to finish this step. Once you have killed 20 “packs” of mobs, you will complete this step.

Step 6: Completion of Training

Once you have completed all your previous trainings, head back to Tenant’s Farm and Speak with [Retiarius Master] Caecilia. This will complete the Retiarius Master’s Story Quest and you will be given the special title “Determined Gladiator”.

(Self made AND based on tos.th’s guide post)
(https://tos-th.com/pre-quest-retiarius/)

5 Likes

Wizard Classes

Rune Caster

Step 1: Knowledge of Glowing Stones

Go to Fedimian town and talk to the Old Man NPC until he mentions about a female mage looking for stones engraved with glowing blue characters. The image below shows what the npc looks like and where he is found.


After that, head straight to Mage tower F1 and go to the Vakarine goddess statue there. There will be books scattered around that area. Read through ALL of them, then read through the book on the shelf last. The book on the shelf will be locked until you read through the other books. The last book should mention about Goddess Saule. Images have been included below to show examples of what you should be doing.


Step 2: Guidance on Rune Stones

Head to Septnyi Glen and speak with Goddess Saule, of course this requires you to have completed the Septnyi Glen main quests beforehand. She will mention something about rune stones and feeling similar things at Royal Mausoleum, as well as speaking to other people who have lived a long time or the Jones family.

Step 3: First Rune

Go to Gateway of the Great King and look for Ahylas Jonas. Speak with him a few times and he will give you the first rune. You will be able to find him at the location highlighted from the image map below

Step 4: Second Rune

Head to Royal Mausoleum to look for the second rune. Each floor has a specific area to where the rune can spawn, and has a chance to spawn every 30 minutes(XX:00, XX:30). Once you find the rune, just interact with it to pick it up. It seems that 5f is the most common spot for the rune to spawn than other floors. A good method would be to check every spawn spot in every ch every 30 minutes. If you cannot find the rune in the spawn points of every channel in that specific 30mins slot, then it means someone else has taken it for that time slot or it didn’t spawn for that slot.
An additional tip would be to get the quest warps for each floor so that you can fast travel to each floor’s rune location instead of running across maps.
Included below are the coordinates for each of the runes for each floor.

1F; [X: 649, Z: -1028]


2F: [X: -860, Z: -784]

3F: [X: -1046, Z: 144]


4F: [X: 477, Z: -1484]

5F: [X: -3062, Z: 316]

Step 5: Third Rune

Go to Nuoridin Falls, and find the third rune behind a Stone Monument.

Step 6: Fourth Rune

First, talk to the [Dievdirbys Master] Sculptor Tesla in West Siauliai Woods, he will mention feeling runic power in a sealed place in the woods. Go to the location shown in the image map below and use the Seal of Space item gained from completing the Tenet Church main questline. Then go to the location of the second image to find the fourth rune.

Step 7: Fifth Rune

Talk to the Chronomancer Master at Stele Road. She mentions that she was given a rune stone as a child, but may need to find it. However, she will eventually find it and give it to you. If she does not give you the fifth rune when talking to her, just come back another time until she finds it and gives it to you. There is a 2-4 hr cool down per channel of getting the rune here, the best method is use the “ShowHideBuff” addon and afk next to the Chronomancer Master to see when is the next rune available to pick up. The addon will show how long until the next rune is available, i had to wait for 2 hours and 10 mins for example. DO NOT CHANGE CHANNELS OR MAPS, if the channel closes (aka no one in the channel for 5 minutes or more), then the spawn timer will reset.

Step 8: Rune Caster’s Invitation

Once you have all 5 Runes, right-click any Rune in your Quest Inventory to fuse them into the ‘Rune Stone of the First Master’. Now go to Goddess’ Ancient Garden with the rune and find [Rune Caster Master] Shelly Pennington, who is now visible. You can now talk with her to advance to a Rune Caster as long as you are a Wizard Class who has all the prerequisites.

(Taken from / Based on pastebin.com/u/ToSPatch)
(https://pastebin.com/jMiMQfB9)

Shadowmancer

Step 1: Mysterious Shadows

Head to Taniel I Commemorative Orb and search for a shadowy figure at the Library Annex Roof. The images below show the exact location and look of the shadow.


Interact with the shadow and a message will appear telling you that the Chronomancer Master might know more about this mysterious shadow. Make your way to Stele Road and look for [Chronomancer Master] Lucid Winterspoon. Talk with her and she will tell you about someone who is familiar with shadows at Rasvoy Lake.

Step 2: Shadow Traces - Khonot Forest

Make your way to Rasvoy Lake and look for [Shadowmancer Master] Eclipse Ubik, you will be able to find her location as shown in the image map below.

You will need to speak with her a few times and select the option of cooperating with her. She will tell you to find traces of shadows at 4 different locations. For the first trace, head to Khonot Forest and look for the Shadowmancer’s Research Device. Images have been included below to show you how they look like and where the location is.

Interact with the device and multiple shadows will spawn along with a transformation device that is close to the Shadowmancer’s Research Device. This will be a small mini game where you will need to interact with the transformation device to turn into a small shadow puddle that can move. During this state, you can interact with the spawning shadow monsters to capture them, if the shadow transformation state goes away, all you need to do is interact with the device to turn back into a shadow puddle. Keep turning into a shadow puddle and interact with the spawning shadow monsters until you get an item called Shadow Trace of Khonot Forest, then interact with the Shadowmancer’s Research Device to get and item called Shadowmancer Master’s Research Device and end the mini game.

Step 3: Shadow Traces - Lhadar Forest

Make your way to Lhadar Forest to search for the second shadow trace. The image below shows the exact location that you will find the Shadowmancer’s Research Device at.

Interact with it and another mini game will start. This time you will need to choose 1 of 3 colours and kill the shadows that have the same colour auras or gas coming out of them. To begin choosing a colour, just hit the shadow which aura’s colour you want to go for, then from then on, just keep hitting the shadows that spawn that have the same colour as the first one you hit. Continue hitting the shadows which auras have the same colour as the one you chose until you get an item called Shadow Trace of Lhadar Forest, then interact with the device to get another Shadowmancer Research Device item.

Step 4: Shadow Traces - Ghibulinas Forest

For the third shadow trace, go to Ghibulinas Forest and look for the Shadowmancer’s Research Device at Kyrba Lot. The exact location is shown in the image below.

Interacting with the Device will bring you into another mini game. In this one, all you need to do is keep interacting with the spawning black shadows. However there will be some hidden shadows that spawn and stun you upon contact too, so avoid those. Keep doing this until you get an item called Shadow Trace of Ghibulinas Forest, then interact with the device to end the minigame and pick up your third Shadowmancer’s Research Device. An image is shown below of how to spot the hidden shadows to avoid during the minigame, they will have small dark patches on the ground.

Step 5: Shadow Traces - Namu Temple Ruins

For the final shadow trace, go to Namu Temple Ruins and find the final device at Ratas Corridor Area. The Image below shows the exact location.

Interacting the device will bring you into a simple mini game. There will be shadows that spawn and you will need to run into them to gather shadow energy, sometimes big shadow monsters might spawn too and you will need to avoid them while running into the other shadows that spawn. Once you have ran into enough shadows that aren’t the big ones chasing you, you will obtain an item called Shadow Trace of Namu Temple Ruins. End the minigame by interacting with the device and obtain another Shadowmancer’s Research Device. The image below shows an example of the big shadow monsters which will spawn to chase you, these are the ones you want to avoid.

Step 6: Advancement into Shadows

Once you have obtained all 4 shadow traces and all 4 Shadowmancer’s Research Devices. Return back to Rasvoy Lake and speak with [Shadowmancer Master] Eclipse Ubik. She will take the items off your hands and tells you that you are fit to become a Shadowmancer. This will complete the Shadowmancer Master’s Story Quest and you will be given the unique title “Shadow Master”.

(Taken from / Based on Gaming Hardcore’s youtube video guide)
(https://www.youtube.com/watch?v=m0I6dx-CPYc)

Onmyoji

Step 1: Onmyoji List of Supporters

The Master’s Story Quest for this class is unusual and different from other classes.
Go to Klaipeda town and talk to [Knight Commander] Uska, select the option of him feeling restless and he will give you a list of Onmyoji Supporters. When you read the list in your inventory, you will get a set of random quests paths to do. You will need to do 2 of the randomly selected quest paths out of the possible 10 paths.

Step 2: The Basic Requirements of an Onmyoji

After you have spoken to [Knight Commander] Uska and given your 2 random quest paths, you will need to do them both to proceed onto the next step. Since there are 10 possible quest paths to be given, i have included what you need to do in them in a short section below. Remember that you need to complete both of the quest paths that were randomly assigned to you.

Path 1:
Talk to [Knight Commander] Uska and he will tell you to visit the Item Merchant in Klaipeda town. Head down to the south side of Klaipeda town and speak with [Item Merchant] Mirina, she will tell you that she needs some high quality leathers which can be made from fur obtained from monsters at Vedas Plateau.
Make your way to Vedas Plateau and kill monsters there, you can right click the monster fur to craft them into high quality leather. Once you have enough leathers(about 100+), return to Klaipeda town and speak with [Item Merchant] Mirina to complete this quest path.

Path 2:
Go to Fedimian and talk with [Druid Master] Gina Greene, she will tell you to head out to Greene Manor to cast a certain protection spell on some Grape Seed Samples with a spell scroll she provides. After speaking with her, Go to Greene Manor and cast protection on 10 Grape Seeds from the mounds near Avarza Grape Farm and Ziura Junction. Certain mounds might be corrupted no matter how much spacebar mashing or time spent, the mounds that are corrupted seem to respawn the grapes after 3 to 5mins.
Once you have protected 10 Grape Seed Samples, return to Fedimian and talk to [Druid Master] Gina Greene to finish this quest path. Included below are the spawn locations of the Grape samples.

Path 3:
Make your way to Greene Manor and speak with Druid Eli. After doing that, you will need to place special order forms on top of the sacks of grain in the map. You can do it by just interacting with the sacks of grain, however some of them are infected so they won’t count.

Once you have completed placing enough order forms, return back and talk to Druid Eli to complete this quest path.

Path 4:
Go and talk to [Item Merchant] Mirina, she will tell you to collect 80 fur pieces made from Saltisdaughters at Vedas Plateau. Go to Vedas Plateau and kill the Saltisdaughters there for the fur, you can click on the fur in your inventory to turn them into the fur pieces that the item merchant wants. Return to [Item Merchant] Mirina once you have enough to complete the quest path.


Path 5:
Go and talk to [Item Merchant] Mirina, she will tell you to collect 150 dry wood at East Siauliai Woods. Head to East Siauliai Woods and interact with the woodpiles to obtain wood. Once you have enough, return to [Item Merchant] Mirina to complete this quest path.

Path 6:
Head to Fedimian and talk to [Druid Master] Gina Greene. You will need to collect 15 Mushrooms at Poslinkis Forest. Go to Poslinkis Forest and interact with the mushrooms around the map to collect them, return to [Druid Master] Gina Greene to complete this quest path.

Path 7:
Head to Orsha and speak with [Lord of Orsha] Inesa Hamondale. Then speak with [Item Merchant] Alf on the same map. You will be requested to obtain Ducky Leathers to turn into 50 Processed Ducky Leathers. You can farm for Ducky Leathers by killing Duckys at Sunset Flag Forest orKhamedaton. Right click the leathers in the inventory to turn them into processed Ducky Leather, each processed one requires 2 Ducky Leathers. Once you have obtained enough, return back to Orsha and speak with [Item Merchant] Alf. Then go back to [Lord of Orsha] Inesa Hamondale and speak with her to complete this quest path.

Path 8:
Travel to Akmens Ridge and talk to [Corsair Master] Hayraven, he will tell you to find Pirate Captain Lowe at Rasvoy Lake. Go to Rasvoy Lake and walk down just a bit south of the goddess statue to find Pirate Captain Lowe. Talk with him and he will tell you to kill Brown Lapasapes around Rasvoy Lake and Ouaas Memorial to find a Simple Brooch. Kill them until you get a Simple Brooch and give it back to Pirate Captain Lowe. Then return to [Corsair Master] Hayraven to finish this quest path.

Path 9:
Head to Istora Ruins and speak with [Plague Doctor Master] Philip Aurellius. You will need to collect 15 Hard Thistles at Alemeth Forest/Barha Forest/Nahash Forest, you can find them by seeing if there is any purple mist when you walk past those maps in certain locations.After you have collected 15 Hard Thistles, return to [Plague Doctor Master] Philip Aurellius and he will ask you for another favour. Memorize the number of items on the boxes scattered around the Research Camp in Istora Ruins, return back to him and answer his questions correctly about the numbers of the items in the boxes. This will complete the quest path. Included below are the spawn locations of the purple mist in the 3 maps.


Path 10:
Go to Manahas and speak with Kedoran Alliance Merchant Leopoldas, he will tell you to collect Dimensional Fragments. Go to Grand Yard Mesa and collect 20 Dimensional Fragments using a Detector item which he provides. Use it at Barga Base, Jaudenti Clearing and Gado Way to find the fragments, They will appear as a small vertical glow.An image of the Fragment locations is included below from Est on discord. Once you have obtained 20 Dimensional Fragments, return to Leopoldas to complete this quest path.

Step 3: Onmyoji Master’s Acknowledgement

Once you have completed your 2 quest paths, head back to Klaipeda and speak with [Knight Commander] Uska. After that, the Onmyoji Master will be present in Klaipeda town to the left side of [Knight Commander] Uska. At this point, you can speak with him to complete the Onmyoji Master’s Story Quest and receive the special title “Master of the Yin and Yang”.

(Taken from / Based on Raizel’s discord post AND tos.th’s guide post)
(No original link / https://tos-th.com/pre-quest-onmyoji/)

4 Likes

Archer Classes

Appraiser

Step 1: Importance of an Appraiser Master

Go to Forest of Prayer to talk to [Fencer Master] Sorscha Hutton and go to Orsha to talk with [Accessory Merchant] Jurus. Keep talking to them until they mention dialogue about the Appraiser Master going missing. Make sure you have done the main quest line up to crystal mines before you proceed onwards. Make your way to Klaipeda and talk with the [Knight Commander] Uska, The option [Talk about the importance of an Appraiser Master] will be added to his chat list when talking to him. Select that option from him.

Step 2: Princess Gaivile’s Attendant

Head to northern part of Klaipeda town, literally next to [Archer Master] Edmundas Tiller to find Princess Gaivile’s Attendant. The npc will spawn randomly across all channels and lasts about 15 minutes before despawning. After managing to talk to Princess Gaivile’s Attendant, he will give you an item called the Royal Order.

Step 3: Signatures and Suspicion

Go to Orsha and talk with [Lord of Orsha] Inesa Hamondale a few times, then go to Entrance of Kateen Forest and talk with Commander Vacenin a few times. The picture below this step shows the Commander’s location. After you have done this. Click on the [Royal Orders] Item in your inventory to get 3 messages:

  • The Royal Order smells slightly of chemicals.

  • The empty space between contents and the first signature are far too wide.

  • The Royal Order looks a little suspicious. Someone Ought to know about it.

Step 4: Inquiries

Return to Orsha and talk with [Lord of Orsha] Inesa Hamondale about the suspicious gap in the letter and the chemical smells, then head to Fedimian and speak with [Identifier/Appraiser] Sandra about the Royal Order. You will need to go to Miner’s Village and speak to [Alchemist Master] Vaidotas. He will give you a list of items to procure for him to make a special reagent. Here is a list of the ingredients and where they can be found:

  • Firent Flower x 15 (Firent, Nefritas Cliff)
  • Ellom Bell x 20 (Ellom, Entrance to Kateen Forest; Myrkiti Farm)
  • Phyracon Leaf x 50 (Phyracon, Mage Tower 1F)
  • Magic Powder x 100 (Enchanter Master, Saalus Convent)

Step 5: Weynd/Gystis Flower Collection

You will need to collect a Weynd/Gystis Flower. This flower spawns randomly at 4 different locations in Gytis Settlement Area, they look similar to the yellow flowers in Letas Stream. The Flowers will disappear once they are collected. It is usually best to camp the spawn points with a party and work together for this since the flower is shareable. The locations of their spawn points are shown below.

Step 6: Driekple Flower Collection

At this stage, you will need to find and take care of a special flower called the Driekple Flower. It can be found at Goddess’ Ancient Garden, the flower appears as a greenish plant object. It is a random spawn and you will need to continuously water the flower. When watering, the flower will alternate between glowing and non-glowing state (not visible; glowing state means it will glow if watered) every 10s. When watered enough times only in the glowing state, it can be collected. Water can be collected from the water area near the Goddess Statue. Once you have watered the flower enough, it will go into your inventory. Below are some images of the locations and process. The flower itself will spawn near the Monument at the 8 o’clock direction from the Statue. It’ll spawn near the tree nearby that monument.

(location of flower spawn in minimap)


(exact location of flower in normal view)

(location of water for use on flower)

Step 7: Official Appointment of an Appraiser Master

Once you have everything from the previous steps, go back to Miner’s Village and talk with [Alchemist Master] Vaidotas to give him the flower and reagent. After that, you will need to head to Fedimian and deliver the special chemical to [Identifier/Appraiser] Sandra. She will give you the [Royal Orders] item and the [Copy of Royal Orders] Item. Go back to Orsha and speak to [Lord of Orsha] Inesa Hamondale for abit, then head to Klaipeda and speak with Princess Gaivile’s Attendant. For the final part of this, head back to Fedimian and talk with [Identifier/Appraiser] Sandra, give her the Official Letter of Appointment and the npc will turn into [Appraiser Master] Sandra. From then on, you can proceed with the straightforward quest chain of becoming an Appraiser if you are an Archer class that has fulfilled the conditions. (the quest chain is literally just talking to some npcs back and forth).

(Taken from / Based on @yukari_hibana (twitter)’s post and Translated by Cleodora @iToS forums.)
(https://docs.google.com/document/d/1m3wyo_HIw5GE1aHJJ5ketoi9jQ0bbiOwwDBcsd_y-WA)

Pied Piper

Step 1: Relief Aid

Go to Fedimian town and speak with [Item Merchant] Muras. Select the option which is about him being worried, then head to Nheto Forest. Once you are there, go to Pjama Resting Place.
Look for a Soldier which is sitting down and talk to him. Pick the option to shake/move him and see his response, you can find the location of the NPC in the red circle of the image map below.

After that, you will need to go to Entrance of Kateen Forest and find Commander Vacenin at the Kateen Forest Camp. You can find the location of the NPC shown by the image map below.

Talk with Commander Vacenin and tell him about the situation of the Soldiers.
After that, make your way to Klaipeda town and speak with [Oracle Master] Apolonjia Barbora.

She will give you a note after a short dialogue that tells you to find the Pied Piper master at Forest of Prayer.

Step 2: Finding the Pied Piper Master

Make your way to Forest of Prayer and find [Pied Piper Master] Jogaila, you can find his location shown in the green dot of the image map below.

Speak with him and after a short dialogue about the lack of materials, you will be prompted to find the Plague Doctor Master at Istora Ruins.

Step 3: Gathering Materials 1

Head over to Istora Ruins and speak with [Plague Doctor Master] Philip Aurellius, you can find his location shown in the image map below.

He will tell you to find special leaves from piles of grass at Vilna Forest.
Go to Vilna Forest to look for the 30 of the Perilla leaves from grass piles. You can find the grass piles in between Wood Watch Tower, Reserved Land for Maras Bee Farm and Shirsie Sunny Place. There is a high probability of acquiring leaves from the piles, but sometimes you might not get any leaves when interacting with a grass pile. It should take you around 10-15 minutes to get 30 leaves.

The image below shows you an example of what the grass piles look like.

Step 4: Gathering Materials 2

Return back to [Plague Doctor Master] Philip Aurellius at Istora Ruins and speak with him once you have the 30 leaves. You will be prompted to visit the Chronomancer Master by Stele Road to find the other ingredients that are required by the Pied Piper Master.
Head over to Stele Road and speak with [Chronomancer Master] Lucid Winterspoon. You will be able to find her just next to the Goddess Statue. Select the option of telling her about the missing ingredients requested by the Pied Piper Master and she will give you an Empty Bottle item. She will also tell you to go to Igti Coast and fill the bottle with Glowing Blue Sand.
Go to Igti Coast and look for small blue circles, then click your bottle and this will let you fill your bottle with some sand. Collect 1000 sand. You should be able to find the circles at Lemyra Sentry, Lamdoras Coral Reef and Sahguma Lagoon. The image included below will show you can example of the circles and interacting with them.

Step 5: Blessing of a Pied Piper

After filling up the Empty Bottle, return back to Stele Road and speak to [Chronomancer Master] Lucid Winterspoon. The final step is to go to Klaipeda town and talk to [Priest Master] Boruble and tell him about the current situation, he will bless the vessel that you have gotten so far into a special blessed medicine. Once you have done this, return back to Forest of Prayer and speak with [Pied Piper Master] Jogaila to hand in the special medicine to treat the Soldiers. At this point, you will complete the Pied Piper Master’s Story Quest and be rewarded with the unique title “Master of the Flute”.

(Taken from / Based on Kim Cheong-Ho’s post on inven)
(http://www.inven.co.kr/board/tos/4196/107832)

3 Likes

Scout Classes

Shinobi

Step 1: Hidden Empty Note
Head to Fedimian town. You will need to search for an “Empty Note” in one of the jars in Fedimian town. The note can spawn in 3 seperate locations, these locations are:

  • To the left of the Druid Master

  • Directly to the south of the Mercenary Post Warp

  • Near the top of Fedimian on the right-hand side

This item has a GLOBAL respawn of 4 hours. It can be in one of these three spots at any one time, most likely the first two. It seems each channel has their own respawn and timer as well, so check multiple channels. Images are included below to show the exact location of the jars you need to interact with.

Step 2: Scout Master’s request

Go to Klaipeda town and search for [Scout Master] Recon Rimgaile. Talk to her and she will notice the note has an invisible message hidden on it. In order to reveal the hidden message, you’ll need to collect quite a few items. She will hand you 2 recipes, “Scout Master’s Elixir” and “Letter Scroll”. You will now need to collect the items required to make them.

Step 3: Ingredient Hunt Part 1

Go to Vieta Gorge and find the ‘Disposable Vials’ in a chest. The location is shown in the image below.


Next, you will need to go to Letas Stream and find the ‘Solvent’ in a chest. The location is shown in the image below.

After that, head over to Alemeth Forest to search for the ‘Yellow-eyed Flower’ in a yellow flower patch. It has a 2~4 hour respawn time and to guarantee the spawn, it is best to camp the channel for the full 2~4 hours. The timer only starts when the channel is not empty and the flower itself only lasts 15 minutes. The spawn locations are shown below.

Once you obtain the previous items in this step, you can now focus on getting the ingredients for the Scout Master’s Elixir.

Step 4: Ingredient Hunt Part 2

To create the ‘Scout Master’s Elixir’, you’ll need to farm a lot of items which are Slick Sap x 100, Tipio Stamen x 80, Wax x 50, Resin x 10, Colifly Stamen x 30. The images below show the current best places to farm for each materials and where the monsters spawn.

Dvasia Peak - Kill Ravinelarvas for Slick Sap (10% drop chance)

Veja Ravine - Kill Tipios for Tipio Stamen (20% drop chance)

Apsimesti Crossroads - Kill Red Tree Ambulos for Wax (8% drop chance)

Goddess’ Ancient Garden - Kill Long-Branched Trees for Resin (10% drop chance)

Narcon Prison - Kill Black Coliflys for Colifly Stamen (5% drop chance), Keep in mind the Colifys tend to move around the map so they can be in various places of this map

Step 5: Revealing the Message

Once all of these items have been acquired, craft the Scout Master’s Elixir. Then, you can use the quest items you collected earlier, the newly crafted Elixir, and the Empty Note to craft the last recipe. Crafting the last recipe reveals the message on the note. Right-click the note to bring up a message. The message is intel from a Shinobi, and mentions a rendezvous point is in Mesafasla. Travel to Mesafasla to find [Shinobi Master] Yura Swanjone. Upon speaking with [Shinobi Master] Yura Swanjone, she will acknowledge your skill in finding out the information hidden on the note, and will then take it from you. After that you will be allowed to advance into a Shinobi class provided you are a Swordsman class with the prerequisites fulfilled. An image is included below to show the location of.[Shinobi Master] Yura Swanjone.

Base Source:
(Taken from / Based on TosPatch Pastebin, unable to find direct link, secondary link is included)
(Where I can find a Shinobi Quest guide?)

Bullet Marker

Step 1: Bullet Marker Master’s Special Request

Head to Klaipeda town and find Mercenary Post Manager Rota, you can find her near the topside of the map, to the right side of the fishing pond. Speak with her and keep select the option of asking for a special request. You will need to keep repeating the process of speaking with her and selecting the option to ask for a special request multiple times. Her dialogue will change a few times, but just keep doing it until she responds with information about a special request from the Buller Marker Master. An image of the dialogue you need from her is shown below.

After she tells you that, go to Greene Manor and speak with [Bullet Marker Master] Flint Winterwood. He will tell you about special bullets and give you 2 items, a Lantern and the Bullet Marker Master’s Memo. Return to Klaipeda town and talk with Mercenary Post Manager Rota again. She will give you 3 bullet recipes which are frost, fire, lighting and she will also give you an Item called the Surveillance Orb.

Step 2: Demon Magic Dust

To begin crafting the bullets, you will need something called Demon Magic Dust (50x per bullet recipe). Make your way to Shanton Reservoir to kill the monsters in that map, you will obtain an item called Demonic Monster Flesh when killing the monsters. You can turn Demonic Monster Flesh into Demon Magic Dust by interacting with Magic Aggregators around the map, an image of their locations and how they look like are shown below. Keep in mind that you can only use the Magic Aggregators that are glowing red to get turn your Demonic Monster Flesh into Demon Magic Dust. You will need exactly 150 Demon Magic Dust to craft all 3 recipes, so only once you get 150 Demon Magic Dust, can you proceed to the next step.


Step 3: Crafting the Flame Bullet

Go to Klaipeda town and go inside the Pyromancer Master’s Lab to speak with [Pyromancer Master] Abreh Melinn, the image shown below is the location of the lab. Talk with her and purchase 200 Pyrites. You can now craft the Flame Bullet from the first recipe. Sit down and craft the flame bullet using 50 Demon Magic Dust and 200 Pyrite.


Step 3: Crafting the Frost Bullet

The next order of business is to craft the Frost Bullet. You will need to obtain 260 Pure Frost Fragments to make it, along with 50 of your Demon Magic Dust. Go to Ashaq Underground Prison 1F and kill any monsters you see on the map, monsters you kill will drop Pure Frost Fragments. Once you have obtained 260 Pure Frost Fragments, go to somewhere safe and craft the Frost Bullet.

Step 4: Crafting the Lightning Bullet

The last bullet you need to craft is the Lightning Bullet. For this, you will need to get 2 Electric Stones. Travel to Grynas Trails and use the Lantern item that was given to you by [Bullet Marker Master] Flint Winterwood. Using the Lantern item will give you a light circle aura around you that can reveal the presence of nearby Electric Stones. An image of what you look like when you use the lantern is shown below.

You will need to literally run around the entire map and look for Electric Stones. If you manage to walk past one, they will appear as orangeish sparks and a message will appear saying that there are nearby Electric Stones. An image is included below to show how the sparks look like. Interact with the sparks to obtain an Electric Stone. Once you have obtained 2 of them, Go somewhere safe to craft the Lightning bullet.

Step 5: Monster Shooting

Now that you have crafted all 3 bullets. You can now use them to shoot at their respective monsters. First of all, make your way to Sekta Forest and look for a Strange Blue Lepusbunny on the map, it will have a golden aura around it. An image of what it looks like is shown below.

Put the Lightning Bullet(Lightning) which is found in your quest item inventory tab, on a hotkey slot and use it to shoot at the monster. You do not have to kill it, just shoot it once with the bullet.
Now make your way to Salvia Forest to look for a Strange Red Spion on the map. Similar to the previous monster, it will have a golden aura around it and this time you will need to use the Frost Bullet(Chill) on it.

The last monster you need to shoot is located at Nefritas Cliff so make your way to that map. Once you are there, look for a Strange Firent. It is similar to the previous two monsters in the fact that it has a gold aura around it. Shoot it with the Flame Bullet(Flame) to finish this step.


Step 6: Mark of a Bullet Marker

Return back to Greene Manor and speak with [Bullet Marker Master] Flint Winterwood, he will tell you that you would make a fine Bullet Marker if you were ever interested. This will complete the Bullet Marker Master’s Story Quest and you will be given the special title “Wandering Gunman”.

(Taken from / Based on Gaming Hardcore’s youtube vid)
(https://www.youtube.com/watch?v=NhtgBsw73Yc)

4 Likes

Cleric Classes

Chaplain

Step 1: Beginning Conditions

Go to Orsha and talk to the guard on the left side of where [Lord of Orsha] Inesa Hamondale is facing (it should be the one closest to [Swordsman Sub Master Codil]), keep interacting with the guard until he mentions something about a Chaplain Master.

Step 2: Asking about the Chaplain Master

Head to East Siauliai Woods, and speak with the first guards closest to the entrance to Klaipeda town. An image below shows the location of these guards. After that, head to Klaipeda town and and talk to [Priest Master] Boruble, he will give you a quest option about Chaplain Master.

Step 3: Finding The Chaplain Master

Go to Dvasia Peak and speak with [Chaplain Master] Ceslovas. This will complete the Chaplain Master’s Story Quest and you will be given the special title “Prestigious Commander”. Below is the location of [Chaplain Master] Ceslovas in the minimap of Dvasia Peak.

(Taken from / Based on Starkisch’s guide which was provided)
(No original link, based on self experience)

Miko

Step 1: Acquisition of Gohei

All steps before the advancement quests can be performed without needing to be at class level 15. After completing Manahas quests for Merissa, the NPC will provide an option to obtain a Gohei when talking to her.

Step 2: Collection of Spirits - Manahas

You will now need to collect 7 spirits from different locations. You will be able to collect them in any order you wish. The first location that we’ll be doing is Manahas.

The spirit will appear as a collectable. It spawns every 5-30 minutes on one channel. The orb can be taken by multiple players (unknown limit), but only appears for a short amount of time and travels abit across the map. The images below shows where the spirit could spawn.


Step 3: Collection of Spirits - Klaipeda

Head to Klaipeda to look for the second spirit. This spirit will appear as a collectable. The spirit can be collected by more than one player and is expected to respawn every 2-4 hours on one channel. Each channel has its own respawn timer so the recommended strategy would be to channel surf and check if the spirit is present on each channel. The location of the spirit can be found in the image below.

Step 4: Collection of Spirits - Orsha

Go to Orsha. In this stage, you will need to pray to a special miko altar for about 50-100(?) times. One channel can only accommodate 1 player praying, multiple players can pray at the same time via multiple channels. When sufficient prayers are performed, the altar will disappear in a flash of light. The prayers are recorded on channel-basis and not per-player. Try to pray in one sitting, Maintenance and channel crashes will reset prayer count. Images below show how the Miko Altar looks like and where it can be found. This should take you about 10-15 minutes if done correctly. The game will try to trick you by providing 2 options of “NOT offering prayers” or “Offering Prayers”. Always click on “Offering Prayers”, the option will switch locations periodically and randomly. If you accidently click on “NOT offering prayers”, you will need to switch channels then switch back to try again.

Step 5: Collection of Spirits - Crystal Mines

Head over to Crystal Mines 3F and go all the way right into the Closed Area. You will have 7 glowing orbs to choose from. Picking the wrong one means waiting 1 hour before you can select another one. The wrongly picked orbs will not respawn, so it will narrow down eventually to the correct one.The 1 hour cooldown counts down even if you are offline and there is no competition from other players for this spirit. The recommended strategy here is that you can collect this specific spirit orb in between looking for other spirits. The second-bottom spirit usually appears appears to have the highest likelihood of being correct, but this is not always the case. An image of the spirit orbs and the location of them are shown below.

Step 6: Collection of Spirits - Pelke Shrine Ruins

Make your way to Pelke Shrine Ruins. This spirit appears as a collectable.The timer appears to reset if there are no players on map and when it resets, the spirit would not be present. The strategy here would be to Camp at one channel and wait for it to spawn. Expect to wait around 10 to 30 minutes. An Image of the location of spawn is shown below

Step 7: Collection of Spirits - Uskis’ Arable Land

Go to Uskis’ Arable Land and make your way to the location specified in the image map below. There will be a Giant Mutated Plant there. Every once in a while (about 25-60 minutes), the plant will glow for a short amount of time (about 5 seconds). Interact with it while it is glowing. The glow is fairly subtle so attention will need to be paid to it. Do not spam spacebar because it will prevent you from actually interacting with the plant when it is glowing. Camp at a channel and wait for it to glow. Ensure that your character is ready to interact (spacebar) with it at any moment notice. Also ensure that the nearby aggro mobs are not too near. The plant also emits a small sound when it glows, so ensure you have audio.


Step 8: Collection of Spirits - Demon Prison District 1

Head to Demon Prison District 2 and kill about 100 monsters around that map. Then go down 1 map to Demon Prison District 1 and go to the Wrong Isolation area. You can reach that part of the map using the Seal of Space Item gained from completing the Tenet Church main questline.
Interact with the orbs at the bottom of the Wrong isolation Area, if you have killed enough monsters in Demon Prison District 2, you will receive an item which can be used on the pillars on the upper part of the Wrong Isolation Area. You will need to talk to the correct pillar to get the spirit. If you get the wrong combination, the pillar crumbles and you don’t get spirit, alternatively If you get the correct combination, the pillar crumbles and you get spirit. Pillars will respawn 1 hour after they collapse.
Which orb to take depends on the current server time. (E.g. 7.30 PM take orb labelled “7”). This means take the 7’o clock positioned spirit if you were to base it on the same format as a clock.
The pillar to select depends on the current day.

Step 9: Finding the Miko Master

Once you have collected all 7 spirits, you will now have a charged Gohei item. Head over to Nuoridin Falls and talk to Adrijus (the only NPC on that map) His dialog will be different from the usual one. You will need to have made sure that you have completed the regular questline of Nuoridin Falls beforehand. After speaking to Adrijus, go to Path of the Recluse and find [Miko Master] Hitomiko. Her location is shown in the image map below. After talking with her, you can proceed with the simple quest of becoming a Miko by using the Gohei item in special magic circles at 7 locations of Residence of the Fallen Legwyn Family, Roxona Reconstruction Agency West Building, Royal Mausoleum Workers Lodge, Nevellet Quarry 1F, Topes Fortress 1F, Sicarius 1F and 2nd Demon Prison. The exact location of the magic circles will be shown in the in-game map for you.

(Taken from / Based on ready725’s Post on tos forums, Telsiai - Kiri Airie) (https://docs.google.com/document/d/1Hrx9E0qXMEMaVxLpPk1lAwXJC0Wc20pkAANFwfmeKLM)

Zealot

Step 1: Learning about the Zealot Order

To begin, you will need to head over to Vera Coast to look for a small stone monument and interact with it. You will learn about a cleric order called the Zealots. An image has been included below to show where you can find the small stone monument to interact with.

After interacting with the stone, go to Manahas and speak with [Inquisitor Master] Thomas Iquinostasys about wanting to know more of the Zealot Order. You will get a message prompting that the Oracle Master might know more about them, so travel to Klaipeda town and find [Oracle Master] Apolonjia Barbora. Speak with her to ask about the goals of the Zealot Order. Now you will need to seek out the Paladin Master to know more. Head over to Nefritas Cliff and speak with [Paladin Master] Valentinas Naimon, he will tell you that the Zealot Master is located at Inner Enceinte District.

Step 2: First Test of the Zealot Order

Make your way to Inner Enceinte District and look for [Zealot Master] Eliza Tal. An image below provides the location where you can find her in the map.

Speak with [Zealot Master] Eliza Tal and keep asking about entering the Zealot Order, you will need to do this a few times. She will then give you an item called The Zealot Order: Fervor and Devotion. In this part of the step, you will need to open that item in your inventory and read through it, make sure to memorize any important details because the Zealot Master will test you on questions relating to the info in that book. Talk with [Zealot Master] Eliza Tal again and she will ask you a random question relating to the information in that book, if you answer correctly then speak with her one more time after that, she will tell you to find a special stone slab. If you answer wrongly, you will need to wait 10 minutes before she will give you another question.
To help you with answering any of her possible questions, i have included all the pages of the book item below so that it is easier for you to find any info for the question the Zealot Master might ask.


Step 3: Second Test of the Zealot Order

For this step, you will need to find and interact with a special stone slab at Igti Coast or Cranto Coast. There will be 5 slabs in each of the 2 maps and they spawn every 4 hours lasting 30 minutes each time. When you interact with a stone slab it will either tell you that it is the wrong one or that it is the one mentioned in the book. Look for the correct stone slab that is mentioned in the book and interact with it. Remember that when 1 stone slab spawns, all the other ones in that map spawns too. If you get the wrong stone slab, just go to the next stone slab position and repeat until you find the right one. Images for the stone slab spawn points for both maps have been included below.

(Cranto Coast)

(Igti Coast)

Once you have found the correct stone slab and interacted with it, return back to Inner Enceinte District and speak to [Zealot Master] Eliza Tal. She will give you an item similar to the one before called Zealots: A History. You will need to read through the pages again and answer another one of her random questions based on the information of the book. Like the previous step, if you get it wrong, you will need to wait 10 minutes before she will give you another question. If you answer it correct then speak with her again once more to proceed. Like before, i have included below images of all the pages in the book to help you in answering any of her questions.

Step 4: Final Test of the Zealot Order

Similar to the previous step, you will need to find another special stone slab, but this time it will be spread out on 3 maps with 15 possible slabs to check out. The maps are Lhahar Forest, Svalphinghas Forest and Nheto Forest. The previous tips on how to find them are the same as the previous step.The images below show the locations of the stone slabs on each of the maps.
(Lhahar Forest)

(Svalphinghas Forest)

(Nheto Forest) - 1 slab location needs seal of space item to access.

Once you have interacted with the correct stone slab, return once more to Inner Enceinte District and speak with [Zealot Master] Eliza Tal. She will give you one item called Zealots and Divine Power. You will need to read once again need to answer 1 more question from her relating to the information in the book. Like before, i have included all the pages in the book to help you with answering her random question.


After correctly answering her question, she tell tell you that she will allow you into the Zealot Order if you are willing. At this point, you will complete the Zealot Master’s Story Quest and be given the unique title “Zealous Believer”.

(Taken from / Based on both Gaming Hardcore’s youtube vid AND samtsui86’s post on forums)
(https://www.youtube.com/watch?v=7rUXAwonBbQ)
(Zealot Advancement Guide)

Exorcist

Step 1: Test of Faith

Go to Fedimian town and speak with [Exorcist Master] Sydow Merrinblock. After a short bout of dialogue, you will be prompted to seek out the Krivis Master.

Head over to Klaipeda town and speak with [Krivis Master] Herkus. He will tell you to pray at 5 different goddess statues at 5 different maps and place offerings to prove your faith. Use the item “Goods for offering” to begin to pray at the statues when you are near them.
The images included below shows the location of Krivis Master as well as the locations of the Goddess Statues on the 5 maps needed.

(Location of Krivis Master)

(Statue 1: Manahas)

(Statue 2: Mochia Forest)

(Statue 3: Rasvoy Lake)

(Statue 4: Penitence Route)

(Statue 5: Forest of Prayer)

Once you have prayed at all 5 goddess statues at all 5 locations, return back to Klaipeda town and speak to [Krivis Master] Herkus, he will prompt you to visit the Priest Master and follow his directions.

Step 2: Healing Cure

Go over to [Priest Master] Boruble and speak with him. He will tell you to make a special healing cure for Commander Julian at Dvasia Peak. The NPC will give you recipes to make the special healing cure which requires herbs called Raudonelis. You can find them from killing Hogma Scouts at Kings Plateau. An image below shows the spawn locations of the Scouts. Sit down and craft the cure once you have 20 of the herbs. Once you have made the cure, make you way to Dvasia Peak and talk with Commander Julian to hand it in, then return back to [Priest Master] Boruble at Klaipeda town to report your work.


Step 3: Knowledge of an Exorcist

Now you will need to go to Manahas and speak with [Inquisitor Master] Thomas Iquinostasys.

After a small bout of conversation, you will be prompted to go back to Fedimian town and talk to

[Exorcist Master] Sydow Merrinblock. He will give you 4 books to read in preparation to answer 4 questions from him. Speak with him again to being answering the questions.
The correct answers are shown below (he might ask u the questions in different order):

After you have done this, he will acknowledge your resolve and tell you to interrogate someone. Switch channels or relog and find the NPC Kintaras near [Exorcist Master] Sydow Merrinblock.

You will need to interact with the NPC multiple times to interrogate him, once you have spoken to him enough times, you can go back and talk with [Exorcist Master] Sydow Merrinblock to report your findings.

Step 4: Spring Light Trip

[Exorcist Master] Sydow Merrinblock will tell you to go to Spring Light Woods and find Sygitas to see what is happening. Head over to Spring Light woods and find Sygitas. The image map below shows his location.

Speak with Sygitas multiple times to find out what is going on, then speak with the NPC Rimanta which is positioned next to him. The image below shows her location.

After you have spoken to Rimanta a couple of times, speak with Sygitas again and he will prompt you to to interact with the drums, boxes and basin below his position. Go and interact with them and then return back and speak with Rimanta a few times to complete this step.
The image below shows an example of the interaction.

Step 5: Remedy Cure

Go back to Fedimian town and speak with [Exorcist Master] Sydow Merrinblock to tell him what has transpired. He will tell you to visit the Plague Doctor Master to make a certain remedy.

Head to Istora ruins and speak with [Plague Doctor Master] Philip Aurellius to inform him of the situation. The Plague Doctor Master will give you a recipe to make the remedy and you will need to collect the materials to make it as well. Once you have all the materials, sit down and craft the remedy.
The ingredients are:

After you make the remedy, return to Spring Light Woods and speak with Rimanta and Sygitas a couple of times to give the remedy to them.

Step 6: Interrogation

Go to Fedimian and speak with [Exorcist Master] Sydow Merrinblock a few times again. You will need to change channels or relog and interact with another NPC which is near him to interrogate him. Keep interacting with Zigmas and get all you can out of him. After this, go and talk with [Exorcist Master] Sydow Merrinblock again and he will note what you have gained and tell you to prepare for a special exam.


Step 7: Exorcist Exam

Talk with the Exorcist Master a few times again and then go to West Siauliai Woods to find [Dievdirbys Master] Sculptor Tesla. Speak with him and he will tell you to collect 12 pieces of topaz(not the same as the normal topaz item). You will need to head to Royal Mausoleum 2F and hunt Vespers to drop pieces of topaz.

Once you have 12 pieces, return to [Dievdirbys Master] Sculptor Tesla and speak with him. He will give you a special small goddess statue carving.
After that, go to Klaipeda town and speak with [Priest Master] Boruble to purchase 2 Holy Water and 2 Gyslotis from him.

Step 8: Ominous Ball

For this step, head to Fedimian suburbs and find the Ominous Ball. You will need to do a set of activities in the correct order, you can find the location of the Ominous Ball north of the Abandoned Farmhouse.


Follow the following order to successfully complete this step. If you fail, you will need to wait 1 minute before you can retry interacting with the ball again.

  1. Spray the Holy Water on the ball.
  2. Burn the Gyslotis on the ball.
  3. Place the Goddess Statue carving down.
  4. Interact with the Ominous Ball to perform exorcism.
  5. Kill the Hallowventers that spawn from it.

Step 9: Recognition of the Exorcist Master

Head back to Fedimian town and speak with [Exorcist Master] Sydow Merrinblock to report what has transpired. He will tell you that you have done a perfect job. At this point you will complete the Exorcist Master’s Story Quest and be given the special title “Divine Exorcist”.

(Taken from / Based on 칼라모르’s post on inven)
(http://www.inven.co.kr/board/tos/4198/83635)

3 Likes

Step 2: Scout Master’s request

Go to Gateway of the Great King and search for [Scout Master] Recon Rimgaile.

The scout master can now be found in Klaipedia

fixed, thanks! :satisfaction:

Any idea if Wandering Gunman still works? He doesn’t give any dialogue