Saalus Convent Guide Forum Ver.
This is a guide on how to successfully complete the Saalus Convent special instanced dungeon.
Saalus(Salad) is a special instanced dungeon which can be accessed at the Saalus Convent map by speaking to [Sister Aiste]. People run this dungeon daily to farm for Blessed Shards which are an item that can be used to craft Blessed Gems for the purpose of transcending equipment.
Blessed Cubes usually give Blessed Shards when opened, but there is a low chance of acquiring a Blessed Gem instead too.
When you choose to enter the Saalus dungeon, you will be teleported to one of three different special dungeon maps to complete. Upon completing the dungeon, you will be given your Blessed Cubes for that character for that day.
For a word of warning, Saalus Dungeon is much harder since Re:Build is added. Make sure you do them in parties and be prepared.
Should you find any errors or mistakes in any of the guides of this doc or have any inquiries/feedback, Please contact me at:
Discord: Palemoon#3503
Tree of Savior (Klaipeda Server) team name: PaleMoon
Reddit: www.reddit.com/u/Luna_PaleMoon/
Saalus - Castle
When you get teleported into this dungeon, you will arrive at the area that is noted by the yellow dot on the image below. You will need to play a minigame to match multiple dices with their respective devices in this dungeon, the matchings are random every time you enter so the pairings that might work today might not work tomorrow. Devices can be found right behind the dice spawn points and you can interact with them once you have a dice on you. The image below shows the location of your spawn point and the spawn point of the dices.
Go and interact with any dice to latch it onto you, then go around the map to interact with the devices and see if they match. If they do not match then just try another device, but if they do match then a boss will spawn in the middle of the map near your initial spawn point.

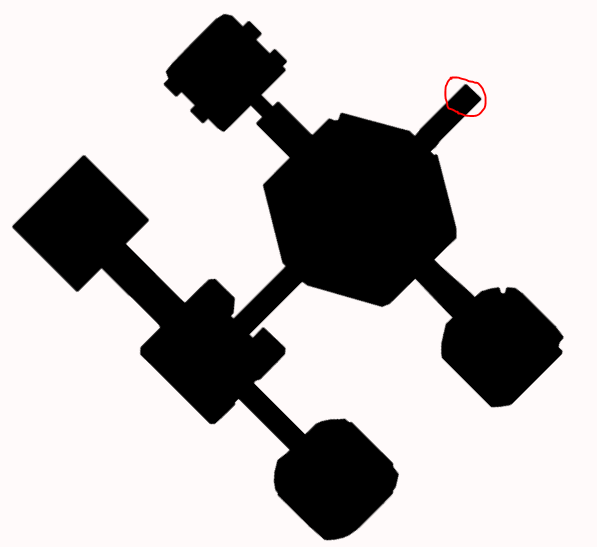
The dices and devices are parallel to each other in matching. This means that if the dice at location A matches the device at location B, then the dice at location B will match with the device at location A. Below is an example to show this.
(Circles are the dices and the rectangles are the devices in this example)

Once you have matched the first dice to a device, then the [Moyabruka] boss will spawn at the location shown on the map below.

The second matching will then spawn the [Mothstem] boss at the location shown on the map below.

The third matching will spawn the [Plokste] boss at the location shown on the map below.

Once you have slain the 3 bosses, the final boss [Werewolf] will spawn in the center of the map as shown below. Kill the final boss to complete the dungeon and gain your Blessed Cubes.

Saalus - Canyon
When you get teleported into this dungeon, you will arrive at the area that is noted by the red circle on the image below. There will be an unpassable blockade near the bridge area that connects to the rest of the map. Kill the pack of monsters in the red circle area to spawn the [Deadborn of Steel] boss. Once you kill the boss, the blockade will be destroyed and you will be allowed to move across the bridge.

Head to the area shown by the red circle in the map below and slay the [Nasty Reaverpede] Boss. then walk near the NPC that is near the yellow dot shown on the map below, follow the NPC around until the NPC stops moving.

Make your way across the second bridge and destroy the blockade near the end to proceed forward. You can find the location of it shown at the yellow dot in the map below.
Follow the path shown by the yellow arrow on the map below. At the end of the arrow you will find the [Frantic Giant Wood Goblin] boss, kill it and then interact with one of the grass patches shown as red dots on the map below. Monsters that spawn may try to interrupt you as you interact with the grass patches, try to work with your teammates to have someone aggro or kill the monsters while another interacts with the grass patches.


Head over to the upper part of that area in the map and kill the [Whirlwind Harpeia] boss, then go and interact with one of the boxes which can be found at the red dots on the map below. Similar to before, monsters may try to interrupt you as you interact with the boxes, try to work with teammates to have 1 person aggro or kill the monsters while another interacts with the box.

You can now choose to do one of 2 paths, one is to use your “Warpstone” item in your inventory to warp back to the start of the map(Path A) and the other one is to head back to the bridge and kill the [Bizarre Velochard] boss to let you pass the bridge(Path B).
After doing one of the 2 paths, head to where the NPC stopped moving earlier and interact with the NPC. You will be given explosives to use on a special portal. Follow the yellow arrow shown in the map below and go to the red dot to interact with the portal and place the explosives there. After a few seconds, the portal will explode and the [Ironbaum] boss will spawn within the red circle shown by the map below. Kill the boss to complete the dungeon and get your Blessed Cubes.
(Path A) (Path B)


Saalus - Royal Mausoleum
When you get teleported into this dungeon, you will arrive at the area that is noted by the red circle on the image below. You will need to hit a few objectives and kill a set of bosses to complete this dungeon.
Follow the yellow arrows shown by the image map below and hit the cubes which can be found at the end of the arrows to spawn the bosses [Warmed up Gazing Golem] and [Clymen]. You will need to kill both bosses to proceed.

After killing the bosses, head to the upper middle area and hit the two cubes which can be found by the yellow dots on the image map below. This will spawn the [Reanimated Shnayim] boss which you will have to defeat. Sometimes the cubes might not be available to be attacked, if this happens, all you need to do is walk back to where the previous bosses died then go back to the cubes. The cubes should become attackable after that.

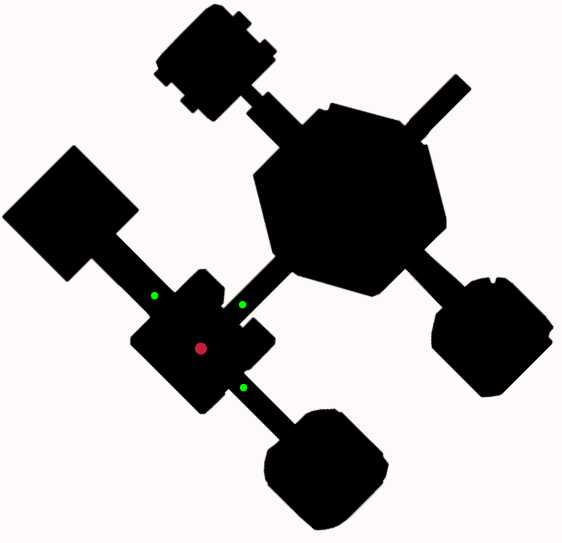
Hit the cube which is closest to the bridge to unlock the gate, the location is shown by the green dot on the image map below. After going through the gate, follow the yellow arrow directions on the map below to hit 2 cubes that will spawn the [Excited Minotaur] boss and the [Fluttering Denoptic] boss in their respective locations. The bosses will spawn at the locations of the red dot on the image map below.

Once you have killed the two bosses, you will need to kill monsters that spawn at 3 different locations, to make the final boss [Noble Tomb Lord] appear. The location of the monsters will spawn at the green dots of the image map below. The red dot is where the final boss will spawn once you have killed enough monsters.
Killing some monsters will spawn the [Shaking Achat] boss, but you do not need to kill it. Just ignore it and focus on killing the small monsters to spawn the final boss, then kill the [Noble Tomb Lord] to complete the dungeon and acquire your Blessed Cubes.
Server: Klaipeda(NA)
TeamName: PaleMoon