


Greetings, Saviors!
Today I would like to tell you about the one and only, the very best and prominent full-support Cleric build on Re:Build, that not only can be used in any game content, but will be highly and passionately loved by your fellow team mates
This guide will be helpful for veteran Cleric players and new Saviors who decided to follow the path of the main supportive class in this game
Link to Full Build

CLERIC

Our obvious core class. Who else did you expect to see here!?
SKILLS
-
 [Heal]
Description
Restores the HP of a selected target. The amount of HP restored depends on the caster’s Healing stat.
~ Our bread and butter as a healer. Due to complete rework of the skill itself, you can no longer brainlessly spam tiles and wait for your team mates to step on them. Now you have to use it with more thought and actually chose who to heal. On the other hand, with Heal now being a chose your target skill, bosses (or enemy players) can’t flip it and use against you, so there will no longer be a psychotic rage from your team mates when you accidentally heal Velcoffer Dragon to its full health
-
 [Guardian Saint]
Description
Increases the caster’s Healing ability.
~ Very nice Healing Power buff that can be upheld 100% of the time. Not much to say about it - use it all the time and enjoy better healing
-
 [Fade]
Description
Erases the threat of monsters making them stop any attacks on you
~ An old good cloaking skill, that was reworked into a fully PvE skill. Now hide you only from monsters (including Bosses), but not from enemy players, so keep it in mind. Still amazing skill, that can help you and your team to regroup and reposition yourself in clutch situations
-
 [Cure]
Description
Cure allies with a Lv. 1 status ailment or inflict damage on enemies
~ Due to this build have more prominent anti-status skills, you will not use Cure that much. But it’s always nice to have an additional skill to remove LV 1 status ailments just in case
ATTRIBUTES
Here and later I’ll point out attributes we need to learn, while ignoring the ones we don’t need
-
 [One-handed Blunt Mastery: Healing]
Descritpion
Increases Healing by 2% per attribute level when equipping a one-handed blunt weapon.
~ Nice and cheap attribute to improve your healing a little bit
-
 [Heal: Linger]
Description
* Applies a buff that continuously restores the HP of allies healed with Heal or Mass Heal
* The buff lasts 10 sec and restores HP in a value equal to [attribute level x 5]% of your Healing stat
* Increases SP consumption by 30%
~ Yet another cheap and nice buff to your healing, that will give 10 sec regeneration
-
 [Guardian Saint: Enhance]
 -
 [Heal: Enhance]
~Common Re:Build improve your skill attributes. Level them up as much as your finances allow you. I would say that LV50-60 are fine for decent and stable performance
PRIEST

An absolutely must-have class for any healer who want to actually be called healer. Due to end-game content in Re:Build became sort of harder, it’s crucial to have a Priest in any party for more healing, resurrecting and reviving. Period
SKILLS
-
 [Mass Heal]
Description
Restores the HP of nearby allies.
~ Simply amazing healing skill, that can restore almost 100% of your party’s HP
-
 [Revive]
Description
Prevents one from becoming Incapable of Combat once
~ Yet another almost-broken-in-its-awesomeness skill, that will drastically improve your party’s survivability
-
 [Ressurection]
Description
Resurrects a target that has been defeated in combat.
In Team Battle League, allows for 1 resurrection per round.
~ If by some bad luck someone in your party managed to die, you can quickly bring him back to life. Bear in mind, that the skill was reworked and became chose-your-target skill, thus making it possible to resurrect only one person at a time
-
 [Aspersion]
Description
Sprinkle holy water to help increase the physical defense of you and your allies and inflict damage to enemies.
~ Due to rework of buff shops and this skills receiving a 300 sec time duration, Aspersion finally became viable in the field. Pardoner’s buffs and Priest’s buff now stacks, so you can give yourself and your party a massive armor boost. Extremely strong skill
-
 [Blessing]
Description
Gives a blessing granting additional damage to the attacks of your party members and allies.
~ Just like Aspersion, Blessing became stack-able with Pardoner’s shop and very viable in the field. AA builds will hug you.
-
 [Turn Undead]
Description
Inflicts Holy-property magic damage to enemies all around, with a chance of defeating Mutant or Demon enemies instantly (does not apply to characters or boss monsters).
Mutant and Demon enemies under the Malleus Maleficarum debuff that survive Turn Undead become stunned for 3 seconds.
While Engkrateia is active, the AoE attack ratio of Turn Undead increases by 50%.
~ Fun to use skill, that will allow you to insta-kill mutant and demon monsters with a chance. Obviously, doesn’t work on enemy players and bosses
Description
Reduces the evasion of enemies in front of you
~ No longer provides your party with DEX bonus, but now decrease enemy’s evasion in % values. Quite handy in the end-game content.
ATTRIBUTES
-
 [Increased Maximum Weight]
Description
* Increases character’s maximum inventory weight by 20
~ Cheap and nice attri that allows you to carry more stuff
-
 [Revive: Duration]
Summary
* Increases duration of [Revive] by 7 seconds per attribute level
* Not applicable in TBL or GvG
* Increases SP consumption by 20%
~ Not much to say. Cheap and must-have attribute
-
 [Blessing: Additional Buff]
Description
* Increases number of targets for [Blessing] by 1 per attribute level
* Increases SP consumption by 10%
~ You do want all your team mates to get Blessing, don’t you? Grab it right away
-
 [Mass Heal: Enhance]
 -
 [Aspersion: Enhance]
 -
 [Blessing: Enhance]
 -
 [Monstrance: Enhance]
~ You know what to do, right?
ORACLE

Due to heavy rework Oracle became one of the strongest supportive classes in Re:Build. Everyone will fight for you to be in their team and searching for a party will be a breeze for you.
SKILLS
-
 [Twist of Fate]
Description
Deal a fixed amount damage to the selected target based on its max HP. But the target continuously recovers its HP and the total amount it will recover matches the double amount lost by this attack. Only half of the damage is applied to boss monsters and the skill does not apply to field boss monsters.
~ Quite tricky but extremely helpful skill if used right. To put it straight, it instantly inflicts 33%-40% (40%-48% with Divine Might) damage to the target, allowing you to finish it off outright. But it’s extremely important not to misjudge the remaining HP of the monster, otherwise it will be healed twice as much. Cannot be used on field bosses (i.e. Velcoffer, upcoming Boruta), but can be used on bosses in Saalus missions and several otherwise immune to damage objects. The most prominent and amazing way to use it - during Velcoffer Nest raids. You can finish off the Statue when its 40% HP left, without luring bomber-birds to it! It saves you and your party a lot of time.
-
 [Foretell]
Description
Perform a spell to summon a magic circle that protects against enemy attacks. As long as you are inside the magic circle, you will not receive damage from enemy attacks.
~ Due to Safety Zone and other invulnerability skills removed from the game, Foretell became one of the strongest protective skills. Bear in mind, that Foretell became a channeling skill, so it’s extremely important to use it in conjunction with Plague Doctor’s Methadone and Beak Mask skills, that gives you immunity to knockdown, knockback, casting interruption and almost any status ailments.
-
 [Death Sentence]
Description
Announce your enemy’s death, largely increasing the damage received by them. If the target is a boss monster, duration and damage-increasing effects are cut in half.
~ Yet another heavily buffed Oracle skill, that allows you to boost damage of your team against any foe. Extremely good against any types of monsters - regular and bosses. And no more backfire effect, so feel free to use it without being afraid to kill yourself!
-
 [Divine Might]
Description
Temporarily increases the skill levels of you and your party members by 1
~ Old good Divine Might was moved to Oracle class that makes us even more happy Saviors!
-
 [Arcane Energy]
Description
Applies the Arcane Energy buff to you and your party members. The buff records your current SP and STA, and if the amount of SP and STA consumed during the buff is higher than the one recorded, at the end of the buff all the SP and STA you consumed are restored.
~ Due to SP consumption in Re:Build being extremely heavy, reworked Arcane Energy became a very helpful skill if used at the right time. Try to use it before a huge skill rotation of your party begins, so they can go back to their full SP after blasting off all that skills of theirs.
-
 [Prophecy]
Description
Grants a temporary effect preventing Lv. 1 status ailments and crowd control effects from affecting nearby party members.
~ Like before, Prophecy is a nice filler skill to grant your team a protection from low-level status ailments
-
 [Counter Spell]
Description
Removes enemy magic circles nearby, and summons another magic circle that reduces the damage taken from enemy magic attacks.
~ With magic attacks immunity effect removed, Counter Spell became a skill to destroy enemies’ magic circles. Magic damage reduction it grants is too low to max this skill out.
ATTRIBUTES
-
 [Arcane Energy: Reduce Damage]
Description
Reduces the damage received from enemies by 10% while [Arcane Energy] is active
~ 10% damage reduction to the whole party? Yes, please!
-
 [Arcane Energy: Duration]
Description
Increases the duration of [Arcane Energy] by 1 second per attribute level
~ Even more time to blast off SP-heavy skills for you and your party
-
 [Prophecy: Increase Damage]
Description
* Increases the damage dealt to enemies by 30% while [Prophecy] is active
* Increases SP consumption by 10%
~ Huge 30% damage boost for your party? Who would say no?
-
 [Counter Spell: Duration]
Description
- Increases the duration of [Counter Spell] by 1 second per attribute level
~ Even though we take this skill solely for enemies’ magic circle destruction, it’s nice to have a magic damage reduction effect a bit longer
-
 [Divine Might: Increase Count]
Description
* Increases [Divine Might]'s count by 1 per attribute level
* Increases SP consumption by 10%
~ Increase the total count of Divine Might to hefty 15 casts
-
 [Foretell: Threat]
Description
* Allies within the range of [Foretell] apply 10% less threat per attribute level to enemies
* Increases SP consumption by 20%
~ Not that being completely immune to any damage you care that much about Threat level, but being extremely cheap it’s better to have this attribute than not
-
 [Death Sentence: Reset]
Description
Reduces the duration of [Death Sentence] to 15 seconds, but resets its cooldown if the enemy dies while there is still time left in the debuff
* Increases SP consumption by 30%
~ Extremely strong attribute in situations when you and your party have to kill a lot of monsters (i.e. CM). Basically it allows you to spam Death Sentence non-stop. But don’t forget to toggle it OFF during Boss fights!
-
 [Death Sentence: Slow]
Description
* Decreases the movement speed of enemies affected by [Death Sentence] by 15% per attribute level
* Increases SP consumption by 10%
~ Nice and cheap bonus to your Death Sentence
-
 [Death Sentence: Enhance]
~ The only basic improve-your-skill attribute Oracle need to take, but it’s extremely valuable
NOTE:
You don’t want to take ![]() [Twist of Fate: Enhance], due to this attribute increases the amount of HP recovered by the monster, rather than initial damage dealt to them
[Twist of Fate: Enhance], due to this attribute increases the amount of HP recovered by the monster, rather than initial damage dealt to them
PLAGUE DOCTOR

One of my favorite classes in ToS has received a nice rework and, I would say, an overall buff. Rather than being a heavy damage dealer, PD is a nice supportive class who can dish out mid-tier damage.
SKILLS
-
 [Healing Factor]
Description
Grants the target regenerative abilities. The target recovers HP up to how much HP was left when they received the buff.
~ A God-level supportive skill, that makes it’s recipient basically immortal (almost). Bear in mind to cast it after healing up to the full HP, as it regenerates health up to the point it was at the moment of using Healing Factor.
-
 [Modafinil]
Description
Momentarily increases movement speed for you and your party members. An additional ratio is applied to those under the Modafinil buff, depending on the target’s character level and the caster’s SPR (maximum +100%).
~ A brand new skills that literally puts former Chronomancer and his Haste to shame. 100% uptime, immense movement speed buff. You and your party will sure be very speedy.
-
 [Beak Mask]
Description
Equip the Bird Beak Mask. The front side of the mask contains a special drug that prevents debuffs of rank 3 or below from affecting you.
~ Plague Doctor’s signature skill, that gives you not only the nightmarish look but almost complete immunity to status aliments. And rework gave it 100% uptime, that is awesome
-
 [Methadone]
Description
Grants an effect that provides knockdown, knockback, and casting interruption immunity for you and your party members. Blocks debuffs of rank 2 and below
~ With no Rune Caster’s Rune of Protection combo in the game, lots of places became a real knockdown fiesta, that is extremely frustrating. Methadone is not a complete panacea to the problem, but it at least gives you protection from knockdowns and knockbacks for a while. Try to use it before important skills rotations of you and your party
-
 [Fumigate]
Description
Spray a cloud of antidote that cures the debuffs of an ally. Allies within the effect will be cured of debuffs of rank 3 and below
~ Fumigate haven’t change much and with Bloodletting removed from the game, it gives a solid protection from statuses to your party. Bear in mind, that attribute that changes it’s effect to 10 seconds area is a must.
-
 [Pandemic]
Description
Spread all the debuffs of enemies within range to other nearby enemies.
~ Being nerfed due to removal of attribute that expanded it range, Pandemic is still a pretty decent skill. Currently does not spread some statuses (i.e. Death Sentence) - but not sure whether it’s a bug or a feature.
-
 [Black Death Steam]
Description
Spread Black Death Steam around and deal continuous damage. The affected targets infect other targets nearby. When using Incinerate on the target, it receives additional damage.
~ Yet another Plague Doctor’s signature skill. But being a full-sport build, we won’t invest much in it. Yet, it will provide some nice additional damage for your party.
-
 [Incineration]
Description
Incinerates enemies affected by debuffs. The duration of Incineration’s effects increases depending on the enemies’ number of applied debuffs
~ Despite the irresistible urge to scream BURN, DA WITCH!! and engulf in flames everything around you, don’t forget that we are a full support, thus won’t invest much in Inceneration. But, just like with Black Death Steam, it helps you to add some damage for your party.
ATTRIBUTES
-
 [Fumigate: Purification]
Description
* The range of [Fumigate] becomes a purification area for 10 seconds
* Increases allies’ poison resistance by 10% per attribute level
* Increases SP consumption by 10%
~ Extremely cheap yet must-have attribute that is great for static fights (i.e. against bosses)
-
 [Incineration: Fast Response]
Description
* Decreases the interval of [Incineration]'s hits by 0.1 sec
* Increases SP consumption by 30%
~ Yet we won’t invest in Incineration, it’s nice to have it tick a bit faster
-
 [Incineration: Infect]
Description
* When an enemy is defeated by [Incinerate], it transfers its debuff to a nearby enemy
* Increases the number of possible targets by 1 per attribute level
* Increases SP consumption by 40%
~ Same as above - cheap and nice little bonus for your Incineration
-
 [Pandemic: Spread Incineration]
Description
* Adds a 5% chance per attribute level for [Pandemic] to spread [Incineration]
Chance applies to each target individually
* Increases SP consumption by 30%
~ Not necessary, but extremely cheap. So why not?
-
 [Modafinil: Enhance]
 -
 [Black Death Steam: Enhance]
 -
 [Incineration: Enhance]
~ Being a full support you want to pay attention to [Modafinil: Enhance] attribute. I won’t recommend bothering with Black Death Steam and Incineration, unless you really want to squeeze everything out of your character
GEARS
LOW-MID-TIER
If you are a new player and don’t have any particular end-game gear, you would like to start with aiming a full set of 380 LV red primuses, called Primus Galaktikos Plate items.


Plate is always a better answer for a full support character. As for random stats, you would like to aim for CON -> SPR -> SP -> SP Recovery in this order. With this build you will be able to show decent performance even without transcendence items and I won’t recommend you to transcend red primuses.
Your shield should be  [Primus Zvaigzde Shield] with nice CON+SPR stats or my personal favorite
  [Emengard Shield]. Despite being only a 315 LV item, it provides great defense, stats, +1 Movement Speed and amazing +7% Final Block rate. It’s very easy to find a cheap ohmygod shield on Market and you can even transcend it.
As for weapon, you can chose between  [Primus Zvaigzde Rod] and
  [Primus Zvaigzde Mace]. Rod will give you more magic attack, while mace is more versatile and universal, can be used by both patk and matk -oriented characters.
As for accessories, there is not much low-level, cheap and good accessories in ToS right now, but for start you can aim for  [Viproti Bracelet] or even
  [Pore] that gives nice SP Recover. But I would strongly recommend to bear with anything cheap you can get your hands on while aiming for more decent accessories.
HIGH-TIER
If you are more of a veteran player with decent amount of resources, I would recommend you to stick to the Solmiki Double set for your full-support character.
It consists of:
-
 [Solmiki Robe]
  [Solmiki Plate Greaves]
 [Solmiki Plate Gauntlets]
 [Solmiki Plate Leggings]
 [Solmiki Medal (Leather)]
 [Solmiki Bracelet (Leather)] x 2
This truly amazing items combo will give you a bulk of pdef, mdef and great stats. I would even recommend you to trans it (till stage 8) and use it on all your toons. Due to Velcoffer items’ hype there is an abundance of cheap and already transcendent Solmiki items on the Market, so you can buy the whole bundle relatively cheap.
If you want to dish out more damage with your Incineration and Black Death Steam you can even go as far as buying 
 [Frieno Set]. It will give you a nice boost of damage especially if combed with
  [Masinios Mace] that is still an amazing item due to it’s special effect. But Frieno Set is extremely expensive now and won’t become any cheaper due to being a materiel for
 [Drakonas Frieno Set], so bear it in mind.
GOD-TIER
Well, obviously it’s a Velcoffer set. Though it might be an overkill to make a full Velcoffer set for your full support cleric, it’s always nice to squeeze everything possible out of your character’s potential.
And Plate is always the answer!
 [Velcoffer Plate Armor]
 [Velcoffer Plate Pants]
 [Velcoffer Plate Gauntlets]
 [Velcoffer Greaves]
 [Velcoffer Shield]
If you can afford to make 4 green Ichors for your Velcoffer armors, I would say you should aim for CON-INT-SPR-DEX, so that the set you’ve made would be usable by ALL your characters. Yes, you will lack SPR on that items, but due to SPR currently being quite bad and you having a lot of SPR from being a Cleric, it’s totally fine. The only drawback (despite it’s extremely hard and expensive to find 4 green lines armor-type Ichors), is that your summoner class (if you have one) will need a separate set of items with SPR on them.
As for weapon - again, it’s either  [Velcoffer Rod] or
  [Velcoffer Mace] with same pros and cons. [Masinios Mace] is still a good Ichor choice for the mace if you want to dish out more damage, while Ichor from
 [Asio Rod] will drastically improve your toughness and healing powers. Anyway, being a full-support, you can stick to any weapon of your choice, with high SPR-CON stats
As for Velcoffer set effects, there are total of five different sets with particular mechanics
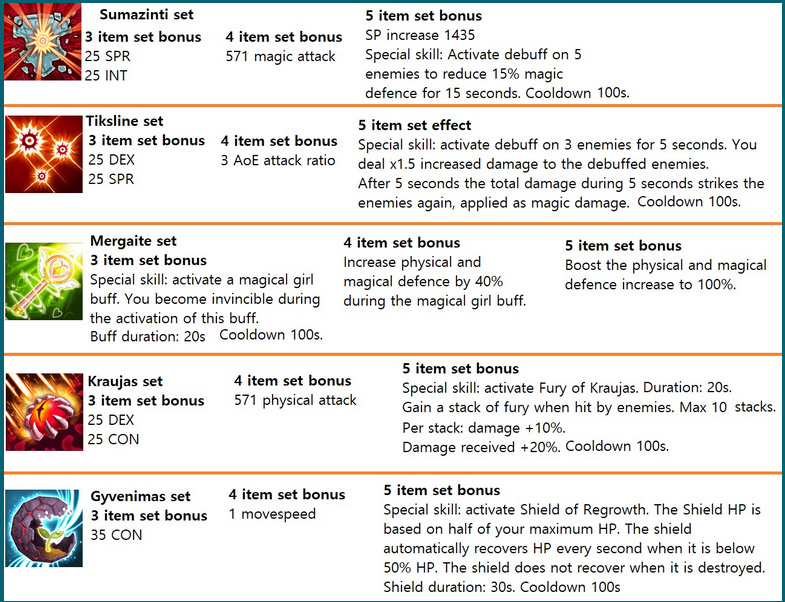
Unfortunately, It’s a bit tricky to have one ideal set effect for all characters to benefit from. Let’s suppose, that our Velcoffer Plate set will be used by full-support and tank characters. Then it would be nice to have either:
- Sumazinti set to boost your team’s magic damage
- Mergaite set to become really tanky
- Gyvenimas set to get a nice shield, 35 CON and 1 movespeed
I would lean to Gyvenimas set due to Cleric in good gear having around 100 000 HP, thus set will grant you a hefty 50 000 shield
Yet, I will stress it one more time - it’s absolutely not necessary to aim for Velcoffer items with your full-support Cleric. But I would recommend to aim for Solmiki items.
 [Froster Lord Card]
 [Velnia Monkey Card]
 [Biteregina Card]
 [Rajapearl Card]
 [Canceril Card]
 [Gazing Golem Card]
 [Zaura Card]
 [Nuaele Card]
 [Blut Card]
 [Linkroller Card]