Team name: Miraec
Server: Telsiai
Contents
- Introduction
- Unique Raids
- Legend Raids
- Gear recommendations for Newbies/Returnees
- Recommended Builds that works with low funding
- How to upgrade your equipment
- Velcoffer Armors and Weapons
- Choices of stats for Ichors
- Ending note
Introduction
So, a lot has changed since you last played. Transcendence rework, balance patches, and finally Re:Build patch. A lot of you might be wondering, what weapons or armors are good, what are the requirements to do Unique/Legend raids etc. I am here with this simple guild to help you all understand what are these raids and what do they reward, and a rough guide on what kind of gears are needed for these raids.
Special thanks to rjgtav for creating TOS Guru!
Link: https://tos.guru/itos/home
Unique Raids
Unique raids are split into 2 level categories and they have no entry limits and they require Raid Portal Stones to enter. There are a few ways to acquire Raid Portal Stones. The first method is by opening Challenge Mode cubes to get the recipe to craft it and the second method is to buy them from the market. Each successive entry on the same character will increase the number of stones required by 1. All unique raids have SHARED entry count for each character.
Example:
Character 1 (Swordsman) > Asio raid (6 stones) > Wastrel Raid (6+1 stones) > Fantasy Library Raid (4+2 stones)
Character 2 (Cleric) > Fantasy Library (4 stones) > Wastrel Raid (6+1 stones) > Refuge Raid (4+2 stones)
Do note that you have to complete some quests in order to unlock Former Fantasy Library and Magic Research Facility
| Raid | Quest Chain | NPC/Location |
|---|---|---|
| Former Fantasy Library: Sausis Room 9 | Back In Time | Chronomancer Master/Stele Road |
| Magic Research Facility | Strange Sculpture + Remnants of the Past | Owynia Dilben/Starry Town |
Level 330:
-
Former Fantasy Library: Sausis Room 9 (FFL) – 4 Raid Portal Stones.
Location: Zima Suecourt

Cube rewards:
- Sierra powder
- Practonium
- Sausis Boots/Gloves
- Nepagristas/Nematomas/Rangovas accessories (Lv350 unique accessories)
- Demon Lord Froster Lord Legend Card
-
The First Refuge (Refuge) – 4 Raid Portal Stones
Location: Nobreer Forest

Cube rewards:
- Sierra powder
- Practonium
- Masinios weapon recipes (Lv350 unique weapons)
- Fietas/Laitas/Ausura armor recipes (Lv350 unique armors)
- Ancient golden socket recipe
- Prodigious Kugheri Balzermancer Legend Card
Level 380:
-
Asiomage Testing Grounds (Asio) – 6 Raid Portal Stones
Location: Frienel Memorial

Cube rewards:
- Spirit Fragment: Asiomage (Character bound, unable to transfer through team storage)
- Practonium
- Asio weapon recipes (Lv380 unique weapons)
- Ancient Golden Socket recipe
- Asiomage Legend Card
-
Magic Research Facility (Wastrel) – 6 Raid Portal Stones
Location: Starry Town

Cube rewards:
- Spirit Fragment: Wastrel (Character bound, unable to transfer through team storage)
- Practonium
- Wastrel weapon recipes (Lv380 unique weapons)
- Ancient Golden Socket recipe
- Wastrel Legend Card
-
Astral Tower Closed Quarters (Ignas) – 6 Raid Portal Stones
Location: Astral Tower 4F

Cube rewards:
- Spirit Fragment: Ignas (Character bound, unable to transfer through team storage)
- Practonium
- Ignas armor recipes (Lv380 unique armors)
- Ancient Golden Socket recipe
- Ignas Legend Card


Collect 50 Asio/Wastrel/Ignas Spirit fragments to exchange for a random recipe/crafted weapon of that particular raid.
Legend Raids
Legend raids are split into 3 level categories and they have a weekly entry limit of 2 per character. Earth Tower Lolopanther Area and Solmiki Area share entry count while Velcoffer’s Nest has its own entry count. In order to enter Solmiki Area, you have to clear Lolopanther Area 20F to get an item called Symbol of G’bb.
For Earth Tower, there’s a boss every 5F and your party can choose to continue or stop. If you choose to stop, you get the cube rewards for that floor only. If you stop at 25F, you get a 25F cube. If you stop at 30F, you get a 30F cube and you will not get a 25F cube. Essences to craft the armors/accessories/weapons are character bound and cannot be transferred through team storage (applies for Velcoffer Spirit Fragments too)
Level 260:
- Earth Tower Lolopanther Area (1F-20F)


- 5F Cube – Pyroego Essences to craft Lolopanther Gloves/Boots
- 10F Cube – Gosarius Essences to craft Lolopanther Bottom/Bracelet
- 15F Cube – Turtai Essences to craft Lolopanther Top/Necklace
- 20F Cube – G’bb Essences to craft Lolopanther Weapons/Shield
| Earth Tower Cube Name | 1st Re-opening | 2nd Re-opening |
|---|---|---|
| Condensed Earth Tower 5F Cube | 1,400,000 | 560,000 |
| Condensed Earth Tower 10F Cube | 2,100,000 | 840,000 |
| Condensed Earth Tower 15F Cube | 2,800,000 | 1,120,000 |
| Condensed Earth Tower 20F Cube | 3,500,000 | 1,400,000 |
| Earth Tower: Lolopanther Equipment | Number of essences | Number of Earth Fragments Lv1 |
|---|---|---|
| Lolopanther Boots/Gloves | 40 Pyroego Essences | 40 |
| Lolopanther Bottom/Bracelet | 40 Gosarius Essences | 40 |
| Lolopanther Top/Necklace | 40 Turtai Essences | 40 |
| Lolopanther Off-Handed Weapon/Shield | 80 G’bb Essences | 40 |
| Lolopanther One Handed-Weapons | 120 G’bb Essences | 40 |
| Lolopanther Two-Handed Weapons | 140 G’bb Essences | 40 |
Level 310:
- Earth Tower Solmiki Area (21F-40F)


- 25F Cube – Neop Essences to craft Solmiki Gloves/Boots
- 30F Cube – Organ Essences to craft Solmiki Bottom/Bracelet
- 35F Cube – Plokste Essences to craft Solmiki Top/Necklace
- 40F Cube – Grim Repear Essences to craft Solmiki Weapons/Shield
| Earth Tower Cube Name | 1st Re-opening | 2nd Re-opening |
|---|---|---|
| Condensed Earth Tower 25F Cube | 3,500,000 | 1,400,000 |
| Condensed Earth Tower 30F Cube | 4,200,000 | 1,680,000 |
| Condensed Earth Tower 35F Cube | 4,900,000 | 1,960,000 |
| Condensed Earth Tower 40F Cube | 6,300,000 | 2,520,000 |
| Earth Tower: Solmiki Equipment | Number of essences | Number of Earth Fragments Lv2 |
|---|---|---|
| Solmiki Boots/Gloves | 60 Neop Essences | 80 |
| Solmiki Bottom/Bracelet | 60 Organ Essences | 75 |
| Solmiki Top/Necklace | 60 Plokste Essences | 70 |
| Solmiki Off-Handed Weapon/Shield | 95 Grim Reaper Essences | 74 |
| Solmiki One Handed-Weapons | 180 Grim Reaper Essences | 70 |
| Solmiki Two-Handed Weapons | 210 Grim Reaper Essences | 70 |
Level 360:
-
Velcoffer’s Nest

Cube rewards:
- Velcoffer Spirit Fragment
- Velcoffer Helmet/Costume
- Velcoffer weapons (Untradeable)
- Verijo Necklace/Bracelet
- Varpas Necklace/Bracelet
- Velcoffer Legend Card
| Velcoffer’s Nest Cube name | 1st Re-opening | 2nd Re-opening |
|---|---|---|
| Velcoffer Cube | 8,190,000 | 3,276,000 |
| Velcoffer Equipment | Number of essences |
|---|---|
| Velcoffer Boots/Gloves | 12 |
| Velcoffer Top/Bottom | 20 |
| Velcoffer One-Handed Weapons | 27 |
| Velcoffer Shield and Off-hand Weapons | 27 |
| Velcoffer Two-Handed Weapons | 36 |
Gear recommendations for Newbies/Returnees
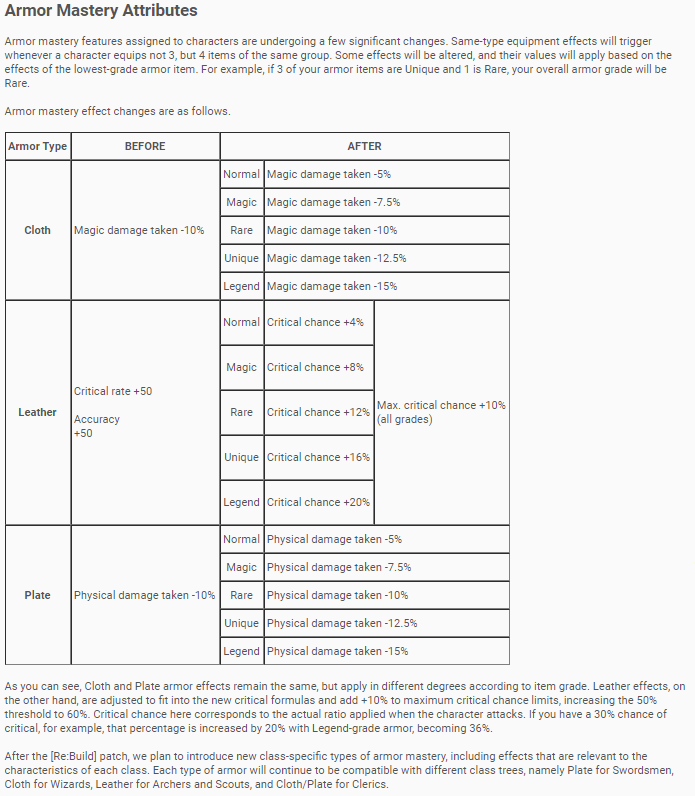
So, before we get into what kind of gears you might want for your armors, this are the changes to the armor set bonus for Re:Build.
- Newbies and Returnees who left during early TOS days
Starting out as a new player/returnee, you will most likely have constraints on resources so it is advisable to get armors that can be shared with multiple characters. If you do not have multiple characters, it is alright. The first step you should be doing is to not waste money on low-level gears and weapons as you will level up so fast. Use whatever you find or get from hunting and questing and proceed to level up to level 380 as it will unlock all available raids in the game for you. Since most of the PVE content is mostly physical damage, physical defense is what you should be concerned with.
Most DPS classes will use Leather armor set for the increase in Max Critical Chance and additional Critical Chance. Max Critical Chance refers to the Critical Cap which is 50% and with the armor set bonus, it raises it to 60% while Critical Chance corresponds to the actual ratio applied when the character attack (Does not affect Critical Hit Rate stat). If you have a 30% chance of critical after Critical check calculation using your Critical Hit Rate stat, with legend-grade armor increasing it by 20%, you will have a 36% chance of getting critical.
Going full Plate/Cloth armors is also a good choice even as a DPS character as it gives you more defense and in turn, more survivability. If you are playing a character that uses Shields, going Cloth Armors will give you a very balanced physical/magic defense stat because Shields only give physical defense and no magic defense. You can use unique-grade Plate/Cloth armors as a placeholder while deciding if you want to get Velcoffer Leather Armors or Plate/Cloth Armors, assuming you want to grind for the end game Legend-grade gears. If not, sticking to Unique-grade or Solmiki armors are fine too.
As for weapons, +11 for anvil enhancement is more than enough. Re:Build patch reduced the amount of bonus attack you get from anvil while buffing all base values of all the weapons. However, you might notice that people aim for +15 and above and that is because at +15, your weapon gets a silver glow and +16 will give your weapon a faint red glow. As you go higher (maximum is +40), the red glow will get more distinct. Please do not trash your weapon just because it is not shiny because a +11 and +15 Velcoffer weapon only have a difference of roughly 700 physical/magic attack at Transcendence stage 10.
- Returnees who have gone on a short hiatus
Things will be easier for you as you most likely already have level 360/390 characters with (transcended) armors and weapons. Solmiki armors and weapons are still good and you can most likely start with the new raids or start doing Velcoffer if you want an upgrade. However, if you do not have transcended gears already, refer to the above section.
Recommended Builds that works with low funding
(X = Personal preference)
- Healer: Cleric - Priest - X - X
- Scout Support: Scout - Linker - Thauma - X
The reason, why I am not recommending any kind of DPS builds, is because DPS builds naturally require a decent amount of funding to play properly. For players who do not have the access to such resources and still want to try out Legend raids like Velcoffer, playing as support would be the most optimal. Of course, this does not mean that you only have to play support roles. Remember to level your skill attributes so your buffs/heals have more potency or extra effects! Aiming for 10-12k physical defense would be a good start and you do not need lots of funding to get it. If you are playing as a Healer/Support character, then you can skip the weapons for now.
If you are looking to play DPS because Support isn’t your style, some advice I would give is that you have to get all your important skill attributes to at least level 30-40. Its good to aim for 8-10k physical attack/magic attack. You do not need legend-grade gears to reach these values.
Unique-grade armors with anvil enhancements are enough to reach 10-12k defense while having a transcend level 6-8 weapon will get you to 8-10k attack.
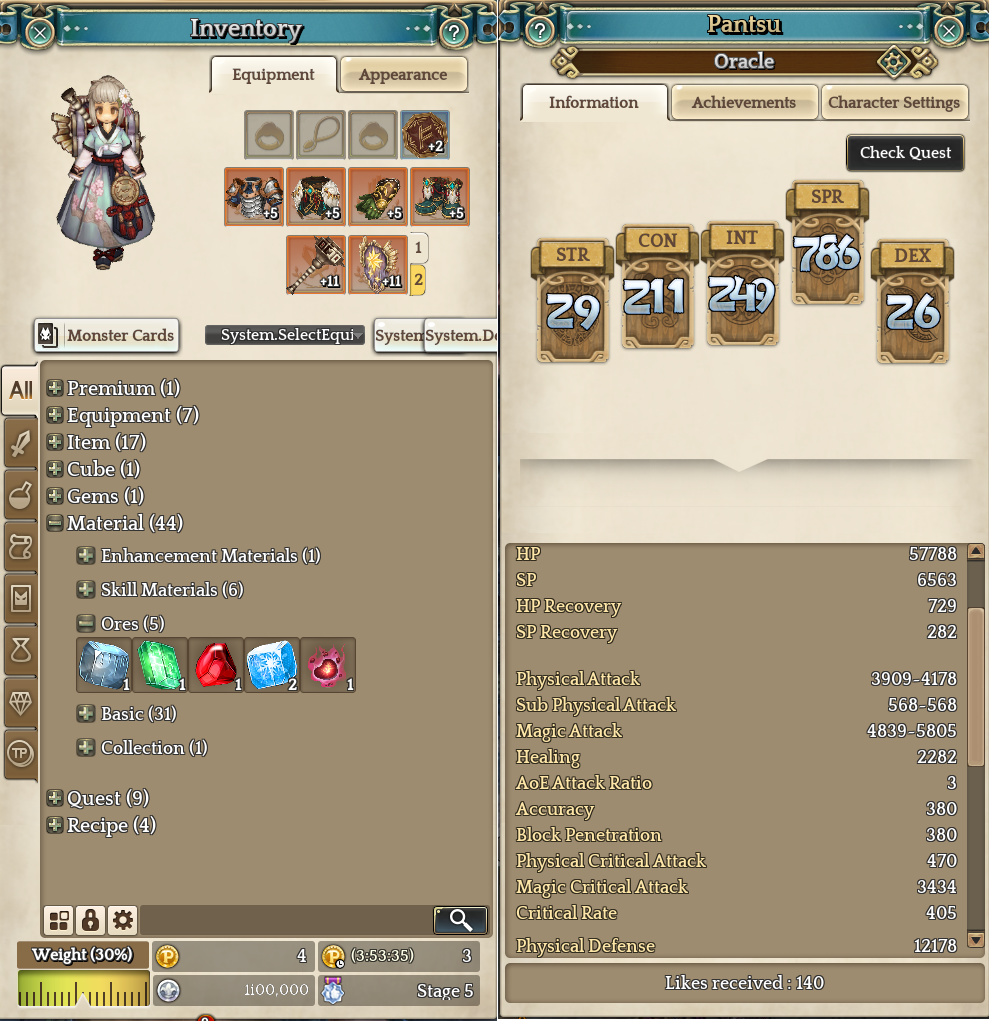
My Cleric - Priest - Oracle - Kabbalist
How to upgrade your equipment
-
Anvil enhancement


Anvil enhancement can be done by getting anvils from the item merchant. Each usage of the anvil will cost silver with some exception of some anvils. The success rate of the upgrade is 100% from +0 to +5. +5 onwards will have a 51% chance of success for armors and a slightly higher percentage for weapons (from +5 to +11) which, at +11 onwards will have a 51% success rate. If your anvil fails, your item loses 1 potential and drops 1 enhancement level. Opening weapon/armor sockets also cost 1 potential and silver so please be careful when you anvil as you would want to leave enough potential to unlock all the sockets on your weapons and armors. Silver Anvil lets you upgrade your weapon without silver costs while Diamond Anvil prevents your enhancement level from dropping if you fail. However, the silver cost of using Diamond Anvil is increased significantly.
If your item reaches 0 potential, upgrading with a normal anvil and failing it will break your weapon. However, if you use a Golden Anvil, your item will not break. Golden Anvils can only be used when your item has 0 potential. However, if you fail at an enhance level of +12 or higher, it will reduce to +10. Another item that can be used when your item is at 0 potential is Golden Sockets. Like the Golden Anvil, instead of upgrading your weapon, it lets you open a socket on your weapon/armor. However, this does not let you open more than what the weapon/armor has so if you have opened all the sockets on your item, the Golden Socket cannot be used.
-
Transcendence


Transcendence is the 2nd way to upgrade your gears. There are 10 stages to transcendence and they require Blessed Gems. Each stage will increase your gear stats by 10% and at stage 10, it will increase by 100%. The success rate is 100% as long as you use the required amounts of Blessed Gems. Each stage of transcendence will require more Blessed Gems and it also differs from different equipment. If you decide to gamble on transcendence, failing the process will reduce your item potential by 1 and failing it when your item has 0 potential will result in item destruction.
There are multiple ways to get Blessed Gems. The first method is to combine 10 Blessed Shards using a recipe bought from the Item Merchant. Blessed Shards can be farmed from numerous sources like Saalus Convent and killing Elite monsters within 30 levels from you. Blessed Gems can be bought with Mercenary Badges gotten through Gem Feud event daily.
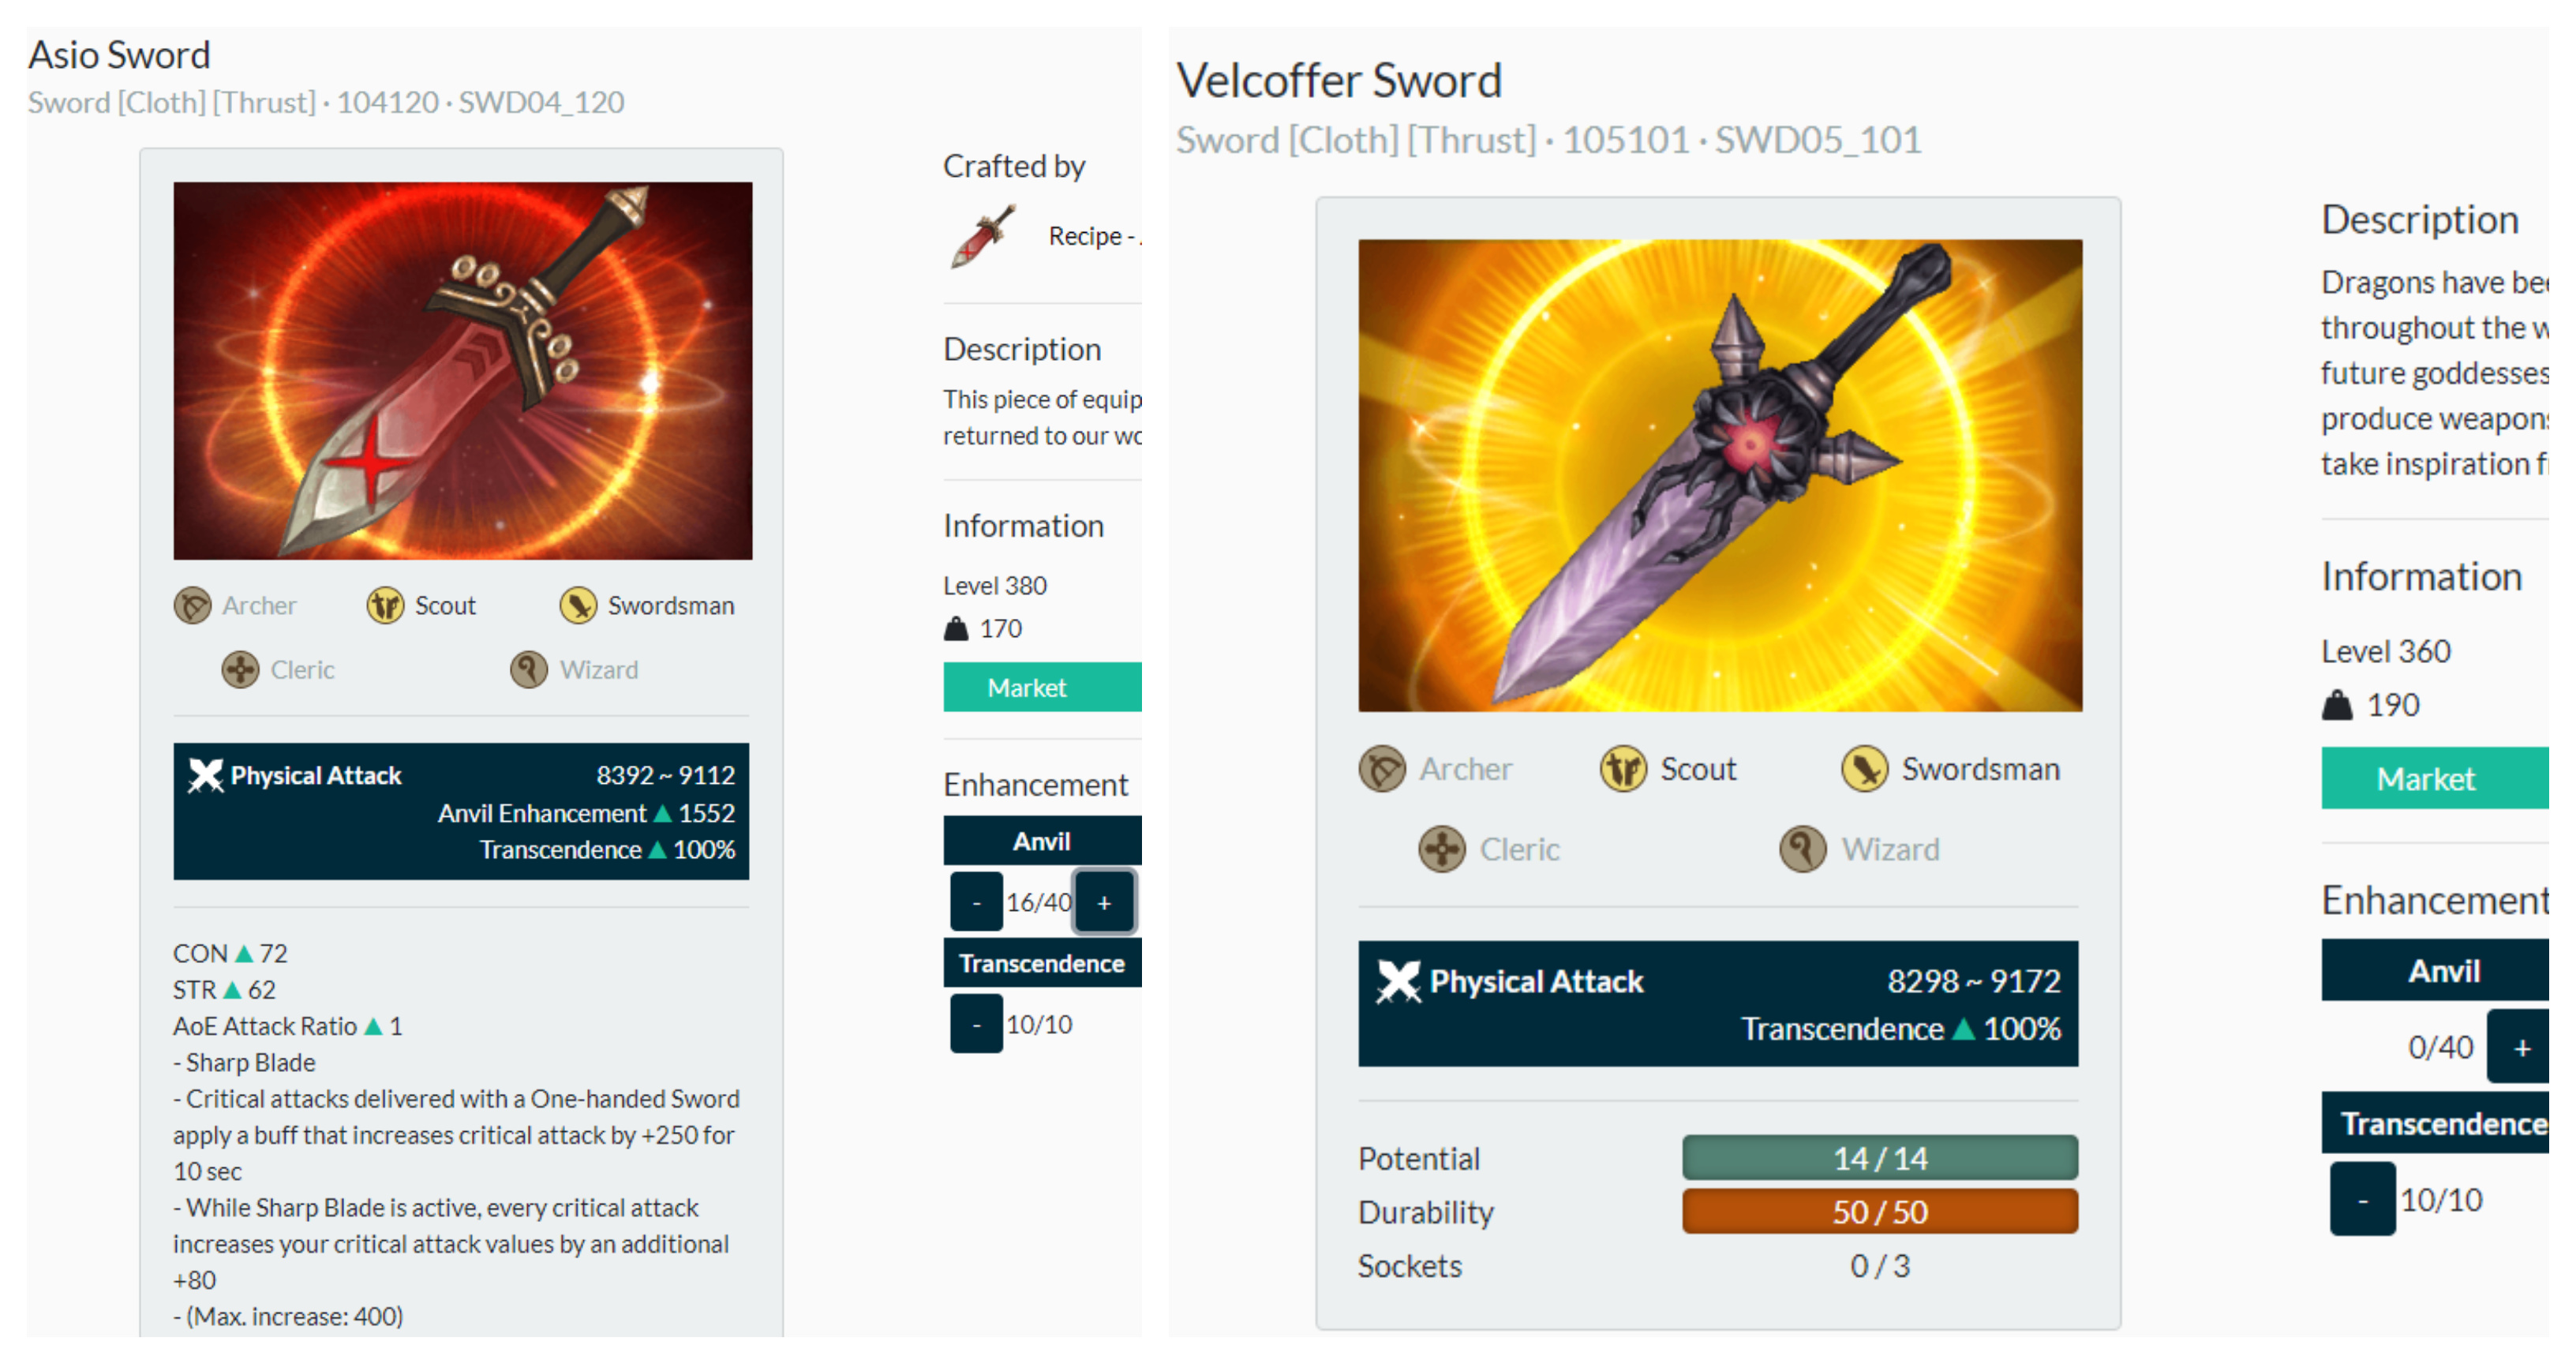
If you are intending to gear a DPS character, here is a mini comparison between different tiers of legendary weapons and Lv380 unique weapons. (+0/11/16 refers to anvil enhancement while T10 refers to Transcendence stage 10),
If you intend to go for Velcoffer weapons, then I suggest that you do not spend too much on your Unique-grade weapons. Upgrade till you reach the suggested attack values then save as much silver/blessed gems as you can as Velcoffer gears are a major time/silver sink.
+0 T10 Asio Sword vs +0 T10 Lolopanther Sword
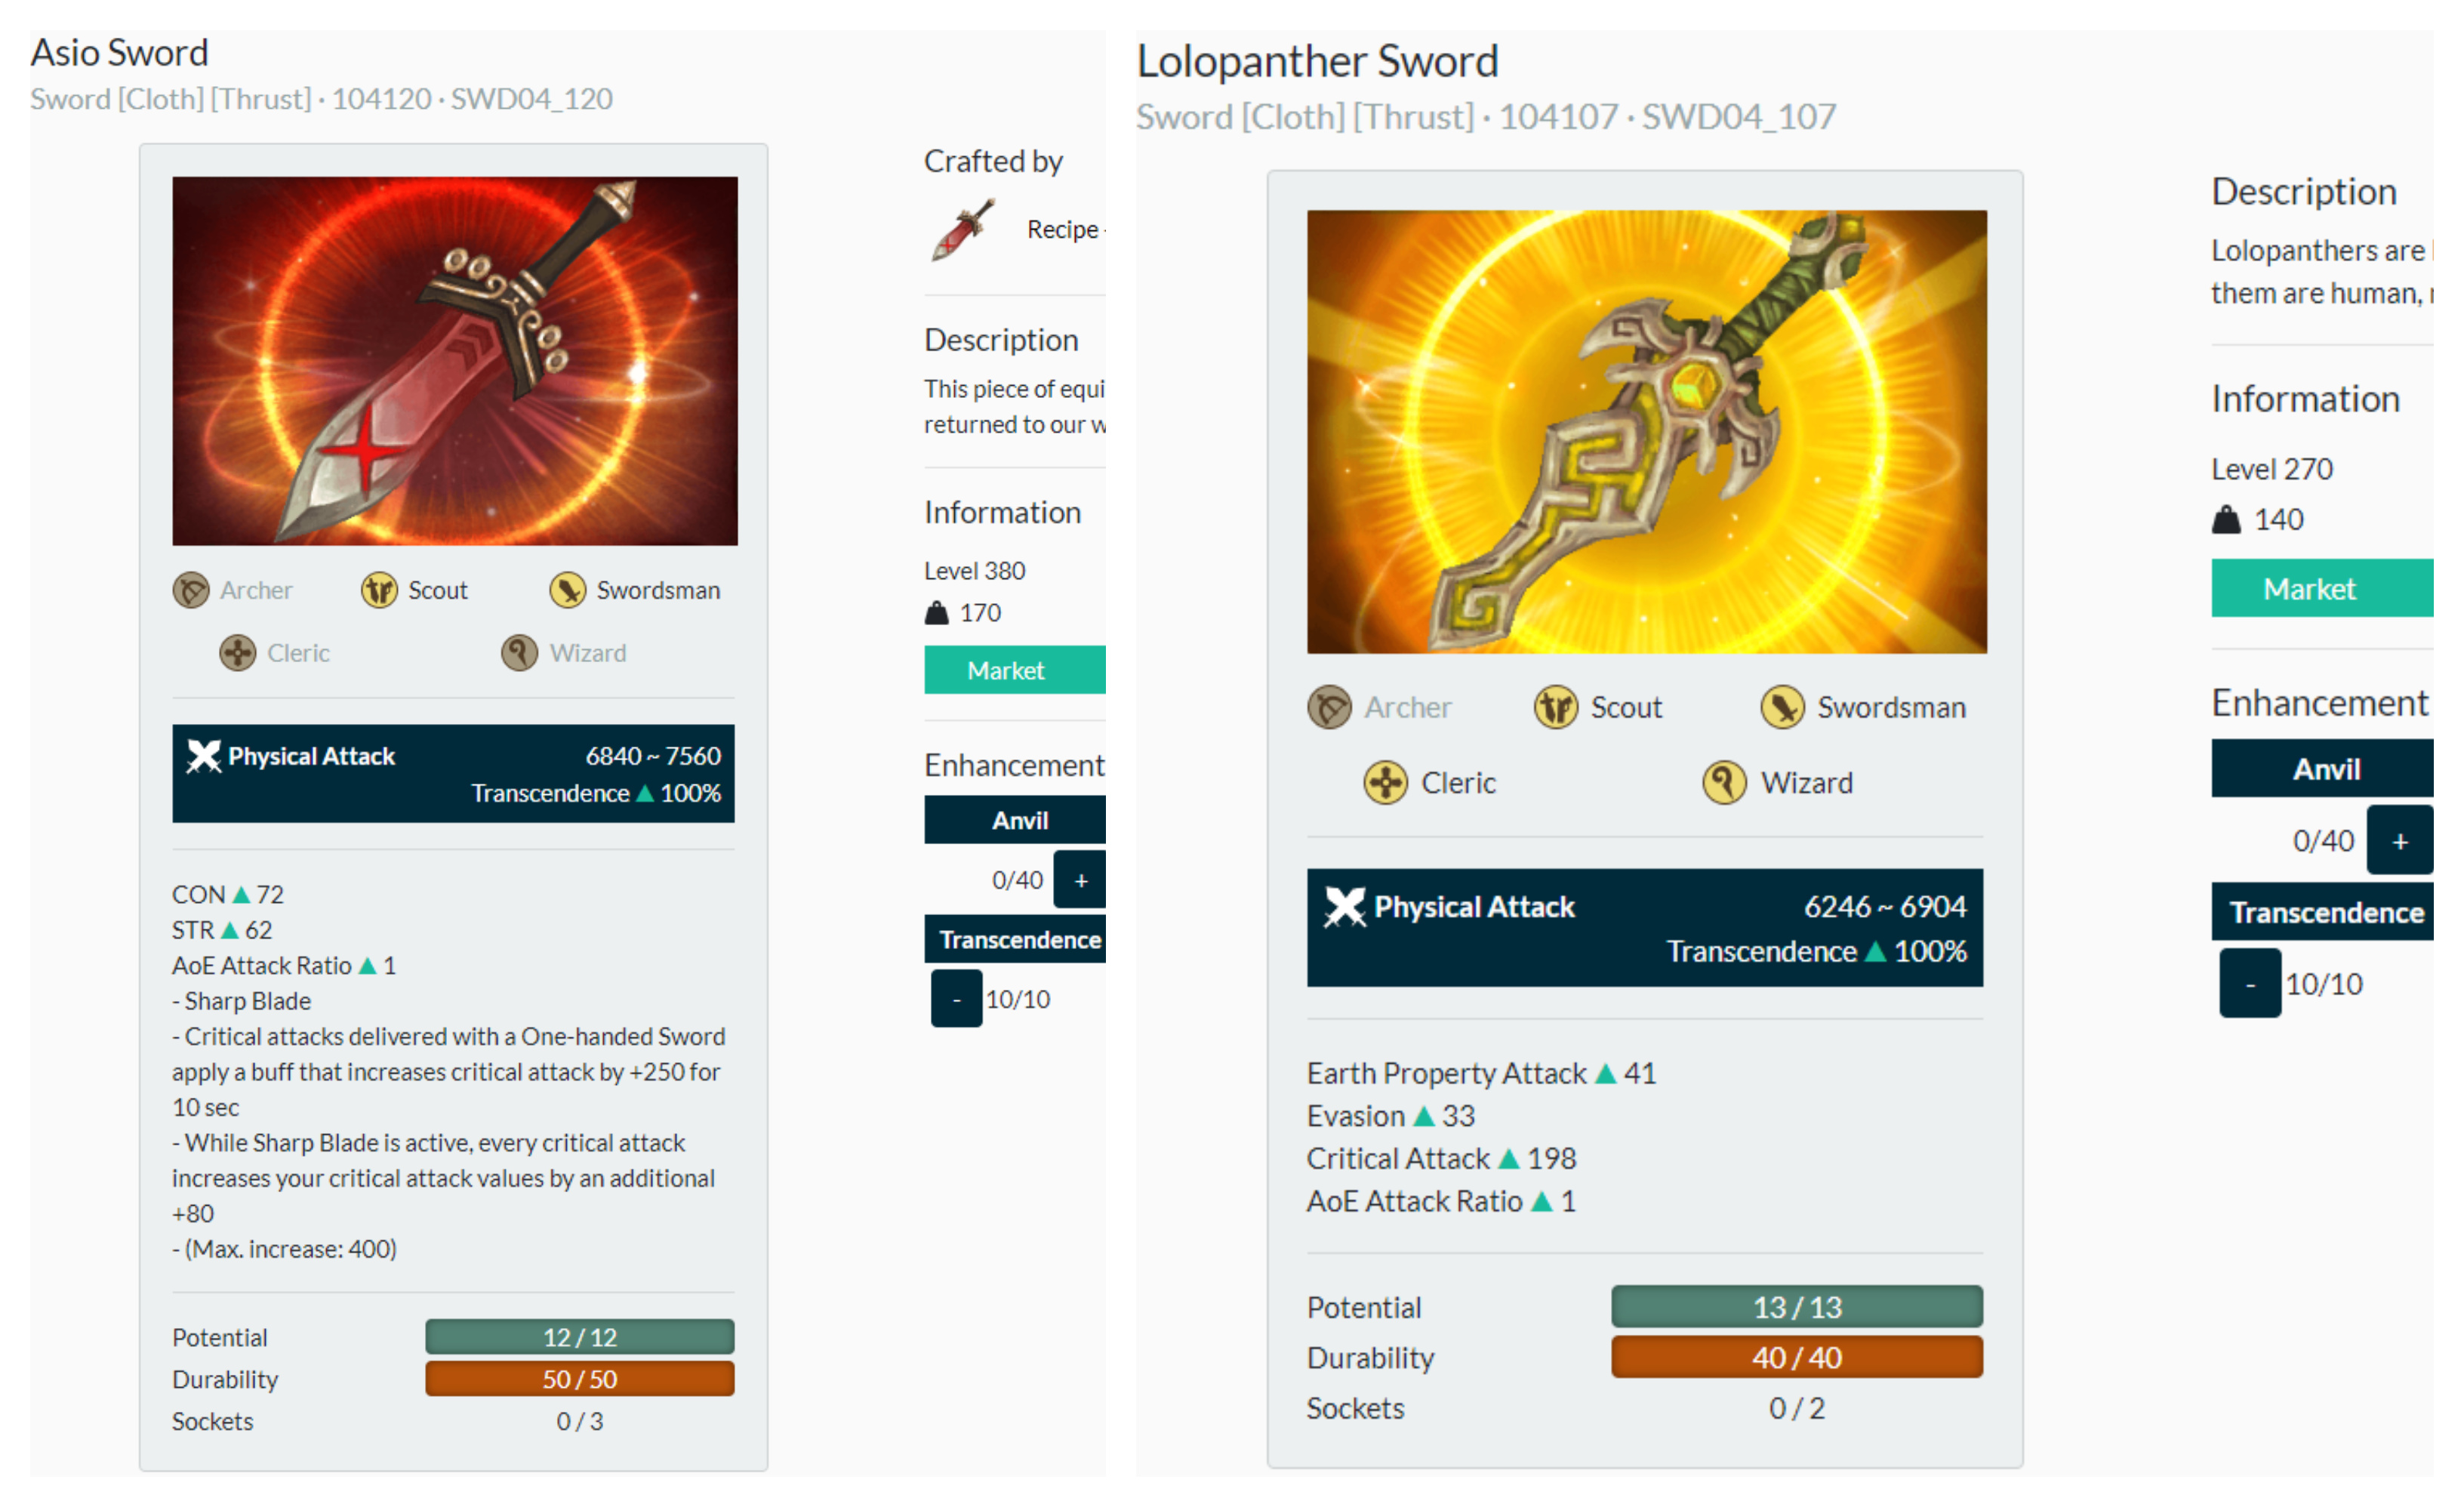
+11 T10 Asio Sword vs +0 T10 Solmiki Sword
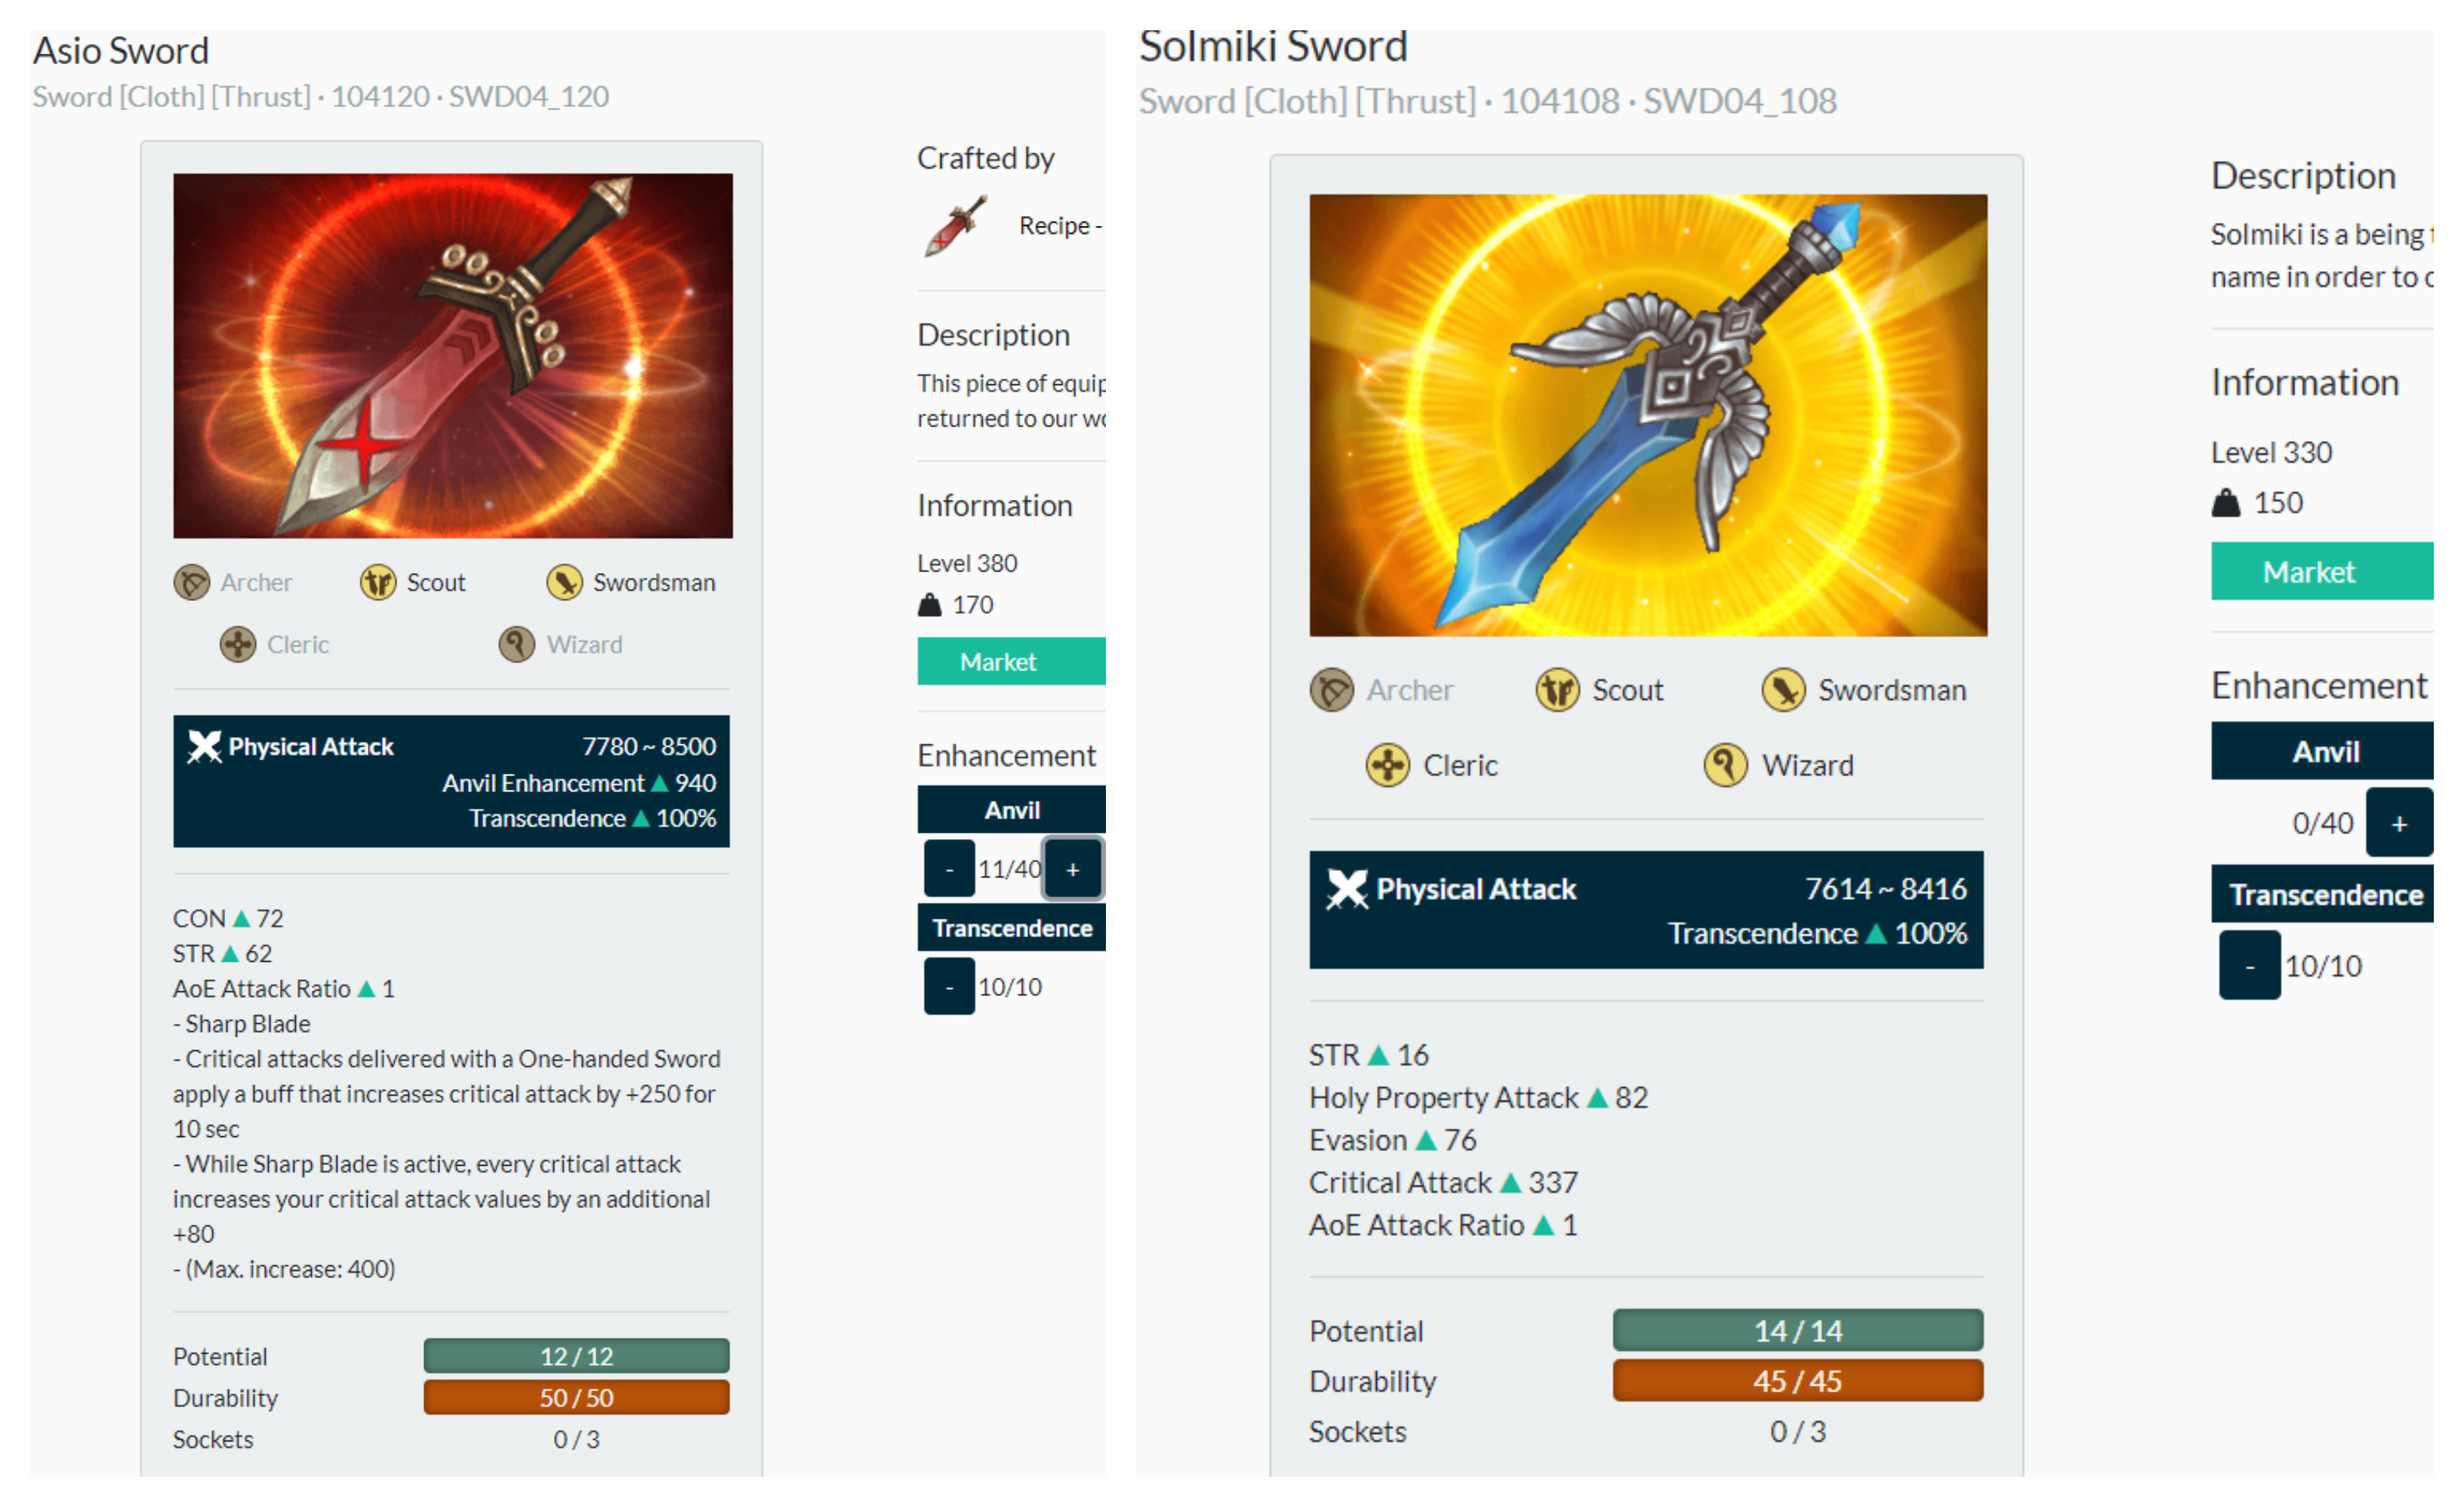
+16 T10 Asio Sword vs +0 T10 Velcoffer Sword
-
Enchant Jewels


Enchant jewels are items that give an extra stat to your equipment. You can get these by simply dismantling Level 75 and above Rare or higher grade equipment. Higher grade Enchant Jewels will naturally produce higher stat values which mean Legend-grade enchant jewels have the highest possibility to get maximum stat value but it does not mean that Rare and Unique-grades Enchant Jewels cannot attain maximum stat value. Enchant Jewels can be added to an equipment of up to 10 levels above the level of the item from which they dropped.
All Enchant Jewel stats are applied independently from the item’s other stats. Using Enchant Jewels does not consume potential nor Silver. Each piece of equipment can only have a maximum of one Enchant Stat applied at any time. Using another Enchant Jewel on a piece of equipment with an Enchant Stat will override the current stat with a new stat. Also, having multiple items with the same Enchant Stat will not stack and only the stat with the highest value will apply.
For example:
AoE Attack Ratio +1 on Gloves
AoE Attack Ratio +3 on Boots
Total Aoe Attack Ratio added = 3
List of stats that can be applied:
Stats Applied (Max. Values)
- Accuracy (25%)
- AoE attack ratio (3)
- Block (25%)
- Block penetration (25%)
- Critical rate (25%)
- Critical resistance (25%)
- Damage on boss monsters (15%)
- Damage when critical (15%)
- Evasion (25%)
- Magic damage taken reduced (25%)
- Main weapon attack damage (15%)
- Movement speed (3)
- Physical damage taken reduced (25%)
- PvP damage (15%)
- PvP damage taken reduced (25%)
- Subweapon attack damage (15%)
Velcoffer Armors and Weapons
WARNING: Velcoffer equipment is a major Silver/Time sink. However, they are also the best due to the set effect bonuses and stats you can get on them. Be prepared to invest a lot of time and effort to making your set.
As you have realized by now, Velcoffer equipment has no stats. This is not a mistake and it is not unidentified equipment. You will also realize that they do not have armor/weapon set effects like their other Legend-grade counterparts Lolopanther and Solmiki equipment. For Velcoffer equipment, there are 2 things you have to know, Partis Solution and Ichors.
-
Partis Solution

Partis Solution is an item that lets you add set effects to your Velcoffer equipment. There are 5 set effects in total and each piece of armor/weapon has to have the same prefix in order to activate the 3/4/5 item set effect bonus. Armors and Shields require 1 Partis Solution while Weapons and Sub-weapons require 4 Partis Solution. You can reroll the prefix as many times as you want. This item can be bought from the Alchemist Master in Miner’s Village for 3,000,000 silver. However, you have to complete the main quest starting from West Siauliai Woods all the way to Miner’s Village in order to get the Alchemist Master to appear in Miner’s Village.
Before you can use the Partis Solution, you have to fill it up completely. To fill it up, you need to get EXP simply by just hunting monsters, doing dungeons, whatever that gives you EXP will fill up the Partis Solution. On average, 1 Challenge Mode can fill up to roughly 3-4 Partis Solution. Remember to right-click the Partis Solution in your inventory or simply add it into a Hotkey slot and press the Hotkey, similar to how you use Dispellers and Charm of Protection.
i. Sumazinti Set

-
3 item set bonus
25 SPR
25 INT -
4 item set bonus
571 Magic attack -
5 item set bonus
SP Increase: 1435
Special Skill: Sumazinti
Activate debuff on 5 enemies to reduce 15% magic defense for 15 seconds. Cooldown 100 seconds.
ii. Tiksline Set

-
3 item set bonus
25 DEX
25 SPR -
4 item set bonus
3 AoE attack ratio -
5 item set bonus
Special skill: Tiksline
Mark 3 enemies nearby. Marked enemies receive 50% additional damage for 5 seconds. After the mark disappears, the enemies receive their total damage taken while the mark was active in the form of magic damage. Cooldown 100 seconds.
iii. Mergaite Set

-
3 item set bonus
Special skill: Mergaite
Provides invincibility throughout the execution of the skill. Cooldown 100 seconds. -
4 item set bonus
After using Mergaite, your physical/magical defense increases by 40% for 20 seconds. -
5 item set bonus
After using Mergaite, the physical/magical defense increase rises from 40% to 100%.
iv. Kraujas Set

-
3 item set bonus
25 DEX
25 CON -
4 item set bonus
571 physical attack -
5 item set bonus
Special skill: Ire of Kraujas
Receive the Ire of Kraujas buff for 20 seconds. The buff stacks as you deal damage to enemies while under its effects.
Max stacks: 10
Damage Increase: (no. of stacks) x 10%
Damage Received Increase: (no. of stacks) x 20%
v. Gyvenimas Set

-
3 item set bonus
35 CON -
4 item set bonus
1 Movespeed -
5 item set bonus
Special Skill: Gyvenimas
Creates a protective shield corresponding to 50% of your max HP for 30 seconds. When the shield’s health is at 50% or lower, it restores its health every 1 second. The shield stops restoring health when it reaches 0 HP or the 30 seconds are over.
-
Ichors


Ichors are items which contain stats that was extracted from Level 350 and above weapons and armors. These Ichors are used to equip stats from those weapons and armors into your Velcoffer gears. To extract/equip an Ichor, head to Fedimian and look for Blacksmith Teliavelis at the top of Fedimian. In order to extract an Ichor, you have to use an Ichor extraction kit which can be purchased from Blacksmith Teliavelis and Sierra powder. The success rate is roughly 5% when an Ichor is extracted, the item is destroyed in the process. When you fail an extraction, it will reduce the item by 1 potential. Failing an Ichor extraction on a 0 potential item will also destroy the item.
You can only extract Ichors from the following as of Re:Build patch:
-
Identified armors and weapons above or equal to Level 350 [Magic, Rare(Berthas), Unique(Primus)]
-
Unique-grade Raid weapons and armors (Masinios, Ausura, Fietas, Laitas, Asio, Wastrel, Ignas)
Extracted Ichors can be applied to Velcoffer equipment. Applying Ichors will only need the Velcoffer equipment + the Ichor. Ichors are only compatible with the same type of equipment they were extracted from.
1H Sword > 1H Sword Ichor > Velcoffer 1H Sword = OKAY
1H Sword > 1H Sword Ichor > Velcoffer 2H Sword = NO
Ignas Plate Armor > Armor Ichor > Velcoffer Plate Armor = OKAY
Ignas Plate Armor > Armor Ichor > Velcoffer Cloth Armor = OKAY
Ignas Plate Armor > Armor Ichor > Velcoffer Cloth Boots = NO
Ignas Greaves (Plate) > Boots Ichor > Velcoffer Cloth Boots = OKAY
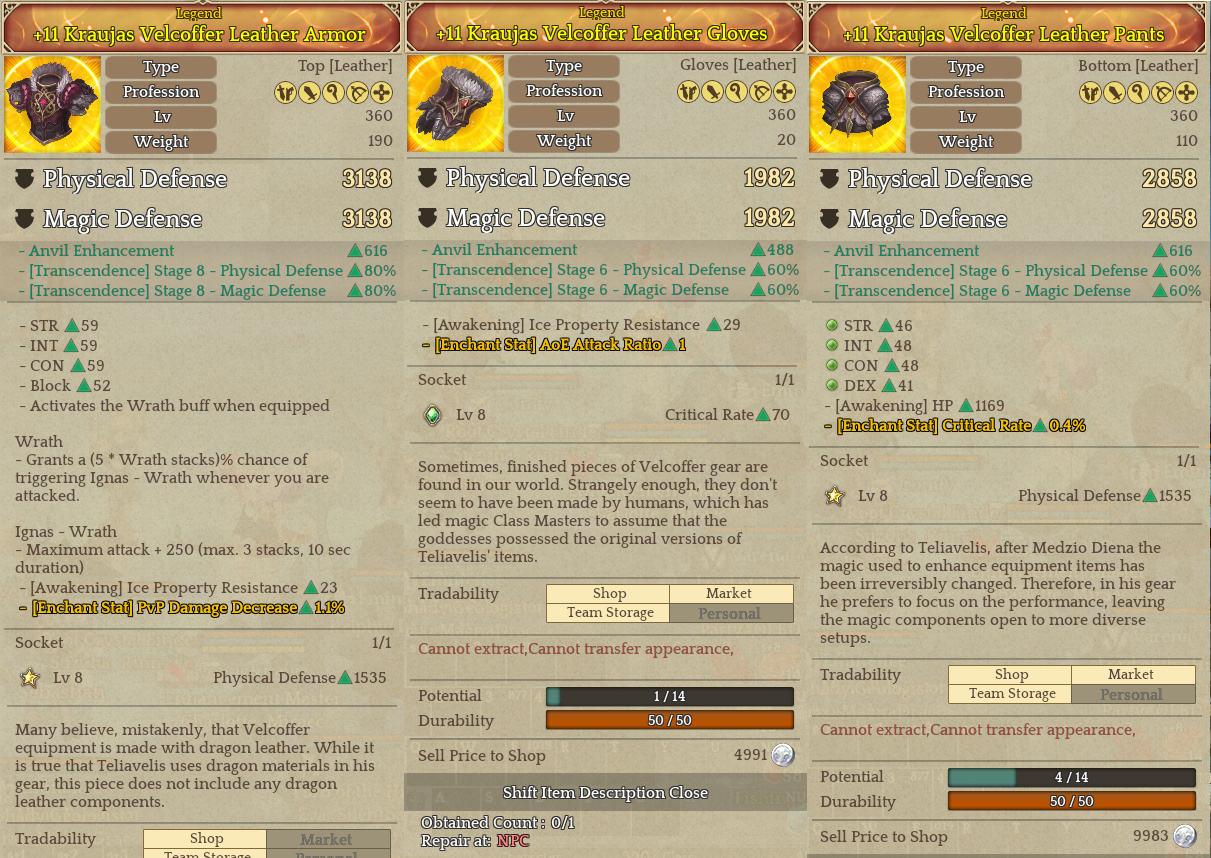
Examples of Velcoffer Equipment with and without Ichors:
Velcoffer Leather Armor with Ignas Plate Armor Ichor
Velcoffer Leather Gloves with no Ichor
Velcoffer Leather Pants with a Level 350 identified Primus pants Ichor.
Choices of stats for Ichors
The choice of stats that you want for your Ichors is up to your own personal preference. Using raid armor/weapon ichors are the top choices but they can also get really expensive as they require you to craft. Using identified Berthas/Primus equipment is also recommended over using Magic-grade gear as those 2 have higher stat rolls. The maximum number of stat lines an armor can roll is 4 and the kind of stat lines that people usually aim for are 2 greens + 1/2 purples, 3 greens with or without 4th stat, or 4 green stat lines. Green stats gives STR/CON/DEX/SPR/INT while Purple stats have Block Penetration, Block, Evasion, Crit Rate, HP etc. People who are interested in PVP will go for options such as Block Penetration and Block while those who are only interested in PVE will generally go for green stats.
There are 2 kinds of re-rolls you can do for your identified equipment. The first option for you is to re-roll your Berthas/Primus equipment at the Blacksmith which will use Nucle and Sierra powders which can also get expensive. This option only changes the type of stat and value of the stats and will not change the color of the stat line. The other option will involve using Magnifiers purchased from the TP Shop. Magnifiers will change the number of stats lines, the color of stats lines, as well as the value of stat lines.
Ending note
I hope this guide will help you decide what kind of gears and armors you want for your characters. Do remember that Transcended equipment can be transferred through team storage so having armors/weapons that can be used by multiple characters saves you a lot of resources. Also, do enjoy the game and play whichever class you like!
